Use the Bulk Payment feature to allocate one payment among multiple contracts, you post
a bulk payment. For
example, you might receive an insurance check for several clients, or
a check that should be divided among sibling accounts.
Watch video tutorial. (Windows Media Player, an active Internet connection, and a valid Ortho2 customer login are required to run video tutorials, webinars, and training programs.)
You can open this feature in multiple ways: Use the method that's most convenient for you.
Home or Patient or Patient Finances ribbon bar > Post transaction.
You can also post transactions from the Quick Access toolbar at the top of your Edge screen, and from your scheduler;
Show posted transactions warning - You can set up Edge so that when you attempt to post a transaction before you finalize the Transaction Report for the previous day, you see a warning message. You must then confirm your action before continuing. This feature helps you maintain the integrity of daily transaction postings. After you have seen the message once, you can select not to see it again that day, if you choose. (See "Set Up Financial Options" for details.)
Select Patient and Billing Party Choose the account to work with. If needed, you can
display completed contracts option to be sure you are viewing all accounts associated with this patient. In addition, the AR column at the far right of the post transactions window indicates whether the contract is set up with an Auto Receipts agreement.
Enable the Bulk Paymentaction.
Payment type & deposit slip details - Select the receipt type and payment account to use for this transaction, or choose a payment on file. Enter the details as you want them to appear on your deposit slip. Be sure to enter the entire transaction amount here, and identify the office to use to post the payment. Then, click Begin to start allocating amounts to patient accounts.
Note that your financial security settings may limit or restrict you from changing the transaction posting date. See "Set Up System Financial Settings" for details.
Batch number (Optional.) - If you have enabled your system to accept batch numbers for bulk payments, type the number to assign to this payment into the batch number field, and click Ok to continue. (See "Set Up System Financial Settings" for details about enabling/disabling the batch number option.)
Allocate payments - Enter the portion of the total bulk payment amount to allocate to the currently selected contract, completing the receipt fields just as if you were posting an individual payment. Click Post to complete this portion of the bulk payment.
Select next patient - Click
Review & commit payment - As you enter individual transactions, you can review the progress toward the total bulk payment at the right of the window. If needed, you can click 
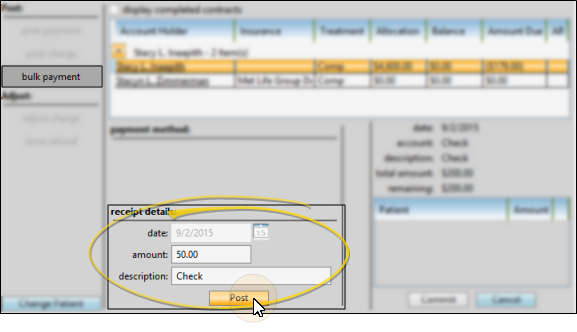
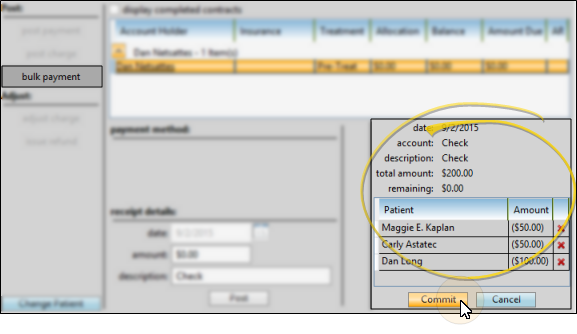
Delete to remove a payment you have entered. When you enter the transaction that fulfills the bulk payment, Edge asks if you are ready to complete the bulk payment and post all the transactions.
If you respond Yes, the transactions are posted as you have allocated them. In addition, the receipt of payment form appears for a signature, if you have enabled it to do so.
If you respond No to posting the bulk payment, you may review the payment details at the right of the window and make changes as needed. When you are ready, click Commit to post the transactions as you have allocated them.
Bulk payment results - After you post a bulk payment, the deposit slip will include a single transaction for the entire bulk payment amount. However, the individual patient's accounts will show only their allocated portion of the bulk payment.
Bulk payment report - Run a Bulk Payments report to review the details of bulk payment transactions. You can choose to include only bulk payment transactions for a specific range of dates, a specific total amount, a specific batch number, and/or a specific office. See "Bulk Payments Report" for details.
Open ledger from post transaction window - Click the responsible party name in the Post Transaction window to open the patient's Finance page to the ledger details. You may need to drag the Post Transaction window to another location on your screen, or minimize it to your task bar in order to view the transactions.
Ortho2.com │1107 Buckeye Avenue │ Ames, Iowa 50010 │ Sales: (800) 678-4644 │ Support: (800) 346-4504 │ Contact Us
Remote Support │Email Support │New Customer Care │ Online Help Ver. 8/3/2015