Open Patient Sign In Editor![]() - Home ribbon bar > Modules Section >
- Home ribbon bar > Modules Section >  Sign-In > Password > Log In. Or, if you do not have a sign-in prompt, you can press Ctrl+E on your keyboard and enter your sign-in password to enter editing mode.
Open Sign-In from the Modules section of the Home ribbon bar.

Log into the editor with your sign-in password. (If you have not set up a password yet, just press Enter at the login prompt.
Sign-In Screen Elements![]() Click the Add button on the Sign-In Editor ribbon bar, then choose the element to add to your screen, such as graphics, videos, slideshows, text, and a patient reward prize list. Or, right-click an element to edit its properties. Be sure to include either a sign-in prompt (for signing in by typing a name) or a sign-in button (for signing in with a touch screen) or both, so that patients have a means of checking into your office.
Click the Add button on the Sign-In Editor ribbon bar, then choose the element to add to your screen, such as graphics, videos, slideshows, text, and a patient reward prize list. Or, right-click an element to edit its properties. Be sure to include either a sign-in prompt (for signing in by typing a name) or a sign-in button (for signing in with a touch screen) or both, so that patients have a means of checking into your office.

Text![]() Use text objects on your sign-in screen to greet patients and remind them of upcoming events at your office. Note that you can use returns and tabs in the box to create multi-line messages.
Use text objects on your sign-in screen to greet patients and remind them of upcoming events at your office. Note that you can use returns and tabs in the box to create multi-line messages.
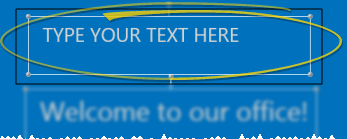
To insert a new text box, click Add from the Sign-In Editor ribbon bar, and select Text. Then click to position the object on your screen, and type the text you want to appear in the box. You can then click and drag to move the element, and right-click within the element to modify additional properties.
Edit Text - Click within the text box to edit the message. If your text is too long to fit within the size of the text box, you can either click and drag the box handles to make the box bigger, or right-click and choose to shrink the font (described below).
Enlarge Font - Right-click the element, then select this option to make the text bigger. You may repeat this step to continue to enlarge the text as many times as needed.
Shrink Font - Right-click the element, then select this option to make the text smaller. You may repeat this step to continue to shrink the text as many times as needed.
Choose Font - Right-click the element, then select this option to open a list of available font types. Select the font you want to apply to all the text in this element.
Choose Color - Right-click the element, then select this option to open a color selection window. Select the color you want to apply to all the text in this element.
Z-Plane Options - “Z-Plane” refers to this element’s position in front of or behind other elements. If you have overlapping elements, right-click an element and select Move Forward or Move Backward to adjust it's position in relation to the other overlapping elements.
Delete Item - Right-click the element and select this option to remove the element from your sign-in screen.
Graphic![]() Use pictures to add visual appeal to your patient sign-in screen.
Use pictures to add visual appeal to your patient sign-in screen.
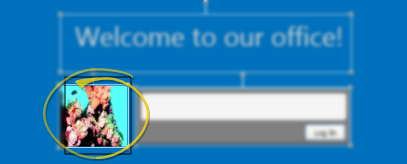
To insert a picture, click Add from the Sign-In Editor ribbon bar, and select Graphic. Then navigate to the picture file you want to use, and click to position the object on your screen. You can then click and drag to move the element, and right-click within the element to modify additional properties.
Stretch to Fill - Right-click, then enable this property to fill the entire area with the image. The content will be stretched, changing the aspect ratio, and possibly distorting the content. Enabling this property disables all other fill properties.
Proportional Fill - Right-click and enable this option to maintain the aspect ratio of the image, filling the object as best as possible. Enabling this option disables all other fill properties.
Z-Plane Options - “Z-Plane” refers to this element’s position in front of or behind other elements. If you have overlapping elements, right-click an element and select Move Forward or Move Backward to adjust it's position in relation to the other overlapping elements.
Delete Item - Right-click the element and select this option to remove the element from your sign-in screen.
Animation![]() Use animated .GIF files to invite patients to use your sign-in station.
Use animated .GIF files to invite patients to use your sign-in station.
To add a new animation,click Add from the Sign-In Editor ribbon bar, and select Animation. Then navigate to your animated .GIF file, and click to position the object on your screen. You can then click and drag to move the element, and right-click within the element to modify additional properties.
Stretch to Fill - Right-click, then enable this property to fill the entire area with the image. The content will be stretched, changing the aspect ratio, and possibly distorting the content. Enabling this property disables all other fill properties.
Proportional Fill - Right-click and enable this option to maintain the aspect ratio of the image, filling the object as best as possible. Enabling this option disables all other fill properties.
Z-Plane Options - “Z-Plane” refers to this element’s position in front of or behind other elements. If you have overlapping elements, right-click an element and select Move Forward or Move Backward to adjust it's position in relation to the other overlapping elements.
Delete Item - Right-click the element and select this option to remove the element from your sign-in screen.
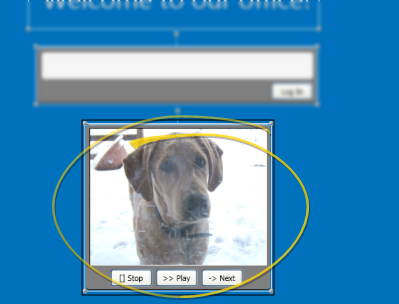
Video![]() Add educational or entertaining video clips, such as Edge Animations videos, to your sign-in screen.
Add educational or entertaining video clips, such as Edge Animations videos, to your sign-in screen.
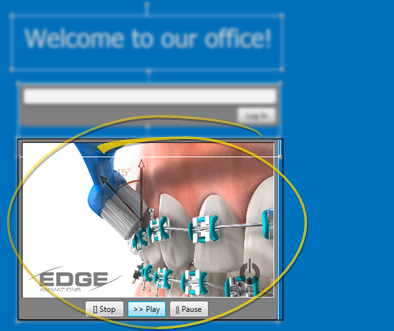
To add a new video, click Add from the Sign-In Editor ribbon bar, and select Video. Then navigate to your video file, and click to position the object on your screen. You can then right-click within the element to modify additional properties, such as hiding the video controls from your patients. (See "Publish & Share Videos" for details about publishing Edge Animations videos.) Most standard video file formats will work with Patient Sign-In.
Stretch to Fill - Right-click, then enable this property to fill the entire area with the image. The content will be stretched, changing the aspect ratio, and possibly distorting the content. Enabling this property disables all other fill properties.
Proportional Fill - Right-click and enable this option to maintain the aspect ratio of the image, filling the object as best as possible. Enabling this option disables all other fill properties.
Choose Control Color - Right-click the element and choose this option to open a color selection window. Select the color and opacity of the object controls.To make the border disappear, reduce the opacity completely.
Hide Controls - Right-click the element, and enable this option to remove the object controls (i.e. Play and Pause) from the sign-in screen so that your patients do not have access to them.
Auto Repeat - Right-click the element, and enable this option to automatically repeat the video. This is especially useful if you have chosen to hide the controls.
Mute Audio - Right-click the element, and enable this option to mute the audio. .
Z-Plane Options - “Z-Plane” refers to this element’s position in front of or behind other elements. If you have overlapping elements, right-click an element and select Move Forward or Move Backward to adjust it's position in relation to the other overlapping elements.
Delete Item - Right-click the element and select this option to remove the element from your sign-in screen.
Slideshow![]() Add interest to your sign-in screen with a slideshow of photographs or other images.
Add interest to your sign-in screen with a slideshow of photographs or other images.
To add a slideshow to your screen, click Add from the Sign-In Editor ribbon bar, and select Slideshow. Then navigate to the folder that contains the pictures you want to include in the slideshow, and click to position the object on your screen. All image files in the selected folder will be included in the slideshow: Whenever you add or remove images from that folder, your slideshow will be updated as well. You can right-click within the element to modify additional properties, such as hiding the slideshow controls from your patients.
Uniform Fill - Right-click the element, then enable this property to ensure the object is always filled, without black bars. The aspect ratio of each image is maintained, but the tops or sides may be cut off if the images are not all the same size. Enabling this property disables all other fill properties.
Stretch to Fill - Right-click, then enable this property to fill the entire area with the image. The content will be stretched, changing the aspect ratio, and possibly distorting the content. Enabling this property disables all other fill properties.
Proportional Fill - Right-click and enable this option to maintain the aspect ratio of the image, filling the object as best as possible. Enabling this option disables all other fill properties.. This setting may leave black bars at the top and bottom of certain images in your slideshow.
Choose Control Color - Right-click the element and choose this option to open a color selection window. Select the color and opacity of the object controls.To make the border disappear, reduce the opacity completely.
Slide Delay - Right-click the element, then select this option to choose how long to display each image before moving to the next, from 1 to 5 seconds.
Hide Controls - Right-click the element, and enable this option to remove the object controls (i.e. Play and Pause) from the sign-in screen so that your patients do not have access to them.
Z-Plane Options - “Z-Plane” refers to this element’s position in front of or behind other elements. If you have overlapping elements, right-click an element and select Move Forward or Move Backward to adjust it's position in relation to the other overlapping elements.
Delete Item - Right-click the element and select this option to remove the element from your sign-in screen.
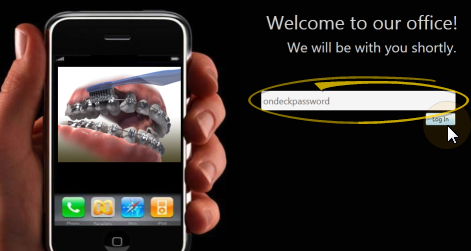
Sign-In Prompt![]() Patients type their name at the sign-in prompt to identify themselves as they log into your system. You must have either a sign-in prompt or a sign-in button for the Patient Sign-In feature to function properly.
Patients type their name at the sign-in prompt to identify themselves as they log into your system. You must have either a sign-in prompt or a sign-in button for the Patient Sign-In feature to function properly.
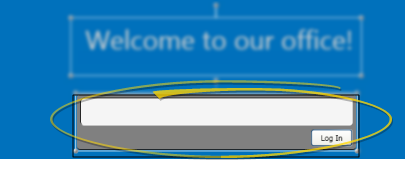
To insert a sign-in prompt, click Add from the Sign-In Editor ribbon bar, and select Sign-In Prompt. Then click the screen to position the prompt. You can then click and drag to move the element, and right-click within the element to modify additional properties.
Enlarge Font - Right-click the element, then select this option to make the text bigger. You may repeat this step to continue to enlarge the text as many times as needed.
Shrink Font - Right-click the element, then select this option to make the text smaller. You may repeat this step to continue to shrink the text as many times as needed.
Choose Font - Right-click the element, then select this option to open a list of available font types. Select the font you want to apply to all the text in this element.
Choose Color - Right-click the element, then select this option to open a color selection window. Select the color you want to apply to all the text in this element.
Choose Control Color - Right-click the element and choose this option to open a color selection window. Select the color and opacity of the object controls.To make the border disappear, reduce the opacity completely.
Z-Plane Options - “Z-Plane” refers to this element’s position in front of or behind other elements. If you have overlapping elements, right-click an element and select Move Forward or Move Backward to adjust it's position in relation to the other overlapping elements.
Delete Item - Right-click the element and select this option to remove the element from your sign-in screen.
Web Sign Up (Edge Portal) Button![]() If you have Edge Portal Premium, you can include a web sign up button on your sign-in greeting screen. Then, from your Patient Sign-In station, responsible parties can click the web sign up button. To register for access to the parent section of the portal, they simply supply their own first and last name, the patient's birthdate, an email address, and phone number.
If you have Edge Portal Premium, you can include a web sign up button on your sign-in greeting screen. Then, from your Patient Sign-In station, responsible parties can click the web sign up button. To register for access to the parent section of the portal, they simply supply their own first and last name, the patient's birthdate, an email address, and phone number.
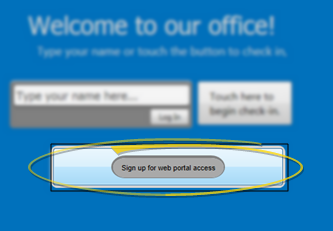
To insert an Edge Portal registration button,click Add from the Sign-In Editor ribbon bar, and select Web Signup Button. You can then click and drag to move the element, and right-click within the element to modify additional properties.
Edit Button Text - Click within the button bx to edit the message. If your text is too long to fit in the button, you can either click and drag the element handles to make the element bigger, or right-click and choose to shrink the font (described below).
Enlarge Font - Right-click the element, then select this option to make the text bigger. You may repeat this step to continue to enlarge the text as many times as needed.
Shrink Font - Right-click the element, then select this option to make the text smaller. You may repeat this step to continue to shrink the text as many times as needed.
Choose Font - Right-click the element, then select this option to open a list of available font types. Select the font you want to apply to all the text in this element.
Choose Color - Right-click the element, then select this option to open a color selection window. Select the color you want to apply to all the text in this element.
Edit Popup Appearance - Right-click the element, and select this option to modify how the registration screens look when someone clicks this button. Then choose the property to edit.
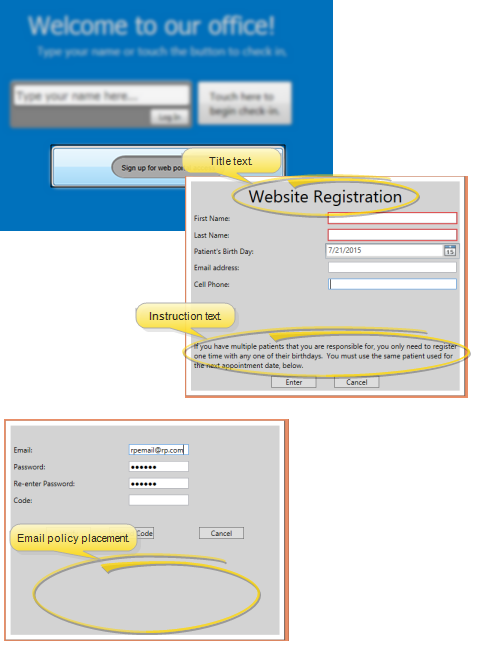
Title Text - This is the text that appears at the top of the Edge Portal registration window.
Instruction Text - This is the text that appears on the first registration screen, describing how to register.
Policy Text - This is your policy for sharing (or not sharing) email addresses that are submitted during the registration process.
Popup Font Size - Select to display the text on the registration screens in a small, normal, or large font size.
Z-Plane Options - “Z-Plane” refers to this element’s position in front of or behind other elements. If you have overlapping elements, right-click an element and select Move Forward or Move Backward to adjust it's position in relation to the other overlapping elements.
Delete Item - Right-click the element and select this option to remove the element from your sign-in screen.
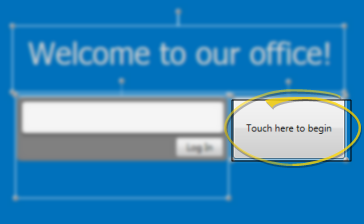
Sign-In (Touch Screen) Button![]() If your patient sign-in station has touch screen capabilities, you can add a touch screen button to the screen. After touching the button, patients select their birthday month and day or optionally swipe their reward card to complete the check in process. You must have either a sign-in prompt or a sign-in button for the Patient Sign-In feature to function properly.
If your patient sign-in station has touch screen capabilities, you can add a touch screen button to the screen. After touching the button, patients select their birthday month and day or optionally swipe their reward card to complete the check in process. You must have either a sign-in prompt or a sign-in button for the Patient Sign-In feature to function properly.
To add a sign-in button to your screen, click Add from the Sign-In Editor ribbon bar, and select Sign-In Button. Then click to position the object on the screen. You can then click and drag to move the element, and right-click within the element to modify additional properties.
Enable Lookup by Reward Card - Enable this option to allow patients to first press the sign-in button, then swipe their reward card to sign in. If this option is disabled, patients must select their birthday month and day to complete the sign-in process.
Change Text - Select this option, then type the text you would like to appear on the button.
Font Size, Font, Foreground, Background - Use these options to change the text size, style, and color, as well as the colors used for the sign-in button and related screens.
Remove - Select this option to remove this object from your sign-in greeting screen.
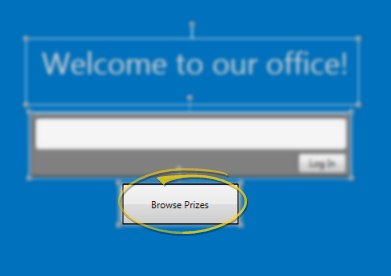
Prize Selector Button![]() Motivate your patients by displaying your list of Patient Reward prizes on your Patient Sign-In screen. Patients can then select a reward as they check in, initiating the prize processing sequence automatically.
Motivate your patients by displaying your list of Patient Reward prizes on your Patient Sign-In screen. Patients can then select a reward as they check in, initiating the prize processing sequence automatically.
To insert a prize selector on your sign in screen, click Add from the Sign-In Editor ribbon bar, and select Prize Selector Button. You can then click and drag to move the element, and right-click within the element to modify additional properties.
Show out of stock prizes - Enable this option to include all prizes in the prize selector list, even if you do not have any on hand. If this option is disabled, only prizes in your inventory will be included. (See "Set Up Prizes & Manage Inventory" for details.)
Enable lookup by reward card - Enable this option to allow patients to first press the prize button, then swipe their reward card to activate the prize selector. If this option is disabled, patients must 1) Have an appointment scheduled for today, and; 2) Select their birthday month and day to open the prize selector.
Change Text - Select this option, then type the text you would like to appear on the button.
Font Size, Font, Foreground, Background - Use these options to change the text size, style, and color, as well as the colors used for the sign-in button and related screens.
Remove - Select this option to remove this object from your sign-in greeting screen.
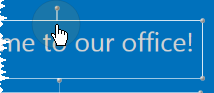
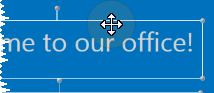
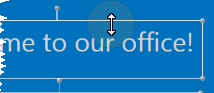
Move, Rotate, or Re-size an Element![]() Use the "handles" at the element borders to move, rotate, and re-size it.
Use the "handles" at the element borders to move, rotate, and re-size it.
Move Objects- Place your cursor over the object so that it turns into a four-headed arrow. Click and drag the object to a new location.
Resize objects - Place your cursor over any edge or corner of the object so that is turns into a two-headed arrow . Click and drag to change the size.
Rotate objects - Place your cursor over the control that extends from the top of the object so that it turns into a hand . Click and drag it around in a circle to change the angle.