Create Dentist & Other Professional Records
Add and maintain Professional records for the consulting and treating professionals, such as oral surgeons, pedodontists, and periodontists, that work with your patients. Each record includes the professional's name, practice name, address, phone number, several user-defined fields, correspondence history, list of patient assigned to this professional, and a notepad you can use to add additional information.
Get Started
Define Professional Types - Use the Pofessional Types
Flag "Email" and "Work Phone" Contacts - The Professional List report includes the contact details for the email and the work phone contact styles. In order for Edge
Use This Feature
-
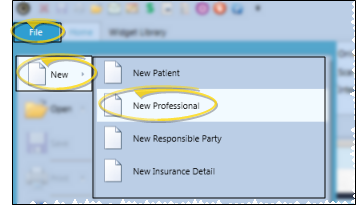
 Open New Professional Window - File ribbon bar >
  New > New Professional. (Or press Ctrl+N on your keyboard to open the New file options.) You can also open the New Professional window while searching to open a professional record with Fast Find. See "Professional Records" for details.
 -
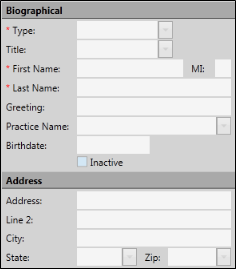
Biographical & Address Details - Enter the individual's professional type (i.e. dentist, oral surgeon, speech therapist), name, birthdate, address and other basic information. The greeting field is primarily used for mail merge documents:
Enter the greeting as
you would like to see it in the salutation of a letter. All required fields are preceded by a red asterisk ( * )
-
Contact Info - Enter phone numbers and email addresses into the Contact Info fields. You can also flag the contact information to use for delivering Edge Reminders messages. (See "Set Up Contact Categories" for details about setting up your contact types.)
-
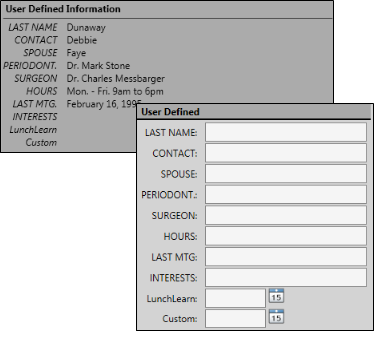
User Defined Information - The User Defined Information section details the unique information you have chosen to include in your professional records.You can change the details when you open the record from the Professionals editor, or by clicking the Edit link while viewing the professional's page. See "Set Up Professional Types" for details about defining the type of information you want to track.
-
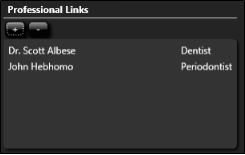
Professional Links - Use this section of the professional record to indicate with professionals this party prefers to work with. When you create a link in one professional record, that same link appears in the other party's record automatically. You can change the details when you open the record from the Professionals editor, or by clicking the Edit link while viewing the professional's page.
-
Save Your Changes - Click Save to save the changes you have made and close the editing window.
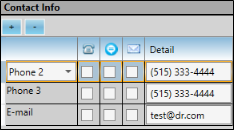
 Telephone,
  Text, and/or
  Email icon beside the contact you want to use for the delivery of Edge Reminders messages.
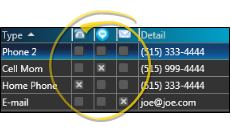
More Information
Link to Patient - You can link professional records as you create patient folders, or when you edit the Patient Information Panel.
Review / Edit Professional Records - You can review and edit professional records from linked patient folders, or from the Professional editor. See "Professional Records" for details.
Messaging Option - When you select a professional to receive a message you send via Messaging, the processional can optionally receive a notice of the message at the email address in the professional record; the professional must then log into Edge Portal to retrieve the complete message text. You may choose to have multiple messages condensed into a digest, to be emailed to the professional at one time, instead of many times throughout the day. In addition, messages received through Edge Portal are saved in the correspondence history. If a patient link was included, the message is saved in the patient's correspondence history as well. Use your Edge Portal settings to enable / disable the professional message options. See "Send an Instant Message" for details.
Print - You may want to print this list as a report for reference. See "Professional List" for details.
![]()
www.ortho2.com │ 1107 Buckeye Ave. │ Ames, IA 50010 │ 800.346.4504 │ Contact Us
Chat with Software Support │ Chat with Network Engineering │ Chat with New Customer Care
Remote Support │ Email Support │ Online Help Ver. 11/11/2019


