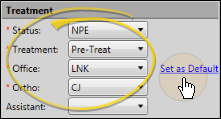
 Treatment Section - Enter the patient's status, phase of treatment, office location, primary orthodontist, and assistant in these fields. *All fields in this section, except the assistant field, are required.
Set Patient Defaults - To set the current responses as the default for new patients, click the Set as Default link. You can set default responses only when creating a new patient folder. Default status and treatment phase fields are required for promoting a family member to a patient from the Family panel of the patient folder.
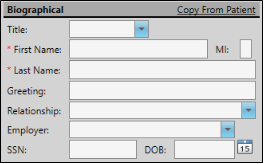
 Biographical - Enter the patient name, birthdate, gender, and other basic biographical information. *Only the patient's first name and last name are required in this section. You can also enter the patient's secondary identification code, if needed.
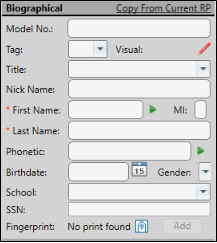
Copy From Current RP - If the patient is also the responsible party, you can fill in the Responsible Party name at the right of the window (described below), then click the Copy from Current RP link to auto-fill the patient first name, last name, and nickname to match. If you had already entered information into some of the patient fields, they will be overwritten by the responsible party information.
Patient ID Codes - When you create a new patient folder, Edge Cloud can auto-generate one or two unique patient identification numbers, according to the settings in your Patient Code Generation editor. Whether or not you auto-generate id codes, you can manually enter the secondary code as you create the patient folder (the primary code is not available as you create new folders). Once the patient folder has been saved, you can edit one or both codes by editing the Patient Information Panel. In addition, you can re-generate the primary identification code for existing patients with the  Regenerate icon in the Patient Information Panel editing window.
Title - The title field is optional. It is most often used as a variable in mail merge documents.
Tag - Use the patient tag field to categorize your patients in any way you wish. The tag appears on the patient folder header, and your Scheduler appointment hover. In addition, you can enable Fast Find to search by the patient tag. You can add a tag to a patient folder as you create the folder, or by editing the Patient Information panel. Patient tags can be unique to the patient, or you can select a standard tag description from your Patient Tag editor. (See "Set Up Patient Tags" for details.)
Visual Tag - Visual tags are displayed in the patient folder header, responsible party record, post transaction window, Smart Scheduler, appointment hover, and optionally on your Patient Tracker and Scheduler appointments. See "Visual Tags" for details.
Nickname - The patient nickname appears on the patient folder header, the Fast Find results list, your Scheduler appointment hover, optionally as a patient folder widget, and other various places in Edge Cloud.
*First Name - The first name field is required. You can click the  Play button beside the First Name and Phonetic Name fields to initiate a phone call to your Edge Reminders test phone number, to see how the name will sound using the computer voice in your Edge Reminders editor.
MI - The middle initial field is optional.
*Last Name - The last name field is required.
Phonetic Name - You can enter the phonetic spelling of the patient name to provide pronunciation guidelines for unusual names, and to be used by Edge Reminders. You can click the  Play button beside the First Name and Phonetic Name fields to initiate a phone call to your Edge Reminders test phone number, to see how the name will sound using the computer voice in your Edge Reminders editor.
Birthdate - The Birthdate field is primarily used for subgrouping, word processing conditional statements, and can trigger a special greeting on your Patient Sign-In screen.
Gender - Use the drop down icon to select the patient's gender. This field is used to determine the gender icon that appears on the patient folder Family panel, and optionally in the patient folder header (enabled / disabled in your Visuals user options), as well as to choose appropriate pronouns in mail merge documents. While this field is optional, it can help you better identify patients with non gender-specific first names and nicknames.
School - Use the drop down icon to select the patient's school from your School editor.
SSN - If needed by your office, enter the patient's social security number in this field.
Fingerprint - Obtaining fingerprint data allows your patients to sign into your Patient Tracker system. See "Acquire Patient Fingerprints" for details.
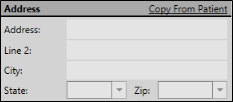
 Address - Enter the patient's home address in these fields. These fields are not required in order to create a patient folder.

Copy From Current RP - If the patient is also the responsible party, you can fill in the Responsible Party address at the right of the window (described below), then click the Copy from Current RP link to auto-fill the address to match. If you had already entered information into some of the patient fields, they will be overwritten by the responsible party information.
Use Zip Code Editor - If you select the zip code from the drop down list while the city and state fields are blank, the appropriate city and state will be filled in for you automatically. Also note that electronic insurance submission requires the state be entered in standard 2-letter postal abbreviation format. (See "Set Up Zip Code List" for details about entering your local cities, states, and zip codes.)
 User Defined Fields - Your patient folders contain two user defined fields that you can use for any purpose. Hyperlinks are supported: You can put Internet web site addresses or email addresses into these fields, then double-click the field to follow the hyperlink. See "Set Up User Defined Field Captions" for details.
 Family - If the patient has family members that are already part of your practice, click in the Family field to search for the family to assign to the patient folder. Or, click +New to create a new family for the patient. * Family is a required field.
If the new patient is already a family member or responsible party associated with an existing patient folder, we recommend using the Promote feature to create this patient's new patient folder. When you create a new patient folder in this manner, you can copy the responsible party, home address, referrer, professionals, contact details, orthodontist, and office from the existing patient folder, enhancing the speed and accuracy of the process. See "Patient Family Panel" for details.
Select an Existing Family - To assign the patient to an existing family group, click the search icon in the Family text box, then choose whether to search by Family or Patient. To search by family, type all or part of the family name or the family address. To search by patient, type any patient field enabled in your Fast Find search properties. When the results appear, select the appropriate family name and address, and click Ok to assign the patient to that family.
Create a New Family - Click +New, then confirm the family name and address, which default to the patient's last name and street address.
 Referrer - Select the person or persons that referred the patient to your office. The referral date defaults to today, but you can edit the date if needed. Referrers are not required.

Add Patient Referrer - If another patient referred this patient to you, click +Patient, then use Fast Find to select the referrer.
Add Professional Referrer - If the patient's dentist, oral surgeon or other professional referred this patient to you, click +Professional and select the referrer. (See "Create Dentist & Other Professional Records" for details about creating professional records.)
Add Other Referrer - If another source, such as your Yellow Pages ad, or an individual not directly involved in the patient's care referred the patient, click +Other and enter the information. (See "Other (Miscellaneous) Referrer Records" for details about creating records for these sources.)
Primary Referrer - If the patient has multiple referrer entries, check the entry that you consider to be the primary referrer for this patient. This information is used in certain Edge Cloud reports.
Delete Referrer - Select the name you want to remove, and click [ - ] to remove the referrer from this patient folder.
 Professional - Select the person or persons who provide treatment for the patient. Professionals are not required.

Add a Professional - Click [ + ] and select the professional to associate with this patient folder. (See "Create Dentist & Other Professional Records" for details about adding professional records to your Edge Cloud database. )
Delete Professional - Select the name you want to remove, and click [ - ] to remove the professional from this patient folder.
 Contact Info - Enter phone numbers and email addresses into the Contact Info fields. You can also flag the contact information to use for delivering Edge Reminders messages. (See "Set Up Contact Categories" for details about setting up your contact types.)
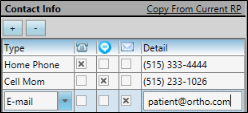
Copy From Current RP / Copy from Patient - (Available only when ceating a new patient folder.) If you have already filled out contact details for either a new patient or a new responsible party, you can click the Copy from Current RP link from the patient section of the window, or the Copy from Current Patient link from the responsible party section of the window to add those contacts to the corresponding list. If you had already entered some contact details, the new details will simply be added to the list.
Add a Contact - Click [ + ] to add a new line to the contact list, and select the appropriate type. (See "Set Up Contact Categories" for details about setting up your contact types.) Then enter the phone number or email address in the Detail column. If you want to send text messages with Edge Reminders, be sure to include at least one phone number categorized as a cell phone in your Contact Categories.
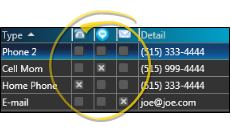
 Assign Edge Reminders Contacts - Enable the
  Telephone,
  Text, and/or
  Email icon beside the contact you want to use for the delivery of Edge Reminders messages.
If you flag multiple contact types, the party will receive a message in each of the selected formats; if you do not flag any contact types, the party will not receive any messages, even when they fit the subgroup you select. (However, if the patient and responsible party contact information matches, Edge Cloud will recognize the duplicate, and send only one message in that format.) See "Send Edge Reminders Messages" for details.
Remove a Contact - Select the contact detail you want to work with, then click [ - ] to remove it from the patient folder.
Send an Email - When viewing the record, you can click the email address in the Contact Details section to send a Quick Message to this party. See "Send Quick Email Messages" for details.
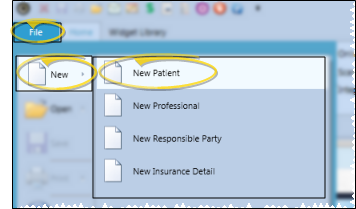
 Open New Patient Window - From the File ribbon bar, select
  New, then choose the New Patient option. (Or press Ctrl+N on your keyboard to open the New file options.) You can also open the New Patient window with the Add New button at the bottom of the Fast Find window. See "Open Patient Folders with Fast Find" for details.
 Enter Patient Data - You can enter the patient's treatment data, biographical data, contact information, and other details into the Patient section of the New Patient window. However, only the initial treatment data, patient first and last names, and family assignment are required for creating a new patient folder.
 Enter Responsible Party Data - Use the right side of the window to enter the responsible party information. At least one responsible party is required. If the patient has multiple responsible parties, you can add them each individually, using the New button, before saving the patient folder.
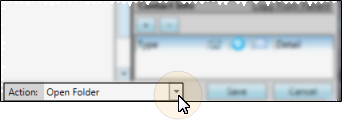
 Action After Saving - Select whether to open your new patient folder or proceed to scheduling an appointment for this patient after you save the information.

 Regenerate icon in the Patient Information Panel editing window.
 Play button beside the First Name and Phonetic Name fields to initiate a phone call to your Edge Reminders test phone number, to see how the name will sound using the computer voice in your


 Telephone,
  Text, and/or
  Email icon beside the contact you want to use for the delivery of Edge Reminders messages.

 Search icon, then use Fast Find to locate the party. Many of the remaining responsible party fields auto-fill for you: You can then review the information, and complete the additional fields as needed. (