Stacks Widget
Use your Stacks
Get Started
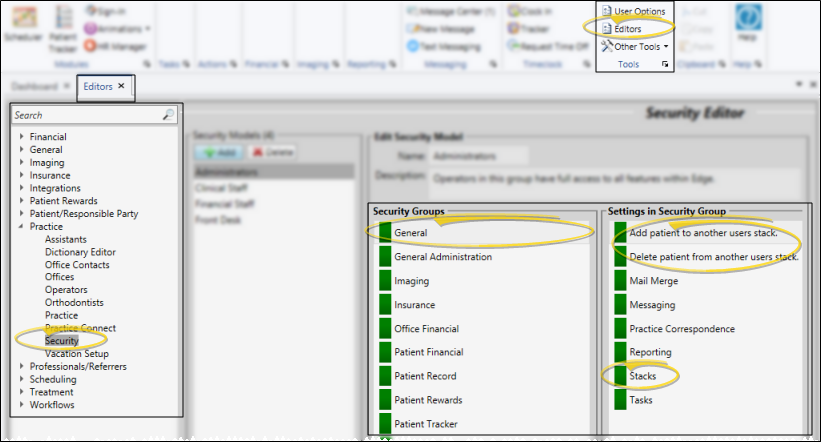
![]() Stacks Security - Use the Stacks options in your General security group to allow / limit access to your own stack and other users' stacks.
Stacks Security - Use the Stacks options in your General security group to allow / limit access to your own stack and other users' stacks.
 Save in your Quick Access toolbar or File ribbon bar (or press Ctrl+S on your keyboard) to save any changes you have made.
How to Get Here
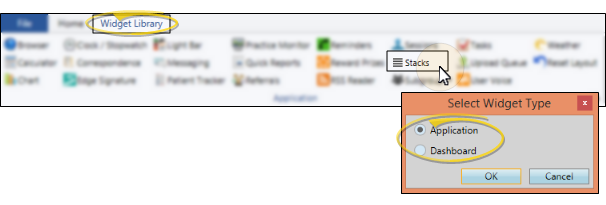
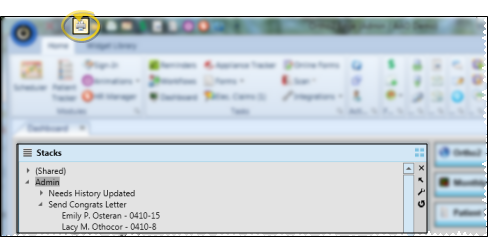
![]() Open Stacks Widget - Widget library ribbon bar >
Open Stacks Widget - Widget library ribbon bar >  Stacks > Dashboard or Application widget.
Choose Your Settings
Stacks Security - Your security rights may limit the stacks you can see and work with. See "Get Started", above, for details.
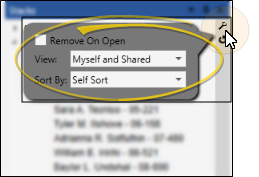
![]() Settings Window - Click
Settings Window - Click  Settings on the widget tool panel to set up which stacks to include in the widget, and how to sort the items within each stack.
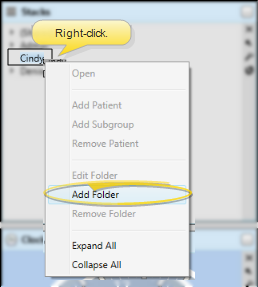
![]() Create Stack Folders - To create a stack for an Edge
Create Stack Folders - To create a stack for an Edge
Use This Feature
Stacks Security - Your security rights may limit the stacks you can see and work with. See "Get Started", above, for details.
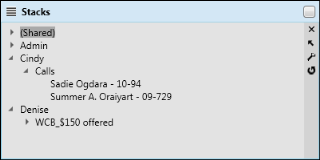
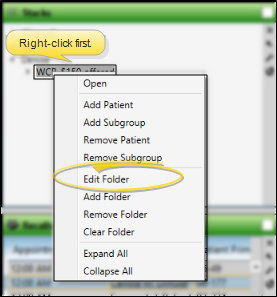
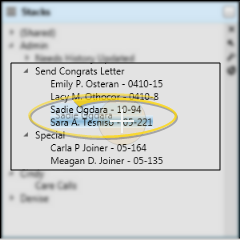
![]() Edit (Rename) a Stack - Right-click a stack and select Edit Folder to change the name of the stack. You might name stack folders something like Care Call, Insurance Verification, Past Due, and Import Images, indicating the type of task required.
Edit (Rename) a Stack - Right-click a stack and select Edit Folder to change the name of the stack. You might name stack folders something like Care Call, Insurance Verification, Past Due, and Import Images, indicating the type of task required.
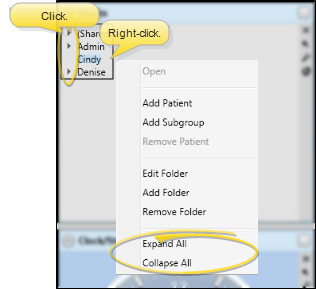
![]() Expand / Collapse Stacks - Click the arrow beside an operator or stack name to expand / collapse it. Or, right-click anywhere in the window and select Expand All or Collapse All to open or minimize all stacks.
Expand / Collapse Stacks - Click the arrow beside an operator or stack name to expand / collapse it. Or, right-click anywhere in the window and select Expand All or Collapse All to open or minimize all stacks.
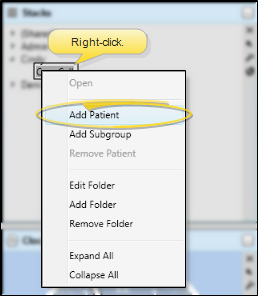
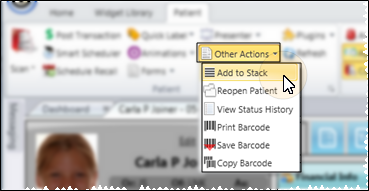
![]() Add a Patient - You can add an individual patient to a stack from the Stacks widget, the Patient ribbon bar, or the Scheduler.
Add a Patient - You can add an individual patient to a stack from the Stacks widget, the Patient ribbon bar, or the Scheduler.
 Actions then
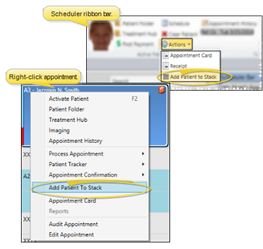
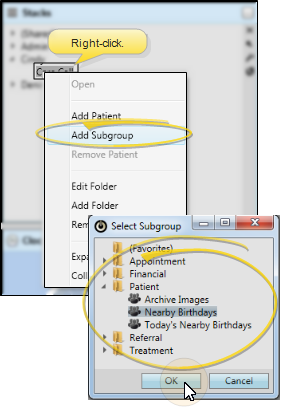
![]() Add a Subgroup - Right-click a stack folder and select Add Subgroup. Choose the subgroup to search for. Each patient that matches the subgroup criteria is added to the stack. You can repeat the process to add the patients to multiple stacks. See "Subgroup Editor" for details about creating subgroups.
Add a Subgroup - Right-click a stack folder and select Add Subgroup. Choose the subgroup to search for. Each patient that matches the subgroup criteria is added to the stack. You can repeat the process to add the patients to multiple stacks. See "Subgroup Editor" for details about creating subgroups.
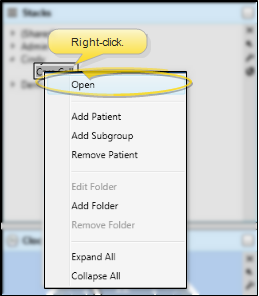
![]() Open a Patient Folder - Double-click a patient name in a stack, or right-click the name and select Open. If the Remove on open setting (described above) is enabled,
the patient will be removed from the stack automatically as soon as you
open the patient folder.
Otherwise,
you will need to remove the patient from the stack manually, as described
below.
Open a Patient Folder - Double-click a patient name in a stack, or right-click the name and select Open. If the Remove on open setting (described above) is enabled,
the patient will be removed from the stack automatically as soon as you
open the patient folder.
Otherwise,
you will need to remove the patient from the stack manually, as described
below.
![]() Move a Patient to a Different Stack - Use drag and drop to move a patient from one stack to another stack. If your widget is set to Self Sort (as described above), you may drop the patient in any location you want. Otherwise, the patient is incorporated into the stack according to the selected sort order.
Move a Patient to a Different Stack - Use drag and drop to move a patient from one stack to another stack. If your widget is set to Self Sort (as described above), you may drop the patient in any location you want. Otherwise, the patient is incorporated into the stack according to the selected sort order.
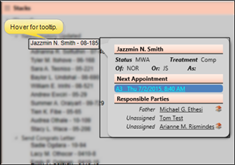
![]() Hover for Tool Tip - Hover over a patient name in a stack to see a tool tip that includes the patient status, treatment phase, next appointment, responsible party contact details, and other information.
Hover for Tool Tip - Hover over a patient name in a stack to see a tool tip that includes the patient status, treatment phase, next appointment, responsible party contact details, and other information.
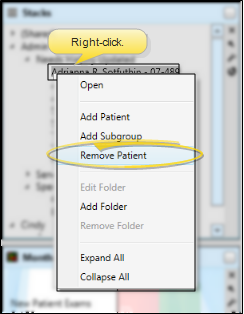
![]() Remove a Patient from a Stack - Right-click a patient name in a stack and select Remove Patient to manually remove the patient from the list. (If the Remove On Open option (described above) is enabled, the patient will be removed from the stack automatically as soon as you open the patient folder from a stack, without using the Remove Patient option described here.)
Remove a Patient from a Stack - Right-click a patient name in a stack and select Remove Patient to manually remove the patient from the list. (If the Remove On Open option (described above) is enabled, the patient will be removed from the stack automatically as soon as you open the patient folder from a stack, without using the Remove Patient option described here.)
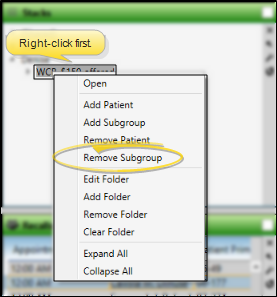
![]() Remove a Subgroup of Patients - Right-click a stack folder and select Remove a Subgroup. Choose the subgroup to search for. Each patient that matches the subgroup criteria is removed from the stack.
Remove a Subgroup of Patients - Right-click a stack folder and select Remove a Subgroup. Choose the subgroup to search for. Each patient that matches the subgroup criteria is removed from the stack.
![]() Clear Stack Folder - Right-click a stack name and select Clear Folder to remove all the patients from the stack. The folder itself is not deleted.
Clear Stack Folder - Right-click a stack name and select Clear Folder to remove all the patients from the stack. The folder itself is not deleted.
![]() Delete Stack Folders - Right-click a stack name and select Remove Folder to remove it entirely. If there are patients currently in the stack, you must confirm your action to continue. There is no history kept of patients who were in the stack, nor
of the stack itself after it is deleted.
Delete Stack Folders - Right-click a stack name and select Remove Folder to remove it entirely. If there are patients currently in the stack, you must confirm your action to continue. There is no history kept of patients who were in the stack, nor
of the stack itself after it is deleted.

![]() Print Stacks - Open Stacks as a Dashboard widget, and expand the panel. Click
Print Stacks - Open Stacks as a Dashboard widget, and expand the panel. Click  Print from your File ribbon bar or Quick Access toolbar (or press Ctrl+P on your keyboard) to print a copy of the current screen contents.
More Information
Widget Panel Options - Depending on your device and panel format, you can expand and minimize widget panels, move the widget location on your screen, float them in their own windows, refresh and print data, and close the widget when you no longer need it. See Application widgets or Your Dashboard for details about using these features.
Automate Adding Patients to Stacks - Use the New Stack Entry workflow activity to add an individual patient or a subgroup of patients to a specific stack folder whenever the activity is triggered by a workflow. See "Workflow Activities" for details.
Automate Removing Patients from Stacks - Use the Remove Stack Entry workflow activity to remove an individual patient or a subgroup of patients from a specific stack folder whenever the activity is triggered by a workflow. See "Workflow Activities" for details. (You can also use the stacks Settings to automatically remove individual patients when you open the patient folder from the Stacks widget, )
![]()
www.ortho2.com │ 1107 Buckeye Ave. │ Ames, IA 50010 │ 800.346.4504 │ Contact Us
Chat with Software Support │ Chat with Network Engineering │ Chat with New Customer Care
Remote Support │ Email Support │ Online Help Ver. 11/11/2019


