Patient Appointments Panel
Open the Appointments panel on the Home page of the patient folder to see currently scheduled appointments for both the patient and family members, and the patient's appointment history. (You can also view a limited version of the patient's appointments on the patient folder widget, the patient Treatment Chart summary, and the Smart Scheduler.)
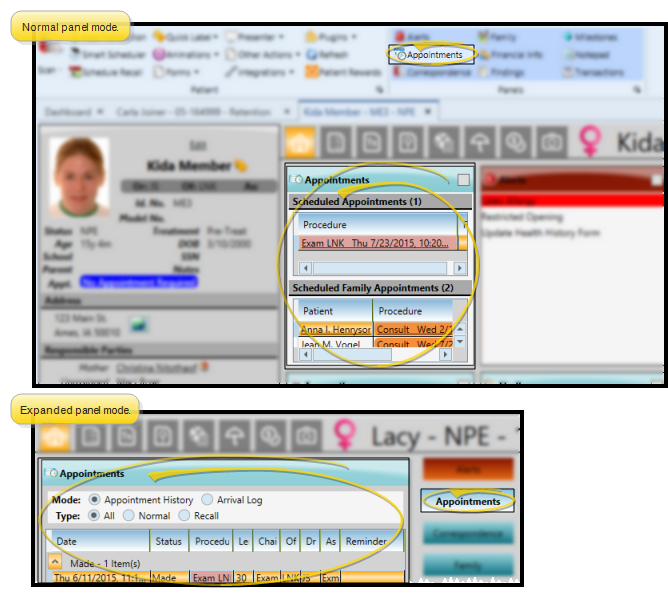
Open the patient folder Home page, and enable the  Appointments panel. (See "Patient Home Page" for details about opening the patient's Home page and selecting the panel(s) to view. The process is slightly different, depending on whether Normal panel mode or Single Expanded panel mode is enabled in your Visual User Options.)
 Expand / Collapse / Move the Panel
If the patient's Home page is in Normal mode, you can click the top-right box, or double-click the header to expand or collapse the panel, and drag the panel around the screen. If you opened the Home page in Single Expanded mode, the selected panel will be expanded, and all other panel headers appear at the right.
Certain features only function when the panel is expanded. If a feature doesn't seem to be working, be sure you are in expanded panel mode. See "Patient Home Page" for details.
View / Edit Patient Appointments - The Scheduled Appointments section of the panel indicates the number of appointments currently scheduled for the patient. With the panel in either collapsed or expanded mode, you can click the appointment link to open that date in your Scheduler, or right-click to update the appointment confirmation status, appointment details, and Patient Tracker times.
View / Go To Family Appointments - (Available in collapsed view only; also available from the Smart Scheduler.) The Family Appointments section of the panel indicates the number of family appointments currently scheduled. You can click a patient name to open that patient folder, or click an appointment to open that date in your Scheduler.
Scheduler Tab Selection - If you have multiple Scheduler tabs open, clicking a patient appointment link will bring the left-most tab to the front of your Edge Cloud window. Note that before you click the link, you can reorder your tabs by simply dragging them into place, thus selecting which Scheduler tab you want to work with. See "Scheduler User Options" for details about enabling/disabling the multiple Scheduler option.
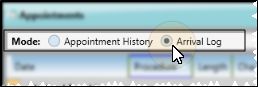
Toggle Appointment History / Arrival Log - (Expanded mode only.) Enable the Arrival Log option to work with the patient's arrival time information. See "Appointment History" for details.
Print Appointment History / Arrival Log (Expanded mode only.) - Click  Print from your File ribbon bar or Quick Access toolbar (or press Ctrl+P on your keyboard) to print a copy of the current screen contents. (To see the arrival log for all patients for any range of dates, print the Arrival Log Report.)