Treatment Hub
With the patient folder Treatment
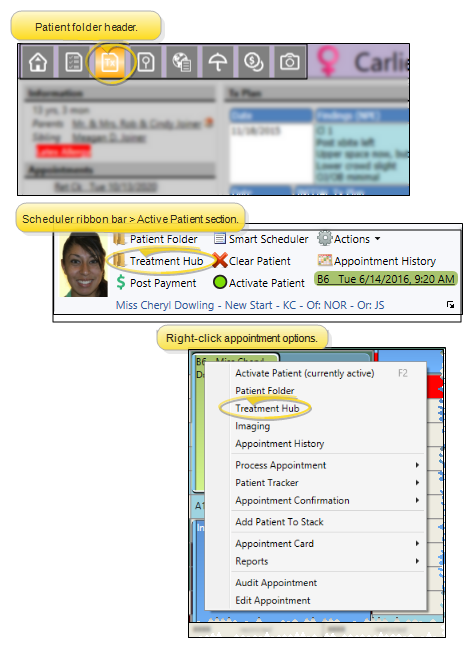
You can open the patient's Treatment Hub page by clicking the Treatment Hub icon from the patient folder header or the Scheduler ribbon bar, or by right-clicking the patient appointment in your Schedule.
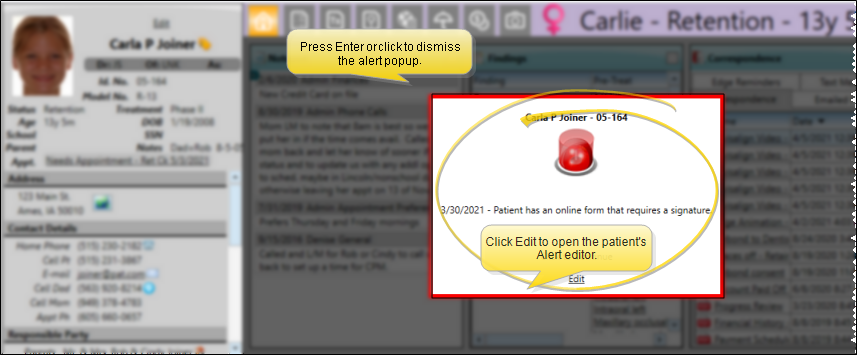
Alert Stop - If the patient has an alert trigger enabled for this feature, the Alert Stop pop-up window will appear when you initiate this feature for the patient. Review the alert information, then either press Enter on your keyboard, or click the box to continue. You can also click the Edit link to open the Alert editor for that patient.
Milestone Reminders - You may be prompted to update milestone dates when you either schedule an appointment or open the treatment chart for a patient whose Next Dental Visit and / or Next Progress Report date is either today or in the past. See "Milestone Reminders" for details.
The header portion of yourTreatment
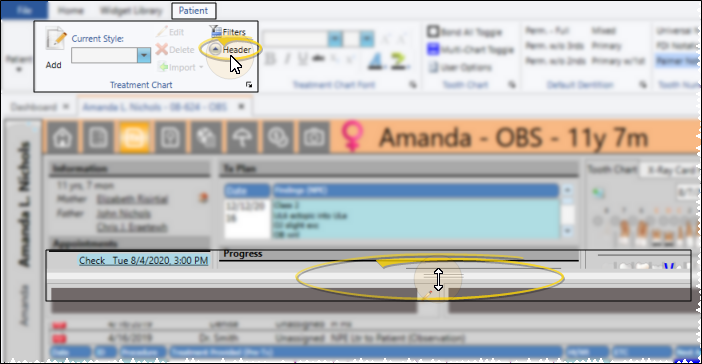
You can use the  Header icon in the Treatment Chart section of the Patient ribbon bar (or press F8 on your keyboard) to show / hide this information, or use the slider bar between the header section and the treatment chart section to change the amount of space allotted to each.
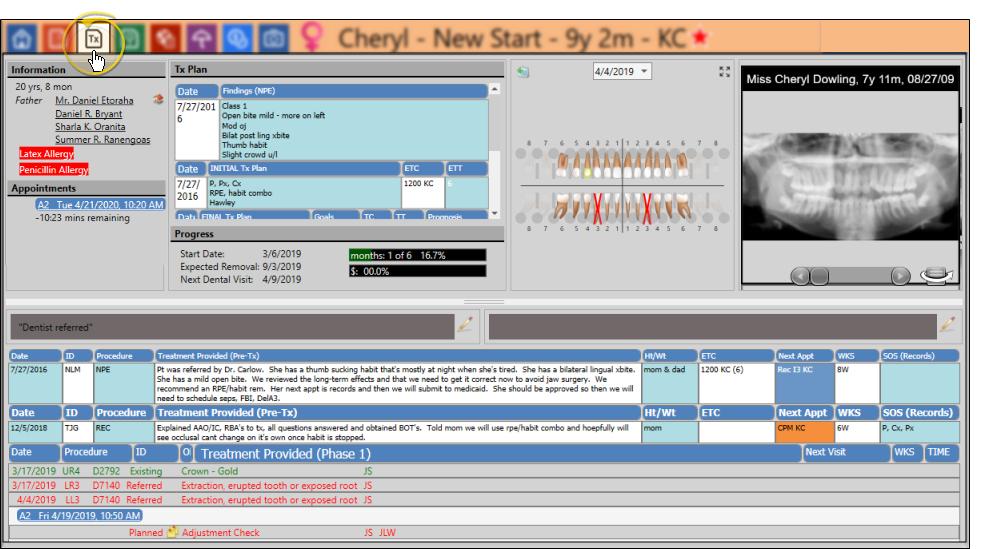
These sections of the Treatment Hub header include the patient age, responsible party and family names, any medical alerts, (in red), and the patient's scheduled appointments. If this person's record has a visual tag applied, the appropriate color/shape appears beside the name. Because this information appears in the Treatment Hub header, you might consider minimizing the patient information panel during general use.
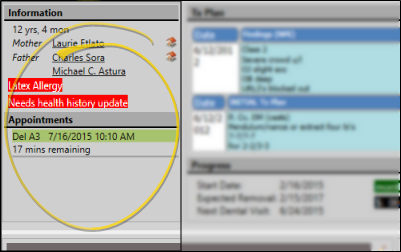
Responsible Party Links - You can click a responsible party name to go to that party's page, or hover over the name to view contact details and initiate an email message.
Guardian Icon- The  Guardian icon appears beside a name when the patient's address exactly matches the responsible party's address, indicating that the patient lives with that party.
Visual Tag - If this person's record has a visual tag applied, the appropriate color/shape appears beside the name. See "Visual Tags" for details.
Sibling Links - If a sibling is also a patient in your office, you can click the sibling name to open that patient folder. See "Patient Family Panel" for details about linking patient families.
Alert Links - Patient alerts with the "Medical" flag enabled appear in red on the Treatment
Appointment Links - You can click an appointment link to open that date in your Scheduler, or right click to edit the appointment details, and
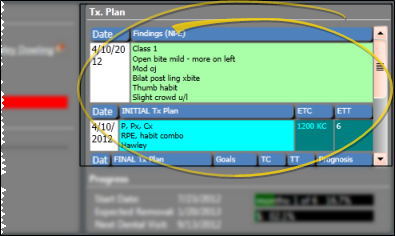
The patient's most recent treatment plan appears in the middle section of the Treatment Hub header. Only styles with the Include on Tx Hub option enabled in the treatment plan style will be included. (See "Treatment Chart & Plan Style Editor" for details about enabling chart and plan options.) You can only view, not create or edit, the treatment plan from here. See "Patient Treatment Plan & Sequence Page" for details about creating and updating treatment plans.
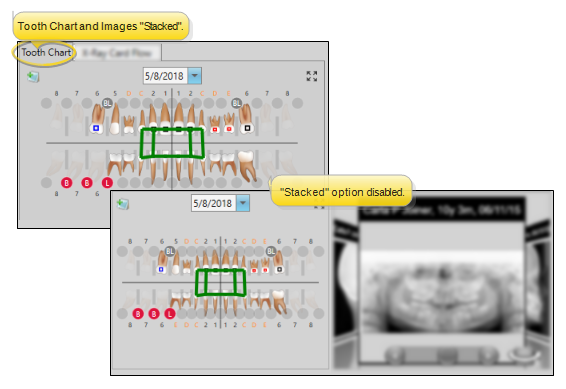
The patient's tooth chart appears in the Treatment
When you display the tooth chart and patient images as "stacked" in the header of your Treatment
Click the  Full Screen icon in the upper right corner of the tooth chart to toggle viewing the chart in full screen mode. You can also click Header in the Treatment Chart section of the Patient ribbon bar (or press F8 on your keyboard) to toggle showing / hiding the tooth chart and other header information, allowing full screen display of treatment chart records.

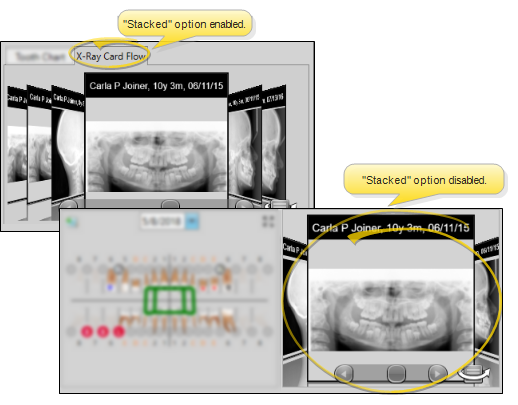
The patient's images appear on
Use your Treatment Hub user options to choose whether to stack the patient's tooth chart and images, or show them side-by-side. Double-clicking an image in the Treatment
When you display the tooth chart and patient images as "stacked" in the header of your Treatment
This section of the Treatment Hub shows you treatment dates for the patient's current treatment phase, and can optionally include summary information about treatment, finances, and appointments.
Use the Progress section of your Treatment Hub user options to choose which progress summaries to show / hide on the header of your Treatment Hub screen.
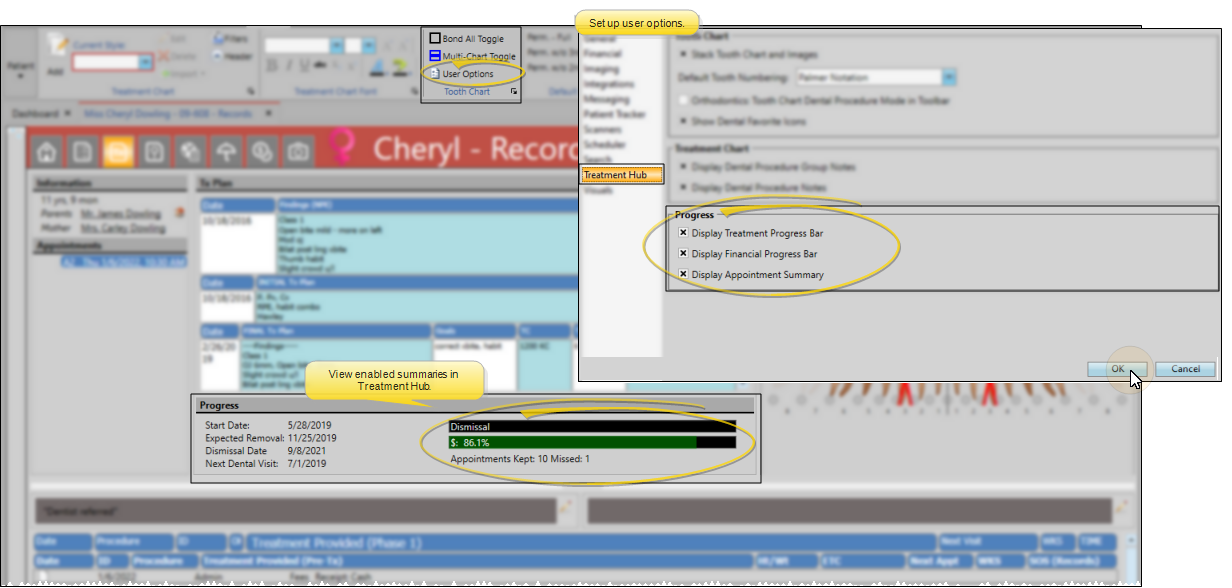
The left side of the Progress section of the window shows you key dates for the patient's current treatment phase, including the start date and expected removal date from the patient's Findings page, and next dental visit date from the Milestones panel of the patient's Home page.
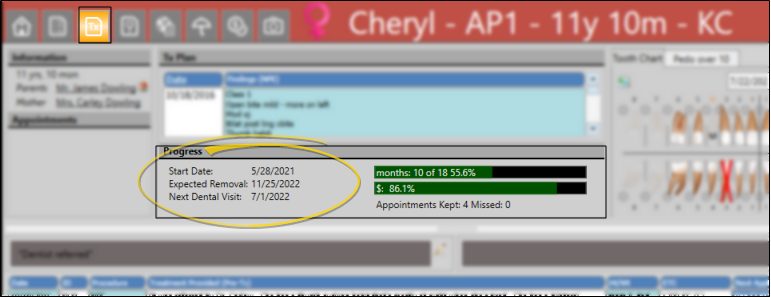
If enabled in your Treatment Hub user options, the treatment progress bar shows you the patient's percentage of treatment time that has taken place, as calculated from the start date and expected or actual removal date. The progress bar changes color to indicate how treatment is progressing relative to the estimate. Green = at or below estimate; Red = Over estimate; Yellow = Patient treatment completed.

Transfers- When you enter a transfer out date on the Milestones panel of a patient's Home page, the treatment progress bar on the Treatment Hub page changes to include the transfer date.
![]()
Practice Connect Tip - You can optionally provide a way for patients and parents to see the treatment progress graph via your Practice Connect app. See "Practice Connect" for details.
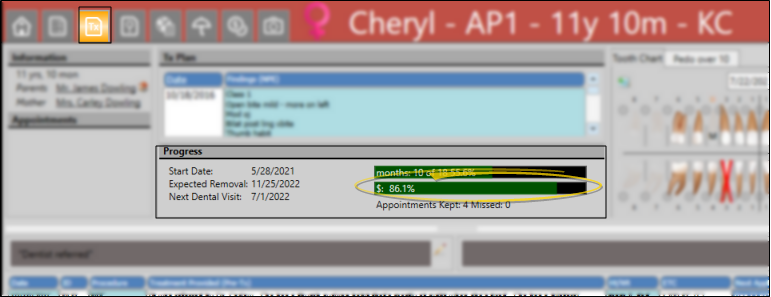
If enabled in your Treatment Hub user options, the financial progress bar shows you the percentage of the contract fee that has been paid so far. The progress bar changes color to indicate how payments are progressing relative to the estimated treatment dates. Green = at or below estimate; Red = Over estimate; Yellow = Patient treatment completed.
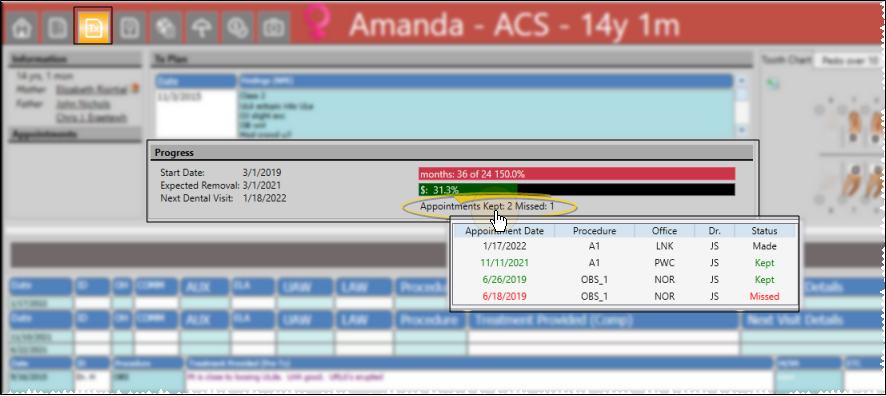
If enabled in your Treatment Hub user options, the appointment summary shows you the number of kept and missed appointments for the patient's current treatment phase. You can hover over the summary to see the appointment details for this phase of treatment.
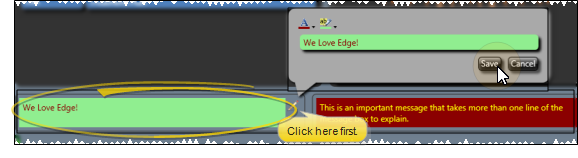
Two patient message boxes appear at the top of the patient's treatment chart records. These messages display on your screen whether or not the Treatment
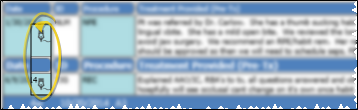
To change message text or colors, click the  icon beside the message you want to edit. Then type your message, or use the color selectors to choose the colors you want to use.
The patient's treatment chart records appear at the bottom of the Treatment Hub window. In addition to using the Header icon in the ribbon bar (or pressing F8 on your keyboard) to show / hide the header, you can use the header slider to completely eliminate the header section, providing the maximum space for viewing treatment chart records. You can include additional items within the treatment chart section of the window. See "Treatment Chart Filters" for details about these options.
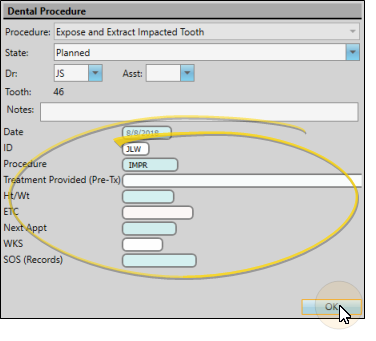
Treatment Chart Records vs. Dental Procedure Details - You can optionally assign a treatment chart style to a dental procedure. Then, after applying the dental procedure to a patient folder, you can edit that procedure and enter the treatment chart details. These details remain in the dental procedure record, and do not appear in as separate treatment chart records. See "About Dental Procedures" for details.

![]() Add and Edit Treatment Chart Records
Add and Edit Treatment Chart Records
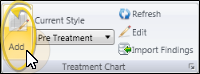
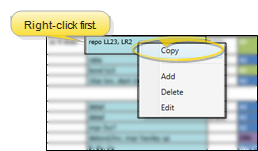
Click Add in the Treatment Chart section of the Patient ribbon bar, or, right-click an existing record and select Add to create a new record with the template shown in the Current Style field. New treatment chart records are entered chronologically, with the newest entry at the bottom of the list, unless the Reverse Order option is enabled in your Treatment Chart filters. Once created, you can edit and delete the record for 24 hours. After that, the record becomes permanent.
![]() Treatment Chart Record Details
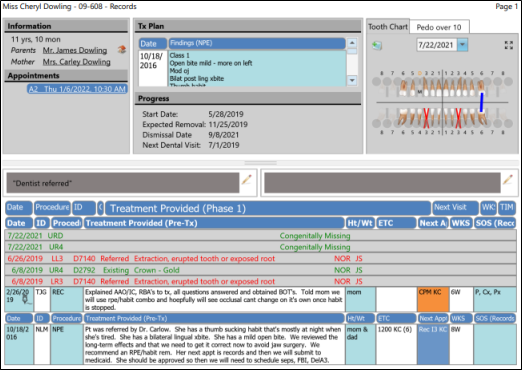
Treatment Chart Record Details
The information shown in an individual treatment chart record depends upon the style you used to create it, and whether you have imported any of the information. You can use the Filters settings, described above, to list the records in either ascending or descending chronological order. You can only edit a treatment chart record within 24 hours of creating it. Afterward, you cannot make any changes.
Click  Print from your File ribbon bar or Quick Access toolbar (or press Ctrl+P on your keyboard) to print a copy of the current screen contents. You can choose to include all data from the current screen, including the patient information and progress, treatment plan, and tooth chart on the print out, or include only the currently displayed treatment chart records.
Even though you cannot edit or delete treatment chart records over 24 hours old, you can right-click a treatment chart column to copy the text to your clipboard. You can then paste the text into another
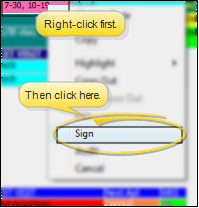
Once a treatment chart record has been saved, authorized persons, such as orthodontists, may sign it to verify the information. This feature is useful for many reasons, and especially in university settings, where entries must be double-checked for accuracy. Signed records cannot be edited, even if they are less than 24 hours old. To sign a record, right-click the entry you want to verify, and select Sign. Then enter your user name and password.
Signed records are identified by an icon ( ) at the beginning of the record
Right-click any record and select Audit to review the operator, date, and time the record was created, as well as when it was last changed.

Use the  Filters icon in the Treatment Chart section of the Patient ribbon bar to show / hide additional information in the treatment chart section of the patient's Treatment Hub. Edge Cloud remembers your filter settings the next time you view the Treatment

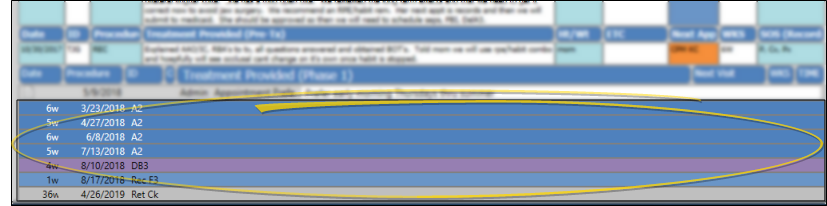
Use the Filters icon in the Treatment Chart section of the Patient ribbon bar to show / hide dental procedures within the patient's treatment chart records. You can choose to show all, none, or only certain types of procedures. When enabled, these items appear chronologically among the treatment chart records. You can differentiate the procedure status by their procedure status color Planned = Red; Completed = Blue; Referred = Red; Existing = Green; Rejected - Black..


Create Procedure Groups - If you apply multiple procedures one after the other, you create a Procedure Group that appears in the treatment chart section of the Treatment Hub window. In addition, when dental procedures are linked to an appointment, those procedures are included in a group with the appointment date as the group heading. You can right-click to ungroup the procedures, move procedures from one group to another, or create a new procedure group.
Edit / Audit Procedure Groups - In addition to working with individual procedures, you can right-click or double-click a procedure header to work with that group. Use the Previous and Next buttons at the bottom of the editing window to toggle through all the procedures in the group.
Dental procedures identify the treatments a patient requires. Each procedure contains information about the specific tooth, mouth, or other area to be treated, the insurance treatment code, and for Edge Specialist users, the fee to charge once the procedure is complete. Dental procedures work seamlessly with your patient tooth chart and treatment chart, appointments, insurance, and fee schedules to provide a comprehensive treatment, billing, and insurance cycle. You can apply dental procedures to patients individually or in groups, and associate them with
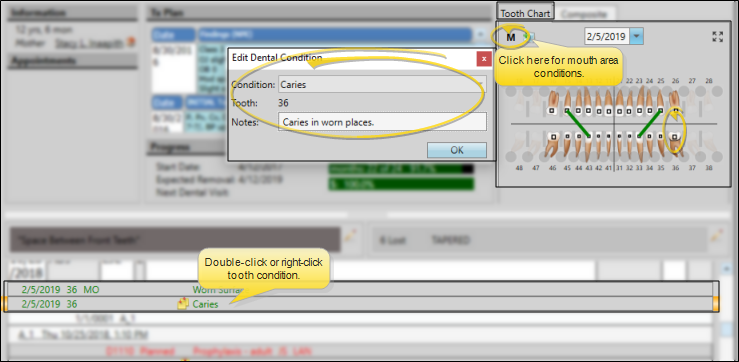
Use the Filters icon in the Treatment Chart section of the Patient ribbon bar to show / hide dental conditions within the patient's treatment chart records. When enabled, these items appear chronologically among the treatment chart records. Dental conditions are assumed to be "existing", so they are color-coded green.

![]() Review / Edit Dental Condition Details
Review / Edit Dental Condition Details
After applying dental conditions with the patient's tooth chart, you can right-click the tooth in the tooth chart to remove the condition. In addition, you can right-click or double-click the condition in the patient's 's treatment chart to edit supporting details, audit, and delete the condition. Conditions applied to a mouth area are edited by clicking the "M" in the upper-left corner of the tooth chart.
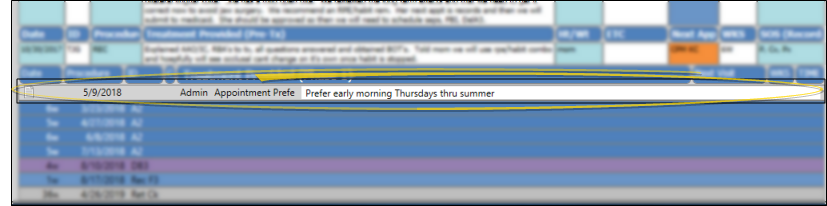
Use the Filters icon in the Treatment Chart section of the Patient ribbon bar to show / hide some or all notepad entries within the patient's treatment chart records. You can enable all or individual notepad categories. When enabled, notepad items appear chronologically among your treatment chart records. The notepad icon in the left column identifies these entries. See "Patient Notepad" for details about the patient notepad.
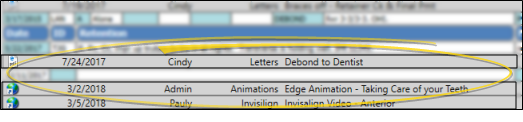
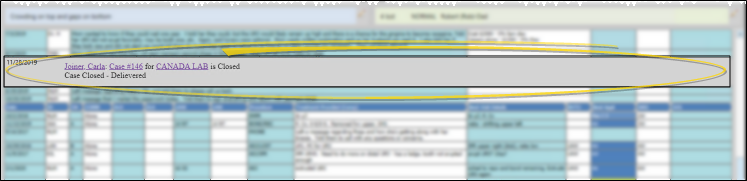
Use the Filters icon in the Treatment Chart section of the Patient ribbon bar to show / hide some or all correspondence history items within the patient's treatment chart records. You can enable all or individual correspondence history categories. Only records from the Correspondence tab or the patient's correspondence history are included: Items from the Emailed Forms, Edge Reminders and Text Messaging tabs are omitted. When enabled, correspondence history items appear chronologically among your treatment chart records. You can click the icon in the left column to open the associated document or video. See "Patient Correspondence History" for details.
Use the Filters icon in the Treatment Chart section of the Patient ribbon bar to show / hide the patient's active Treatment Sequence items within the patient's treatment chart records. The treatment sequence items will appear at the bottom of your treatment chart records. Once a sequence procedure is flagged as "kept", it is removed from the treatment chart automatically. See "Treatment Sequence" for details about managing your patients' treatment sequence.
Use the Filters icon in the Treatment Chart section of the Patient ribbon bar to show / hide the patient's EasyRx prescriptions within the patient's treatment chart records. Learn more.

Use the Filters icon in the Treatment Chart section of the Patient ribbon bar to show / hide the patient's inVisit virtual visit summaries within the patient's treatment chart records.
Optional Module![]() - This is an optional add-on, available for a fee. Please contact your Ortho2 Regional Manager for details.
- This is an optional add-on, available for a fee. Please contact your Ortho2 Regional Manager for details.
inVisit Widget - In addition to viewing your patients' virtual visits from their Treatment Hub, you can use the inVisit widget to view and open a visit summary, as well as link inVisit and Edge Cloud patient folders. See "inVisit Widget" for details.
With the inVisit filter enabled in the patient's Edge Cloud Treatment
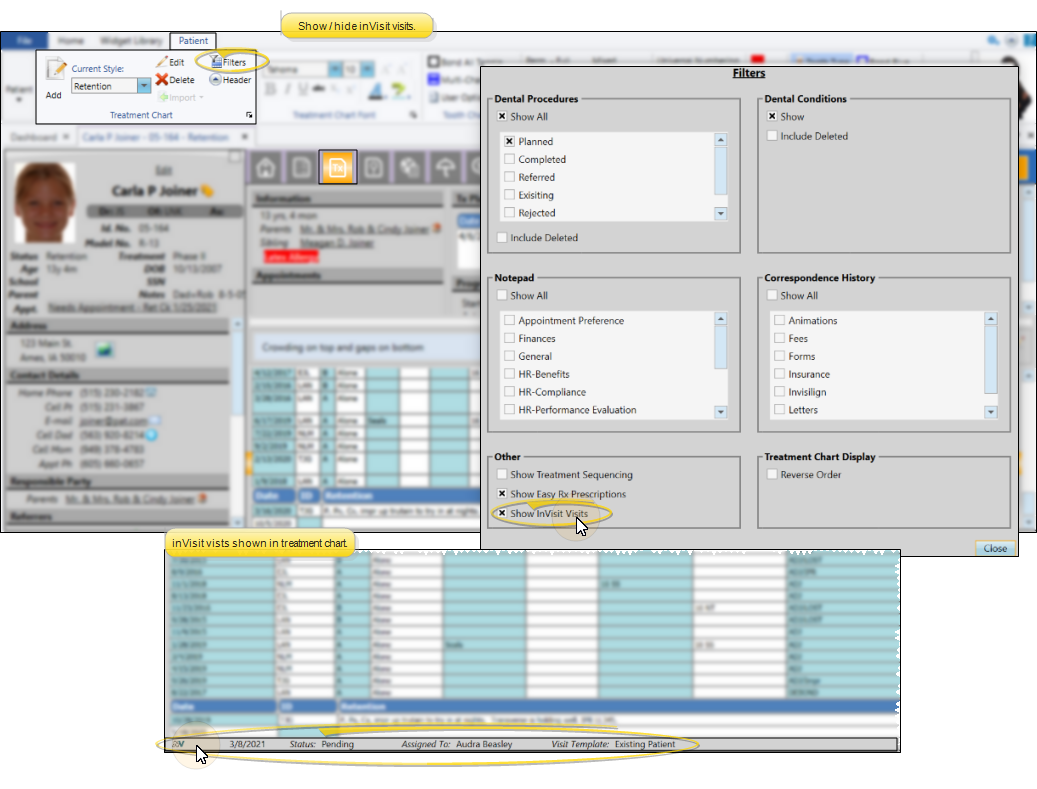
After a patient submits an inVisit virtual visit, you can quickly import the visit photos into the Imaging page of their Edge Cloud patient folder. First, be sure the inVisit filter is enabled in the patient's Treatment
Then, simply right-click an inVisit summary and select Import Images. Your Edge Imaging auto-import window opens. Now, all you need to do is select the image layout you want to use, and click Import to begin the auto-import process.
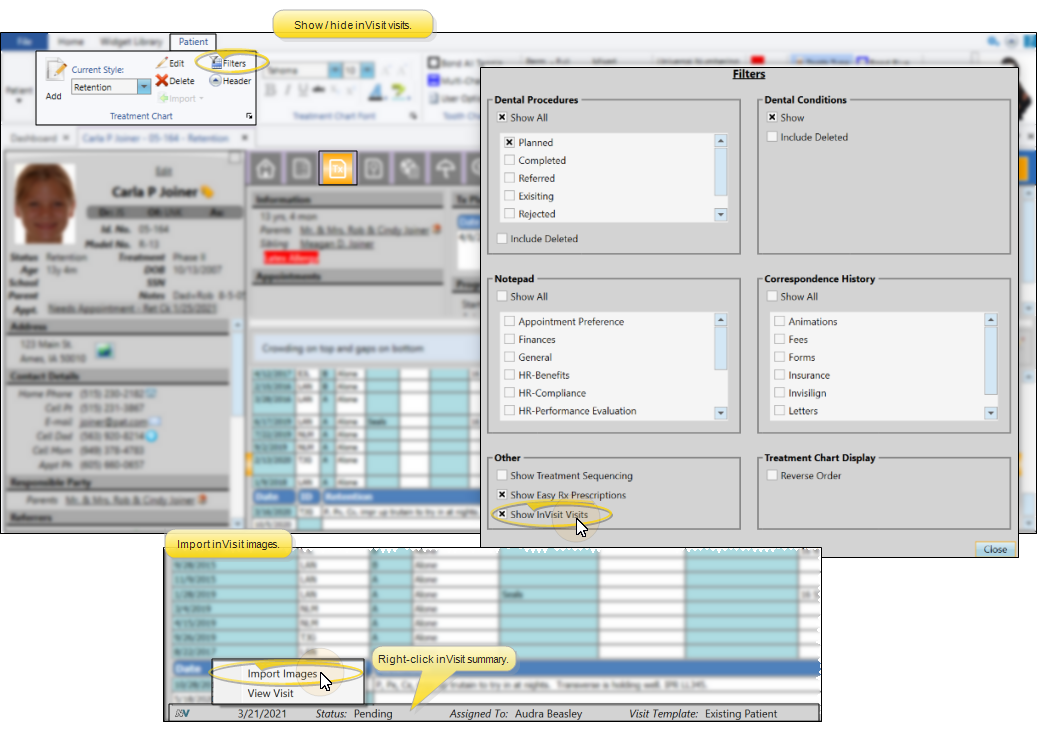
For best results, we recommend you create an image layout that imports the required inVisit photos in order so all you have to do is right-click an inVisit summary, select Import, choose your inVisit image layout, and start importing. The original photos are retained in the patient's inVisit Virtual Visit page.
Use the Filters icon in the Treatment Chart section of the Patient ribbon bar to show / hide the patient's DDX cases within the patient's treatment chart records. Learn more.
![]() Treatment Chart Display Reverse Order
Treatment Chart Display Reverse Order
Leave the Reverse Order option disabled to display treatment chart records in the order they were entered: The newest records appearing at the bottom of the list. Enable this option to display treatment chart records in reverse chronological order: The newest records appearing first.
![]() Treatment
Treatment
Use the Open Treatment Chart workflow trigger to activate a workflow whenever you open the Treatment
![]() Open the Treatment
Open the Treatment
Use the Open Patient workflow activity to open the patient folder whenever the activity is triggered by a workflow. Use the Workflow editor to select the tab you want to open when this activity is triggered. See "Workflow Editor" for details.
![]() Automate Record Creation with a Workflow
Automate Record Creation with a Workflow
Use the Create Tx. Chart Entry workflow activity to open the Treatment