Patient Information Panel
The Patient Information Panel contains patient treatment, biographical, and contact information. You can personalize the panel to include additional widgets you use most often. The panel always appears on the left side of the patient's Home page. You can optionally hide / show the panel on all other patient folder pages.
![]() Show / Hide Patient Information Panel
Show / Hide Patient Information Panel
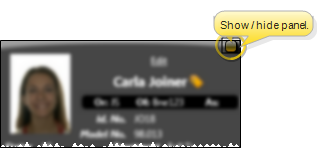
The patient information panel always appears on the left side of the patient folder Home page. When viewing any patient folder page except the Home page, you can click the box at the upper right to show / hide the patient information panel. Hiding the panel provides more room to see other information. To expand the panel, click the box again. Each time you exit a patient folder page, Edge Cloud remembers whether you have collapsed or expanded the patient information panel. For example, if you collapsed the panel while viewing the Finances page, the next time you view a Finances page for any patient, Edge Cloud will collapse the patient information panel automatically.
![]() Patient Information Panel Sections
Patient Information Panel Sections
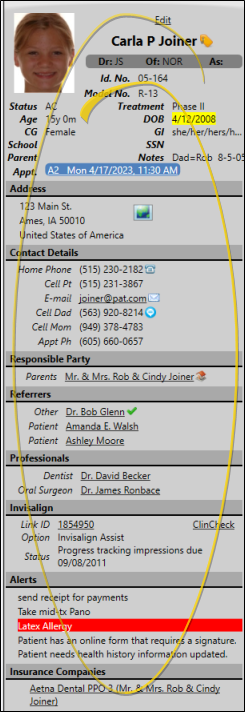
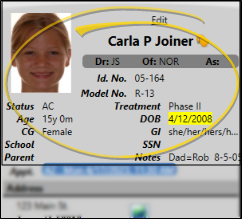
The patient information panel includes several sections of information, including details about the patient's treatment, responsible parties, referrers, and professionals. In addition, you can use patient folder widgets to include even more information on the panel.
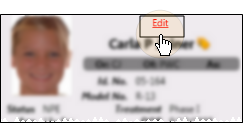
The top portion of the panel includes the patient photo, and details about the patient's assigned orthodontist, office, and assistant, identification numbers, birthday and age, status, and treatment phase, as well as user-defined details. You can click the photo to open the patient's Imaging page, click the next appointment link to open your Scheduler and activate the patient, and print a patient Quick Label from this section of the panel.
Open the Imaging Page![]() - If you use Edge Imaging,a thumbnail of the image type you have labeled as the "Default" (generally the facial smile photo) can
appear on the
- If you use Edge Imaging,a thumbnail of the image type you have labeled as the "Default" (generally the facial smile photo) can
appear on the
Listen to First Name / Phonetic Name![]() - You can listen to the patient's first name and phonetic name while in Edit mode. Click Edit at the top of the patient information panel to open editing mode. You can click the
- You can listen to the patient's first name and phonetic name while in Edit mode. Click Edit at the top of the patient information panel to open editing mode. You can click the  Play button beside the First Name and Phonetic Name fields to initiate a phone call to your Edge Reminders test phone number, to see how the name will sound using the computer voice in your Edge Reminders editor. Click Save in the Quick Access toolbar (or press Ctrl+S on your keyboard) to save any changes, or click Cancel at the top of the Patient Information Panel to exit editing mode.
Print Quick Label![]() - Click the
- Click the  Label button beside the name field or in the ribbon bar to print a Quick Label for this record.
Orthodontist / Office / Assistant![]() - The Orthodontist (Or:), Office (Of:) and Assistant (As:) assigned to the patient appear near the top of the patient information panel. The color assigned to the patient's office in the Office editor is the background color of the patient folder header. When you change the orthodontist or office assignment of a patient, you can choose to apply any future contract charges to the new doctor / location by enabling the orthodontist / office transfer option of your System Financial Settings. Otherwise, the patient's contract charges will continue to be credited toward the original orthodontist / office. This option takes effect only when you change the assignment in the patient information panel; simply scheduling a patient appointment with a different doctor or office does not affect the assignment of contract charges.
- The Orthodontist (Or:), Office (Of:) and Assistant (As:) assigned to the patient appear near the top of the patient information panel. The color assigned to the patient's office in the Office editor is the background color of the patient folder header. When you change the orthodontist or office assignment of a patient, you can choose to apply any future contract charges to the new doctor / location by enabling the orthodontist / office transfer option of your System Financial Settings. Otherwise, the patient's contract charges will continue to be credited toward the original orthodontist / office. This option takes effect only when you change the assignment in the patient information panel; simply scheduling a patient appointment with a different doctor or office does not affect the assignment of contract charges.
When you create a new patient folder, Edge Cloud can auto-generate one or two unique patient identification numbers, according to the settings in your Patient Code Generation editor. Whether or not you auto-generate id codes, you can manually enter the secondary code as you create the patient folder (the primary code is not available as you create new folders). Once the patient folder has been saved, you can edit one or both codes by editing the Patient Information Panel.
Edit Primary Code With Caution![]() - Although you can edit primary identification codes, and even use the
- Although you can edit primary identification codes, and even use the  Regenerate icon in the Patient Information Panel editing window to create a new code, once a patient is successfully assigned to a primary id code, you should NOT change it without very careful consideration. This code is linked to patient images and other Edge Cloud data , and changing it could cause unintended data issues.
Patient Tag![]() - (Shown on the patient folder header, not in the Patient Information panel.) You can add a patient tag to a patient folder as you create the folder, or by editing the Patient Information panel. Use the patient tag field to categorize your patients in any way you wish. The tag appears on the patient folder header, and your Scheduler appointment hover. In addition, you can enable Fast Find to search by the patient tag. Patient tags can be unique to the patient, or you can select a standard tag description from your Patient Tag editor.
- (Shown on the patient folder header, not in the Patient Information panel.) You can add a patient tag to a patient folder as you create the folder, or by editing the Patient Information panel. Use the patient tag field to categorize your patients in any way you wish. The tag appears on the patient folder header, and your Scheduler appointment hover. In addition, you can enable Fast Find to search by the patient tag. Patient tags can be unique to the patient, or you can select a standard tag description from your Patient Tag editor.
Visual Tags![]() - (Shown on the patient folder header, not in the Patient Information panel.) Visual tags are displayed in the patient folder header, responsible party record, post transaction window, Smart Scheduler, appointment hover, and optionally on your Patient Tracker and Scheduler appointments.See "Visual Tags" for details.
- (Shown on the patient folder header, not in the Patient Information panel.) Visual tags are displayed in the patient folder header, responsible party record, post transaction window, Smart Scheduler, appointment hover, and optionally on your Patient Tracker and Scheduler appointments.See "Visual Tags" for details.
Status and Treatment Phase![]() - Edge Cloud uses the patient status and treatment phase to delineate contracts, track patient progress, monitor certain practice goals, and trigger treatment and appointment events. Both the status and treatment fields appear on the patient information panel just underneath the patient name for easy recognition. In addition, the status is included in the patient folder header and the patient folder window tab. You enter details about the patient's treatment findings, as well as the start origin, on the Findings page of the patient folder. When you update a patient's treatment phase from the Patient Information Panel, you have the opportunity to copy the previous findings, as well as the findings notes, start origin, start date, expected appliance removal date, and actual appliance removal date, to the new treatment phase on the Findings page of the patient folder. If you choose to do this, you will not be prompted to apply a treatment sequence to the new phase. (See "Prompt for Treatment Sequence When Saving Findings Data" for details.)
- Edge Cloud uses the patient status and treatment phase to delineate contracts, track patient progress, monitor certain practice goals, and trigger treatment and appointment events. Both the status and treatment fields appear on the patient information panel just underneath the patient name for easy recognition. In addition, the status is included in the patient folder header and the patient folder window tab. You enter details about the patient's treatment findings, as well as the start origin, on the Findings page of the patient folder. When you update a patient's treatment phase from the Patient Information Panel, you have the opportunity to copy the previous findings, as well as the findings notes, start origin, start date, expected appliance removal date, and actual appliance removal date, to the new treatment phase on the Findings page of the patient folder. If you choose to do this, you will not be prompted to apply a treatment sequence to the new phase. (See "Prompt for Treatment Sequence When Saving Findings Data" for details.)
Age / Birthday![]() - Both the patient's current age in years and months, as well as the birthday (DOB) appear on the patient information panel. Note that the patient's birthday is highlighted when the date is within two weeks of today's date.
- Both the patient's current age in years and months, as well as the birthday (DOB) appear on the patient information panel. Note that the patient's birthday is highlighted when the date is within two weeks of today's date.
Clinical Gender / Gender Identity![]() - As you create a patient folder or edit the Patient Information Panel, you can assign both the patient's clinical gender and gender identity preference. You use the Gender Identity editor to maintain the list of gender pronouns and associated icons needed for your practice. The abbreviations "CG" (clinical gender) and "GI" (gender identity) appear on the Patient Information panel of the patient folder. You can optionally use your Visual User Options to show / hide the gender identity icon in the patient folder header. In addition, the gender identity icon appears with sibling names in the Family panel of the patient's Home page.
- As you create a patient folder or edit the Patient Information Panel, you can assign both the patient's clinical gender and gender identity preference. You use the Gender Identity editor to maintain the list of gender pronouns and associated icons needed for your practice. The abbreviations "CG" (clinical gender) and "GI" (gender identity) appear on the Patient Information panel of the patient folder. You can optionally use your Visual User Options to show / hide the gender identity icon in the patient folder header. In addition, the gender identity icon appears with sibling names in the Family panel of the patient's Home page.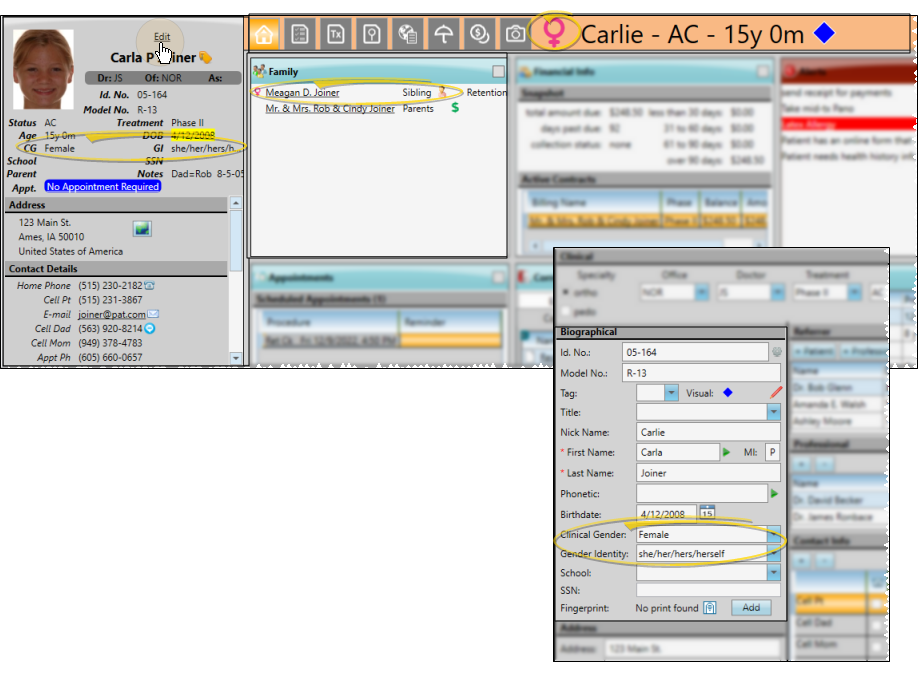
School![]() - You can track the patient's school, selected from the list in your School editor.
- You can track the patient's school, selected from the list in your School editor.
SSN![]() - If you entered the patient's social security number, only the last 4 digits appear here for security purposes.
- If you entered the patient's social security number, only the last 4 digits appear here for security purposes.
User-Defined Fields![]() - Each patient folder and responsible party record can contain two user defined fields that you can use for any purpose. Hyperlinks are supported: You can put Internet web site addresses or email addresses into these fields, then double-click the field to follow the hyperlink. See "User Defined Fields Editor" for details.
- Each patient folder and responsible party record can contain two user defined fields that you can use for any purpose. Hyperlinks are supported: You can put Internet web site addresses or email addresses into these fields, then double-click the field to follow the hyperlink. See "User Defined Fields Editor" for details.
You can view and edit limited appointment information from the Patient Information Panel, as well as print or email an appointment card.
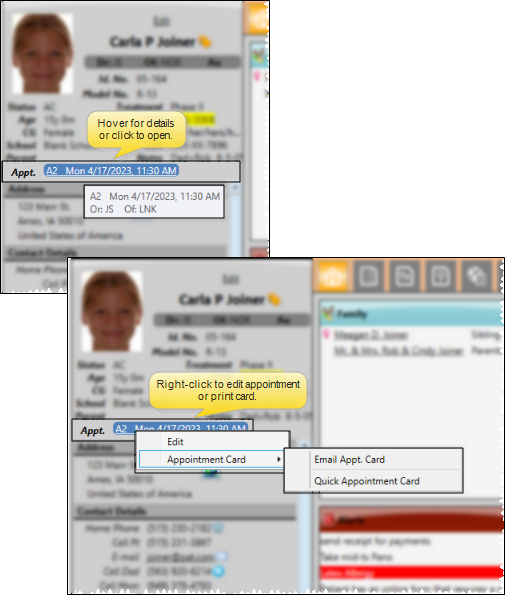
View Details![]() - Hover over the patient's next appointment to see further details.
- Hover over the patient's next appointment to see further details.
Open / Edit the Appointment![]() - You can click an appointment link to open that date in your Scheduler, or right click to edit the appointment details, and
- You can click an appointment link to open that date in your Scheduler, or right click to edit the appointment details, and
If you have multiple Scheduler tabs open, clicking a patient appointment link will bring the left-most tab to the front of your Edge Cloud window. Note that before you click the link, you can reorder your tabs by simply dragging them into place, thus selecting which Scheduler tab you want to work with. See "Scheduler User Options" for details about enabling/disabling the multiple Scheduler option.
Print an Appointment Card![]() - Right-click an appointment in the patient's Patient Information Panel, or in your Scheduler, or activate a patient in your Scheduler and select to generate an Appointment Card. When you select the email option, you can then choose to send the message to any email address associated with the patient. See "Form Email Setup Editor" for details.
- Right-click an appointment in the patient's Patient Information Panel, or in your Scheduler, or activate a patient in your Scheduler and select to generate an Appointment Card. When you select the email option, you can then choose to send the message to any email address associated with the patient. See "Form Email Setup Editor" for details.
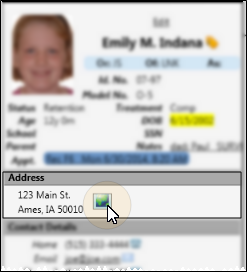
This section of the patient information panel displays the patient's home address.
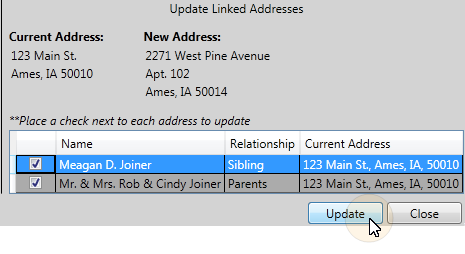
Update Linked Addresses![]() - When you edit the address or contact details for a patient or responsible party, you have the opportunity to change linked records to match. In some cases, you must refresh the record before the update records dialog appears.Click for details..
- When you edit the address or contact details for a patient or responsible party, you have the opportunity to change linked records to match. In some cases, you must refresh the record before the update records dialog appears.Click for details..
When someone has both a patient folder and a responsible party record, certain fields, such as the social security number, are not synced between records. However, when the relationship field in the Family panel of the patient's Home page is flagged as "Self", the phone number and address of both records are automatically synced whenever a change is made.
When you edit the address or contact details for a patient or responsible party, you have the opportunity to change linked records to match. In some cases, you must refresh the record before the update records dialog appears.
Example address change update dialog.
Example phone number / email change update dialog.
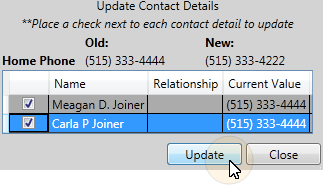
Select records to update - Click the box beside individual records to update.
View Map![]() - While viewing the record, you can click the
- While viewing the record, you can click the  Map icon beside the address to open a map of the street address. (An active Internet connection is required for this feature to work.)
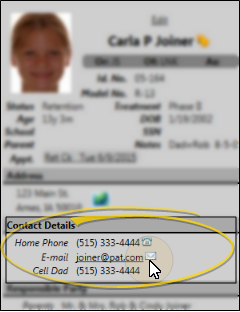
This section of the patient information panel displays the phone numbers and email addresses you have listed for the patient, not necessarily the responsible party. If an icon appears beside a contact detail, that detail has been flagged to receive Edge Reminders messages: You can hover over an icon to review more information. In addition, you can click an email address to send a Quick Message to the patient. (See "Contact Categories Editor" for details about creating / editing your contact category names.)
You can enable / disable Edge Reminders contact flags for any subgroup of patients with the Assign Edge Reminders Defaults tool. You might use this, for example, to enable the Text Message flag for the Patient Cell contact type of all "Active" patients when you first start sending appointment reminder text messages. See " Apply Edge Reminders Contact Flags to a Subgroup" for details.
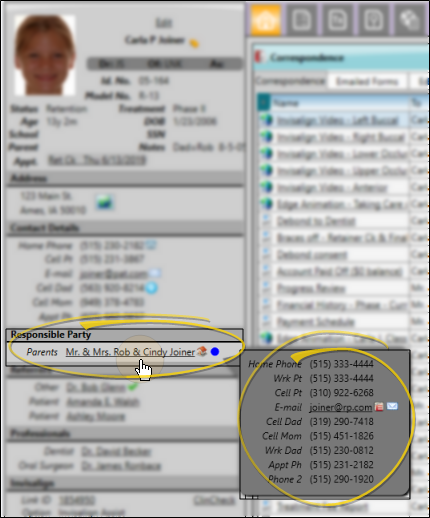
This section lists the responsible parties associated with this patient. The  Guardian icon appears beside a name when the patient's address exactly matches the responsible party's address, indicating that the patient lives with that party. If this person's record has a visual tag applied, the appropriate color/shape appears beside the name. You can hover over the underlined name to view contact details, then click the email address in the popup to send a Quick Message, or click the name to open that record.
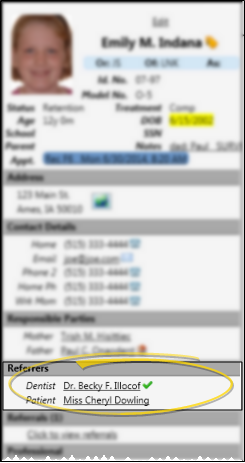
This section lists the parties that referred the patient to your practice. The  Primary icon indicates which referrer has been flagged as the primary referrer. You can hover over the underlined name to view contact details, then click the email address in the popup to send a Quick Message, or click the name to open that record.
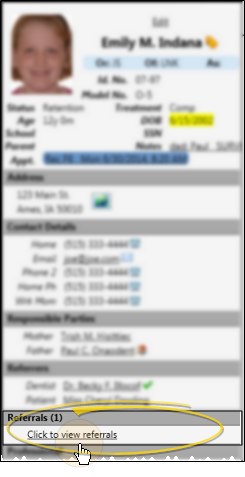
This section lists the number of patients this patient has referred to your practice. You can click the link to launch the Referrals by Patient report for this patient, which details the referred patients, along with their current status and treatment fee amount. If the patient has not referred any other patients to your practice, this section does not appear in the Patient Information Panel.
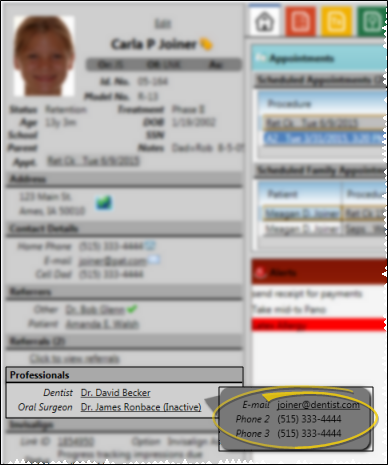
This section lists the patient's dentist and other professionals. You can hover over the underlined name to view contact details, then click the email address in the popup to send a Quick Message, or click the name to open that record. In addition, you see a notice beside the name when the professional's record has been flagged inactive in your Professional editor.
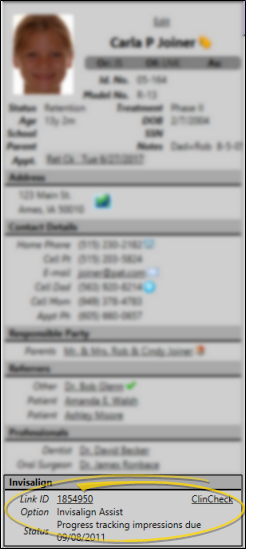
This section details the patient's current Invisalign status. You can click the Link ID to launch the Invisalign web site with the patient's record open for your review, or click the ClinCheck link to open that Invisalign page. (This requires you to allow all popups for the site.) If you do not use the optional Invisalign integration, or if this patient is not linked to an Invisalign account, this section does not appear on the Patient Information Panel. See "Edge Cloud / Invisalign Integration" for details.
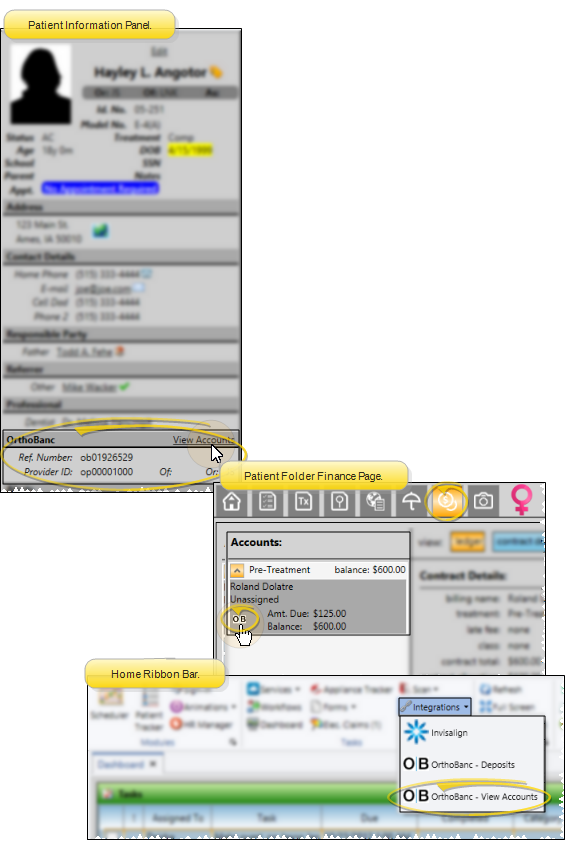
The OrthoBanc section of the Patient Information Panel displays the patient's linked OrthoBanc reference number. You can click the View Accounts link to manage the patient's Edge Cloud / OrthoBanc account. If the Patient Information Panel does not include an OrthoBanc section, the patient is not linked to an OrthoBanc record. See "OrthoBanc Integration" for details.
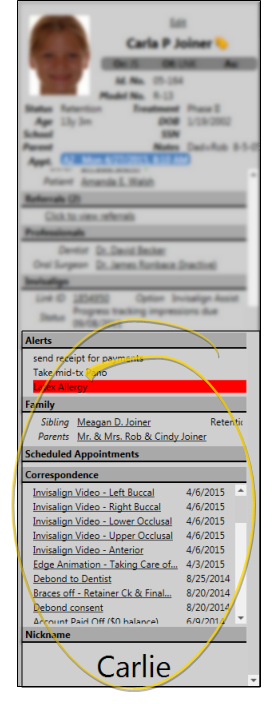
Use patient folder widgets to keep the patient information you need to see most often on your patient information panel. Your patient folder widget options include patient alerts, family relationships, appointments, patient milestones, correspondence history items, and a prominent patient nickname, among other useful tools. See "Patient Folder Widgets" for details.
![]() Edit the Patient Information Panel
Edit the Patient Information Panel
![]() Open / Close the Editing Window
Open / Close the Editing Window
Click Edit at the top of the panel to make changes to the Patient Information panel. See "Create a New Patient Folder " for details about each field. If you make changes, be sure to click  Save on the Quick Access toolbar (or press Ctrl+S on your keyboard) to save the changes. Or, click Cancel to ignore them.
To set the current Treatment section responses as the default for new patients, click the Set as Default link. You can set default responses
When someone has both a patient folder and a responsible party record, certain fields, such as the social security number, are not synced between records. However, when the relationship field in the Family panel of the patient's Home page is flagged as "Self", the phone number and address of both records are automatically synced whenever a change is made.
![]() Assign / Remove Patient Specialties
Assign / Remove Patient Specialties
Once you have assigned a specialty to a patient, you can only remove it if no activity has occurred that is related to that specialty, including adding tooth conditions, dental procedures, or financial details.
![]() Automate Status Changes with Workflows
Automate Status Changes with Workflows
Use the Change Status workflow activity to update a patient's status. The workflow can optionally select a specific status, or you can choose the status when the workflow is triggered. See "Workflow Activities" for details.