Workflow Activities
The actions you want a workflow to take when it is triggered are called "Activities". The activity properties specify how you want the activity to function when the workflow is run. Most activity properties can be set up when you first add the activity to a workflow via the Wizard. You can also edit activity properties from the Activity Properties section of the Workflow editor window. The properties available depend on the type of activity you are working with. While you can change many of the properties as needed, certain properties that are required for the activity to function are set up by your Edge Cloud system, and cannot be changed by you.
Use the Change Status workflow activity to update a patient's status. The workflow can optionally select a specific status, or you can choose the status when the workflow is triggered.
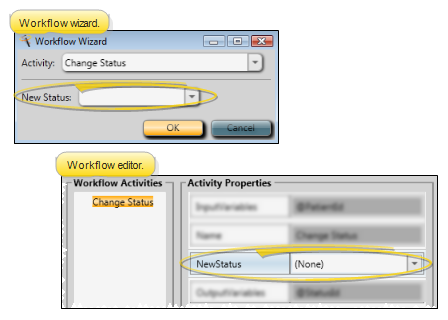
New Status![]() - Use this property to select the status you wish to apply to the patient when this activity is triggered by a workflow. If you select None, you will be prompted for the status.
- Use this property to select the status you wish to apply to the patient when this activity is triggered by a workflow. If you select None, you will be prompted for the status.
What Happens?![]() - If you select a specific status in the activity properties, the status change happens automatically whenever the activity is triggered by a workflow. If you set the property to None, the Workflow Manager window will prompt you for the status as the activity is being processed.
- If you select a specific status in the activity properties, the status change happens automatically whenever the activity is triggered by a workflow. If you set the property to None, the Workflow Manager window will prompt you for the status as the activity is being processed.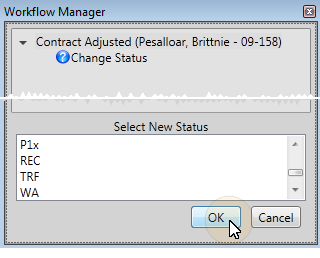
More About this Activity![]() - See "Patient Information Panel" for details about viewing and editing patient statuses.
- See "Patient Information Panel" for details about viewing and editing patient statuses.
Use the Create Tx. Chart Entry workflow activity to open the Treatment
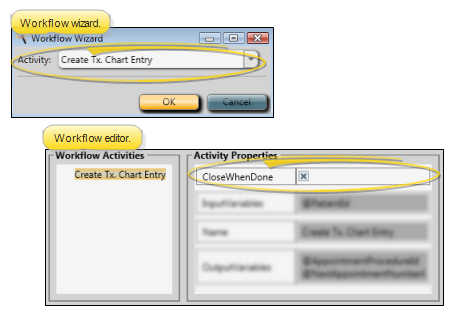
Close When Done![]() - (Available only from the Workflow editor.) Enable this option if you want Edge Cloud to close the patient folder once you have created and saved the treatment chart entry that was initiated by the workflow. Otherwise, the patient folder will remain open even after you finish the record.
- (Available only from the Workflow editor.) Enable this option if you want Edge Cloud to close the patient folder once you have created and saved the treatment chart entry that was initiated by the workflow. Otherwise, the patient folder will remain open even after you finish the record.
What Happens?![]() - When this activity is triggered by a workflow, the Treatment
- When this activity is triggered by a workflow, the Treatment
More About this Activity![]() - See "Treatment Chart Records" for details about entering treatment chart data into patient folders.
- See "Treatment Chart Records" for details about entering treatment chart data into patient folders.
Use the Make an Appointment workflow activity to open the Smart Scheduler or Recall Appointment window for the patient when the workflow is triggered.
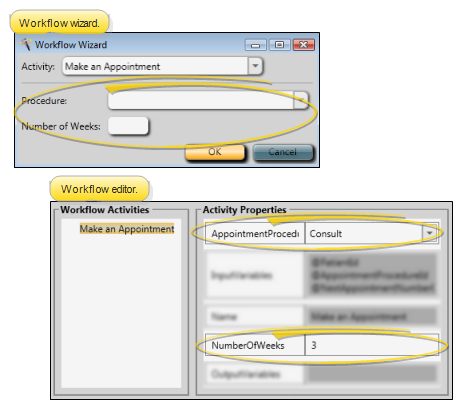
Procedure![]() - Use this property to select the default appointment procedure to use. If you select a regular appointment procedure, the workflow will open theSmart Scheduler; if you select a recall appointment procedure, the workflow will open the Recall Appointment window.
- Use this property to select the default appointment procedure to use. If you select a regular appointment procedure, the workflow will open theSmart Scheduler; if you select a recall appointment procedure, the workflow will open the Recall Appointment window.
When setting up this activity with a wizard, you must select a specific procedure. However, if you edit the appointment procedure property from the Workflow editor, you can set the procedure to None. The workflow will then open the Smart Scheduler to the patient's most recently scheduled procedure.
Number of Weeks![]() - Use this property to select the default number of weeks from today to start searching for appointments. If you set the property to 0, the Smart Scheduler will default to searching for appointments beginning with today's date.
- Use this property to select the default number of weeks from today to start searching for appointments. If you set the property to 0, the Smart Scheduler will default to searching for appointments beginning with today's date.
What Happens?![]() - When this activity is triggered by a workflow, the Smart Scheduler or Recall Appointment scheduler will open for the patient, with your default procedure and number of weeks selected. You can then continue to appoint the patient as needed.
- When this activity is triggered by a workflow, the Smart Scheduler or Recall Appointment scheduler will open for the patient, with your default procedure and number of weeks selected. You can then continue to appoint the patient as needed.
More About this Activity![]() - See "Smart Scheduler" for details about searching for appointment openings. See "Recall Appointments" for details about recall appointments.
- See "Smart Scheduler" for details about searching for appointment openings. See "Recall Appointments" for details about recall appointments.
Use the Make Notepad Entry workflow activity to prompt you for text to add to the patient's notepad.
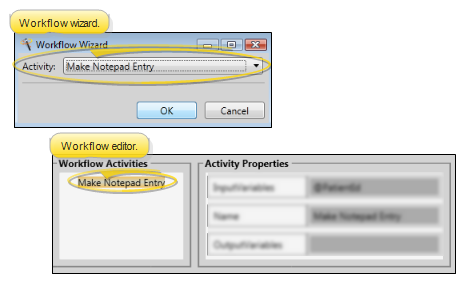
No Properties![]() - This activity does not have any user-defined properties.
- This activity does not have any user-defined properties.
What Happens?![]() - When this activity is triggered, the Workflow Manager window will prompt you for the category to use, and provide a space for you to type the text of the notepad entry. When you are finished, click Ok to process the activity as complete.
- When this activity is triggered, the Workflow Manager window will prompt you for the category to use, and provide a space for you to type the text of the notepad entry. When you are finished, click Ok to process the activity as complete.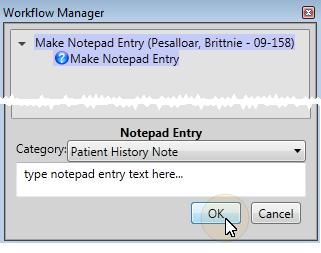
More About this Activity![]() - See "Patient Notepad" for details about entering notepad text into patient folders.
- See "Patient Notepad" for details about entering notepad text into patient folders.
Use the Merge Letter workflow activity to generate a specific merge document for the patient.
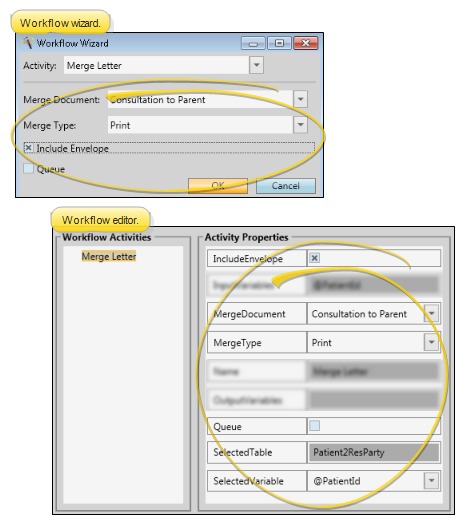
Merge Document![]() - Use this property to select the document to generate for the patient. If you set this property to None in the Workflow editor, the activity will not be triggered.
- Use this property to select the document to generate for the patient. If you set this property to None in the Workflow editor, the activity will not be triggered.
Merge Type![]() - Use this property to select whether the document will be printed, viewed or emailed to the recipient.
- Use this property to select whether the document will be printed, viewed or emailed to the recipient.
Include Envelope![]() - Use this property to select whether or not to generate an envelope when this document is merged for a patient. The document must have an envelope assigned to it in your Mail Merge Documents editor for this option to work properly.
- Use this property to select whether or not to generate an envelope when this document is merged for a patient. The document must have an envelope assigned to it in your Mail Merge Documents editor for this option to work properly.
Queue![]() - Use this property to send the document to your mail merge queue, rather than generating it as soon as the workflow is triggered.
- Use this property to send the document to your mail merge queue, rather than generating it as soon as the workflow is triggered.
Selected Variable![]() - (Available only from the Workflow editor.) - In most cases, you do not need to edit this property: It is used to identify the type of data needed for the merge letter. Generally, the Selected Variable property corresponds with the Selected Table field. (The Selected Table field corresponds to the Selection Type field in your Merge Document editor, and cannot be changed in the Workflow editor.) In most cases, you do not need to change the default Selected Variable. However, if your document is not merging properly from the workflow, you may need to change the default Selected Variable.
- (Available only from the Workflow editor.) - In most cases, you do not need to edit this property: It is used to identify the type of data needed for the merge letter. Generally, the Selected Variable property corresponds with the Selected Table field. (The Selected Table field corresponds to the Selection Type field in your Merge Document editor, and cannot be changed in the Workflow editor.) In most cases, you do not need to change the default Selected Variable. However, if your document is not merging properly from the workflow, you may need to change the default Selected Variable.
What Happens?![]() - When this activity is triggered, the selected document will be merged for the patient. If you enabled the Queue option, the document will be placed in your mail merge queue. Otherwise, the merge will take place without any input from you.
- When this activity is triggered, the selected document will be merged for the patient. If you enabled the Queue option, the document will be placed in your mail merge queue. Otherwise, the merge will take place without any input from you.
More About this Activity![]() - See "Send Mail Merge Documents" for details about merging documents for your patients.
- See "Send Mail Merge Documents" for details about merging documents for your patients.
Use the Message Box workflow activity to pop a specific message onto your screen.
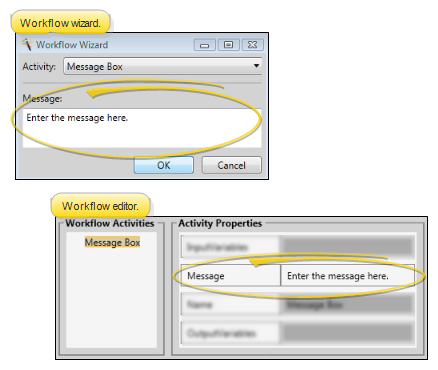
Message![]() - Use this property to type the message you want to pop onto the screen whenever this activity is triggered.
- Use this property to type the message you want to pop onto the screen whenever this activity is triggered.
What Happens?![]() - When this activity is triggered by a workflow, your message will pop onto your screen. Click Ok to remove the message box. You cannot change the message once it has been triggered.
- When this activity is triggered by a workflow, your message will pop onto your screen. Click Ok to remove the message box. You cannot change the message once it has been triggered.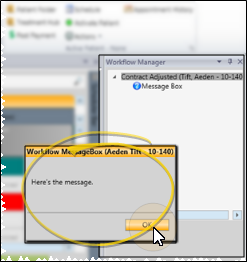
Use the New Patient workflow activity to initiate creating a new patient folder.
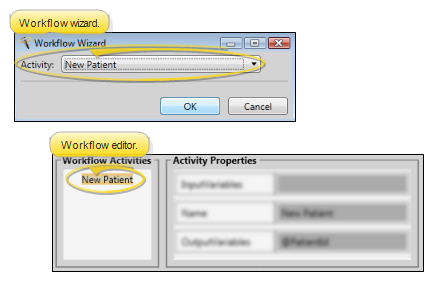
No Properties![]() - This activity does not have any user-defined properties.
- This activity does not have any user-defined properties.
What Happens?![]() - When this activity is triggered, the New Patient dialog will open, prompting you to create a new patient folder.
- When this activity is triggered, the New Patient dialog will open, prompting you to create a new patient folder.
More About this Activity![]() - See "Create a New Patient Folder " for details about entering data into new patient folders.
- See "Create a New Patient Folder " for details about entering data into new patient folders.
Use the New Stack Entry workflow activity to add an individual patient or a subgroup of patients to a specific stack.
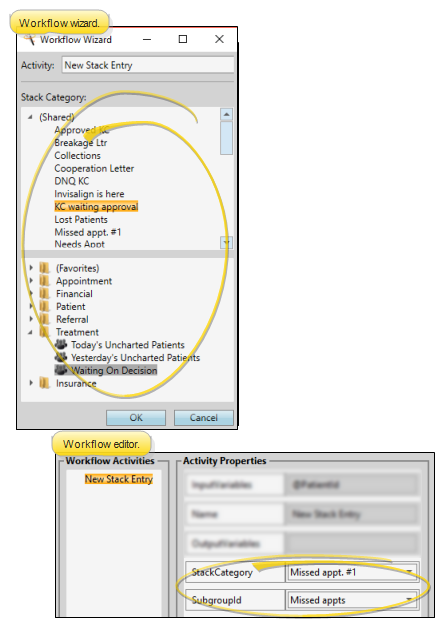
Stack Category![]() - Use this property to select the category to use when adding a patient or a subgroup of patients to stacks via this workflow activity. When you use a wizard to add this activity to a workflow, your entire stacks widget appears in the window, with full functionality. When you add this activity via the Workflow editor, category names appear for your selection, but no stacks functionality is available. If you select None as the category from the Workflow editor, this activity will not function when the workflow is triggered.
- Use this property to select the category to use when adding a patient or a subgroup of patients to stacks via this workflow activity. When you use a wizard to add this activity to a workflow, your entire stacks widget appears in the window, with full functionality. When you add this activity via the Workflow editor, category names appear for your selection, but no stacks functionality is available. If you select None as the category from the Workflow editor, this activity will not function when the workflow is triggered.
Subgroup ID![]() - (Optional.) You can use this property to select a subgroup to use to add multiple patients to a stack via this workflow activity. If you leave this property blank, only the current patient will be added to the stack.(See "Subgroup Editor" for details about creating subgroups.)
- (Optional.) You can use this property to select a subgroup to use to add multiple patients to a stack via this workflow activity. If you leave this property blank, only the current patient will be added to the stack.(See "Subgroup Editor" for details about creating subgroups.)
What Happens?![]() - When this activity is triggered, the patient, or the patients that fit the selected subgroup, will be added to the selected stacks category automatically, without any input from you.
- When this activity is triggered, the patient, or the patients that fit the selected subgroup, will be added to the selected stacks category automatically, without any input from you.
More About this Activity![]() - See "Stacks Widget" for details about using stacks.
- See "Stacks Widget" for details about using stacks.
Use the New Task workflow activity to automatically add a new entry to your task widget. A link to the patient folder will be included with the task description.
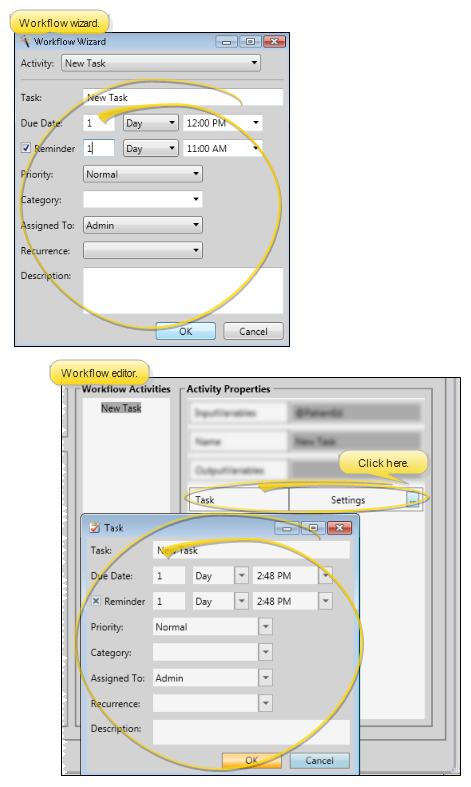
Properties![]() - Enter the details for the task just as you would enter them into the Task widget. See "Tasks Widget" for details.
- Enter the details for the task just as you would enter them into the Task widget. See "Tasks Widget" for details.
What Happens?![]() - When this activity is triggered, the task will be created and added to your Task widget automatically, without any input from you.
- When this activity is triggered, the task will be created and added to your Task widget automatically, without any input from you.
Use the Open Patient workflow activity to open the patient folder whenever the activity is triggered by a workflow. Use the Workflow editor to select the tab you want to open when this activity is triggered.
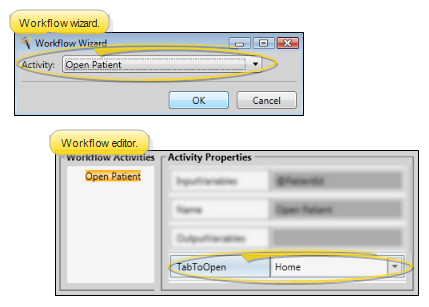
Tab to Open![]() - (Available only from the Workflow editor.) Use this property to select the patient folder page you want to open when this activity is triggered.
- (Available only from the Workflow editor.) Use this property to select the patient folder page you want to open when this activity is triggered.
What Happens?![]() - When this activity is triggered, the patient folder will be opened to your default first page, unless you have specified a different page to open form the Workflow editor.
- When this activity is triggered, the patient folder will be opened to your default first page, unless you have specified a different page to open form the Workflow editor.
More About this Activity![]() - See "Open a Patient Folder" for details about additional ways to open a patient folder.
- See "Open a Patient Folder" for details about additional ways to open a patient folder.
Use the Post Misc. Charge workflow activity to initiate posting a specific miscellaneous charge for the patient.

Misc Charge![]() - Use this property to select the miscellaneous charge you want to post when this activity is triggered by a workflow. You must select a description from your Miscellaneous Charges editor.
- Use this property to select the miscellaneous charge you want to post when this activity is triggered by a workflow. You must select a description from your Miscellaneous Charges editor.
What Happens?![]() - When this activity is triggered, the Post Transaction dialog will open for the patient, prompting you to post the miscellaneous charge. At that time, you can make changes to the default charge details. Once you post the transaction and close the Post Transaction dialog, the activity is processed as completed.
- When this activity is triggered, the Post Transaction dialog will open for the patient, prompting you to post the miscellaneous charge. At that time, you can make changes to the default charge details. Once you post the transaction and close the Post Transaction dialog, the activity is processed as completed.
More About this Activity![]() - See "Post Miscellaneous Charges" for details about posting charges.
- See "Post Miscellaneous Charges" for details about posting charges.
Use the Process Appointment workflow activity to process the patient's appointment as Made, Kept, Missed, Deleted, Changed, Canceled, or send the appointment to Scheduler bar.

Process As![]() - Use this property to select how you want the appointment flagged when this activity is triggered by a workflow. You may select the process the appointment as Made, Kept, Missed, Deleted, Changed, or Canceled; or, choose to send the patient to the Scheduler Bar, or choose All to process all of the patient's pending appointments.
- Use this property to select how you want the appointment flagged when this activity is triggered by a workflow. You may select the process the appointment as Made, Kept, Missed, Deleted, Changed, or Canceled; or, choose to send the patient to the Scheduler Bar, or choose All to process all of the patient's pending appointments.
What Happens?![]() - When this activity is triggered, the appointment is processed as you have selected. Appointments processed as Made, Kept, Missed, Deleted, Changed, or Canceled are added to the patient's appointment history. Appointments processed to the Scheduler bar are moved to the Patients Without Appointments list, without making any notation in the appointment history.
- When this activity is triggered, the appointment is processed as you have selected. Appointments processed as Made, Kept, Missed, Deleted, Changed, or Canceled are added to the patient's appointment history. Appointments processed to the Scheduler bar are moved to the Patients Without Appointments list, without making any notation in the appointment history.
More About this Activity![]() - See "Process Appointments" for details about each processing status.
- See "Process Appointments" for details about each processing status.
Use the Remove Stack Entry workflow activity to remove an individual patient or a subgroup of patients from a specific stack.
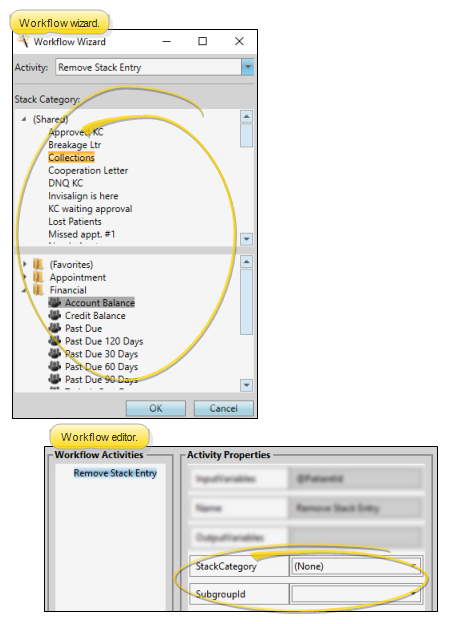
Stack Category![]() - Use this property to select the category to use when removing a patient or a subgroup of patients from a stack via this workflow activity. When you use a wizard to add this activity to a workflow, your entire stacks widget appears in the window, with full functionality. When you add this activity via the Workflow editor, category names appear for your selection, but no stacks functionality is available. If you select None as the category from the Workflow editor, you will be able to select the category to remove the patient from when the workflow is triggered.
- Use this property to select the category to use when removing a patient or a subgroup of patients from a stack via this workflow activity. When you use a wizard to add this activity to a workflow, your entire stacks widget appears in the window, with full functionality. When you add this activity via the Workflow editor, category names appear for your selection, but no stacks functionality is available. If you select None as the category from the Workflow editor, you will be able to select the category to remove the patient from when the workflow is triggered.
Subgroup ID![]() - (Optional.) You can wse this property to select the subgroup to use to remove multiple patients from a stack via this workflow activity. If you do not choose a subgroup, only the current patient will be removed. (See "Subgroup Editor" for details about creating subgroups.)
- (Optional.) You can wse this property to select the subgroup to use to remove multiple patients from a stack via this workflow activity. If you do not choose a subgroup, only the current patient will be removed. (See "Subgroup Editor" for details about creating subgroups.)
What Happens?![]() - If you select a specific stack category in the activity properties, the patient removal happens automatically whenever the activity is triggered by a workflow. If you set the property to None, the Workflow Manager window will prompt you for the stack category as the activity is being processed.
- If you select a specific stack category in the activity properties, the patient removal happens automatically whenever the activity is triggered by a workflow. If you set the property to None, the Workflow Manager window will prompt you for the stack category as the activity is being processed.
More About this Activity![]() - See "Stacks Widget" for details. about using stacks.
- See "Stacks Widget" for details. about using stacks.
Use the Run Report workflow activity to generate a specific report.
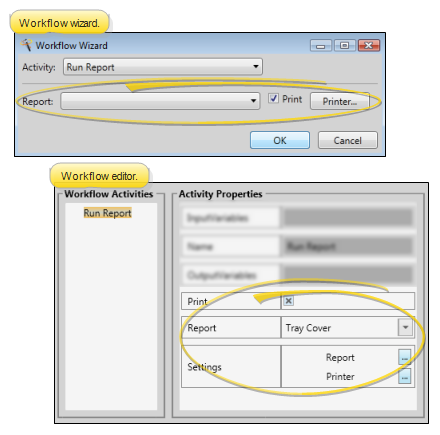
Report / Report Settings![]() - Use the Report property to select the report you want to generate when this activity is triggered by a workflow. If you are using a workflow wizard, once you choose the report the associated options appear for you to set up the way you wish. If you are using the Workflow editor, click the Report button in the Settings property to open the associated options.
- Use the Report property to select the report you want to generate when this activity is triggered by a workflow. If you are using a workflow wizard, once you choose the report the associated options appear for you to set up the way you wish. If you are using the Workflow editor, click the Report button in the Settings property to open the associated options.
Print![]() - Enable the Print property to send the report to the selected printer immediately after it is triggered. If the property is disabled, the report will display on your screen.
- Enable the Print property to send the report to the selected printer immediately after it is triggered. If the property is disabled, the report will display on your screen.
Printer![]() - If the Print property is enabled, you may select the printer to use when this report is generated via this workflow activity. If you are using a workflow wizard, once you enable the Print option, you can click Printer to choose the printer settings. If you are using the Workflow editor, click the Printer button in the Settings property to select printer settings.
- If the Print property is enabled, you may select the printer to use when this report is generated via this workflow activity. If you are using a workflow wizard, once you enable the Print option, you can click Printer to choose the printer settings. If you are using the Workflow editor, click the Printer button in the Settings property to select printer settings.
What Happens?![]() - When this activity is triggered, the selected report will be generated without any input from you. If you have chosen not to print it, the results will appear on your screen.
- When this activity is triggered, the selected report will be generated without any input from you. If you have chosen not to print it, the results will appear on your screen.
More About this Activity![]() - See "Run Edge Cloud Reports" for details about report settings and output options.
- See "Run Edge Cloud Reports" for details about report settings and output options.
Use the Script workflow activity to initiate an executable file outside of Edge Cloud. (Available only from the Workflow editor.)

Script Filename![]() - Click in this field, and navigate to the location of your script file.
- Click in this field, and navigate to the location of your script file.
What Happens?![]() - When this activity is triggered, the selected script file will be launched.
- When this activity is triggered, the selected script file will be launched.
Use the Select Contract workflow activity to open a window that prompts you to select the patient contract to work with.
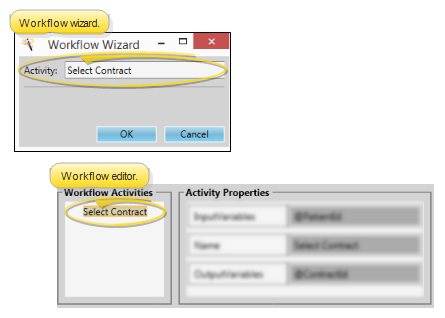
No Properties![]() - This activity does not have any user-defined properties.
- This activity does not have any user-defined properties.
What Happens?![]() - When this activity is triggered, you are prompted to select the contract to work with.
- When this activity is triggered, you are prompted to select the contract to work with.
More About this Activity![]() - See "Patient Finance Page" for details about patient financial contracts.
- See "Patient Finance Page" for details about patient financial contracts.
Use the Send Appliance workflow activity to create a new appliance service record for the patient.
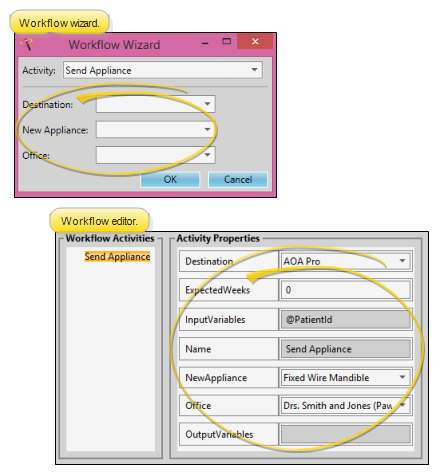
Destination![]() - Identify the location of the lab or office where the appliance is being sent for service or consultation. See See "Appliance and Destination Editor" for details for details about your list.
- Identify the location of the lab or office where the appliance is being sent for service or consultation. See See "Appliance and Destination Editor" for details for details about your list.
Expected Weeks![]() - (Available only from the Workflow editor.) Enter the number of weeks this appliance is generally out for service. If you leave this field at 0, no expected return date will be entered into the patient folder.
- (Available only from the Workflow editor.) Enter the number of weeks this appliance is generally out for service. If you leave this field at 0, no expected return date will be entered into the patient folder.
New Appliance![]() - Choose the type of appliance that is being serviced. See See "Appliance and Destination Editor" for details for details about your list.
- Choose the type of appliance that is being serviced. See See "Appliance and Destination Editor" for details for details about your list.
Office![]() - Select which office location in your practice to associate with this appliance's service. This may or may not be the same office that is normally associated with the patient.
- Select which office location in your practice to associate with this appliance's service. This may or may not be the same office that is normally associated with the patient.
What Happens?![]() - When this activity is triggered, a new appliance service record is added to the Milestones panel of the patient Home page. If you entered an Expected Weeks property in the Workflow editor, the appropriate date is calculated and entered into the record. If you have not entered the number of expected weeks, no expected return date is included.
- When this activity is triggered, a new appliance service record is added to the Milestones panel of the patient Home page. If you entered an Expected Weeks property in the Workflow editor, the appropriate date is calculated and entered into the record. If you have not entered the number of expected weeks, no expected return date is included.
More About this Activity![]() - See "Patient Appliances" for details about patient appliance service records.
- See "Patient Appliances" for details about patient appliance service records.
Use the Send Email workflow activity to open the email dialog for patient. You can optionally provide default subject and body text, or leave these fields blank and fill them in when the workflow is triggered.
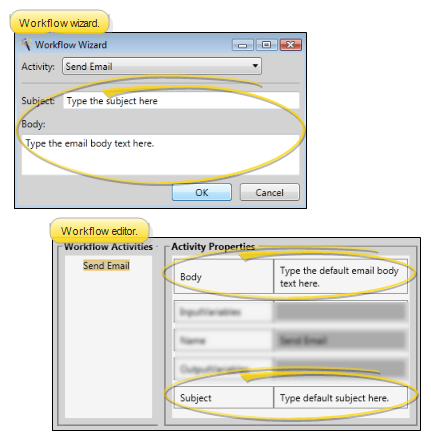
Subject![]() - (Optional.) You can type a default email subject line in this field.
- (Optional.) You can type a default email subject line in this field.
Body![]() - (Optional.) You can type the default email body text in this field.
- (Optional.) You can type the default email body text in this field.
What Happens?![]() - When this activity is triggered, you first select the category to assign to this message. Then, an email dialog will open for the patient, with the default Subject and Body text (if any) inserted. You can edit the text as needed, and add one or more recipient addresses in the To: field of the dialog. Once you click Send, the workflow activity is processed as complete.
- When this activity is triggered, you first select the category to assign to this message. Then, an email dialog will open for the patient, with the default Subject and Body text (if any) inserted. You can edit the text as needed, and add one or more recipient addresses in the To: field of the dialog. Once you click Send, the workflow activity is processed as complete.
More About this Activity![]() - See "Send Quick Email Messages" for details about other ways to send email messages to patients.
- See "Send Quick Email Messages" for details about other ways to send email messages to patients.
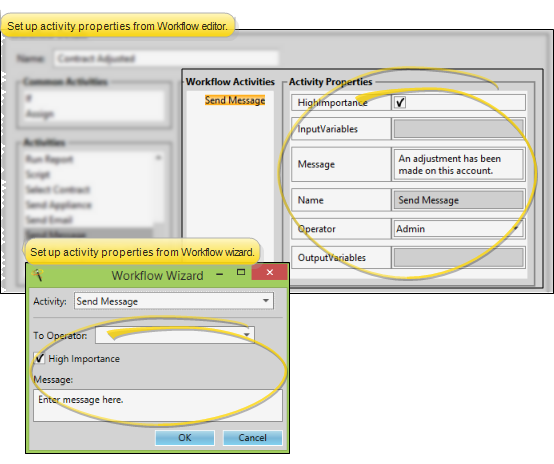
Use the Send Message workflow activity to send an Edge Cloud Messaging message, along with a patient link, to staff members and / or professionals.
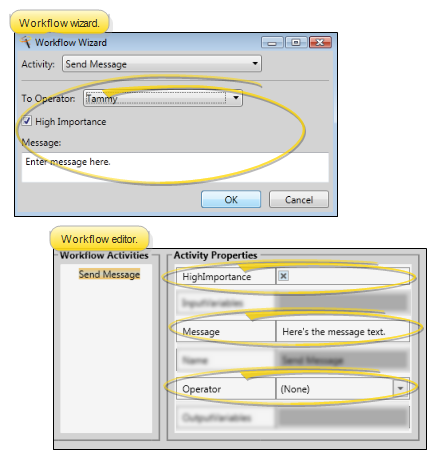
Operator![]() - Select the person you want to receive the message. When you use a wizard, you must select one Edge Cloud operator to receive the message immediately when the activity is triggered. However, you can use the Workflow editor to set this property to None, and be prompted for the Edge Cloud operators and / or professionals that should receive the message when the activity is triggered.
- Select the person you want to receive the message. When you use a wizard, you must select one Edge Cloud operator to receive the message immediately when the activity is triggered. However, you can use the Workflow editor to set this property to None, and be prompted for the Edge Cloud operators and / or professionals that should receive the message when the activity is triggered.
High Importance![]() - Enable this option to flag the message with the
- Enable this option to flag the message with the  High Importance icon.
Message![]() - Type the text of the message. If you have selected to send the message to a specific operator, you cannot change the message text once the activity has been triggered by a workflow. However, if the Operator property is None, you will be able to change the message text at the time you are selecting the recipients.
- Type the text of the message. If you have selected to send the message to a specific operator, you cannot change the message text once the activity has been triggered by a workflow. However, if the Operator property is None, you will be able to change the message text at the time you are selecting the recipients.
What Happens?![]() - When this activity is triggered, it adds a patient link to the top of the message. If you have selected to send the message to a specific operator, the message is sent with no further input from you. However, if the Operator property is None, you will be able to select recipients and edit the message before sending it.
- When this activity is triggered, it adds a patient link to the top of the message. If you have selected to send the message to a specific operator, the message is sent with no further input from you. However, if the Operator property is None, you will be able to select recipients and edit the message before sending it.
More About this Activity![]() - See "Send an Instant Message" for details. about Edge Cloud Messaging.
- See "Send an Instant Message" for details. about Edge Cloud Messaging.
![]() Set Actual Appliance Removal Date
Set Actual Appliance Removal Date
Use the Set Actual Appliance Removal Date workflow activity to enter today's date as the actual appliance removal date for the patient's current treatment.
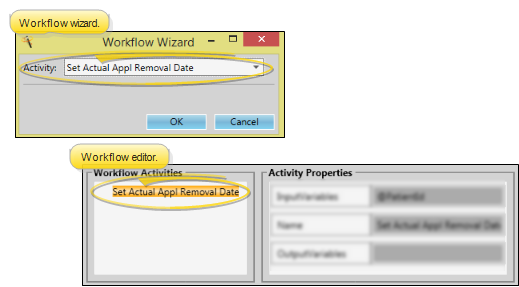
No Properties![]() - This activity does not have any user-defined properties.
- This activity does not have any user-defined properties.
What Happens?![]() - When this activity is triggered, the actual appliance removal date for the patient's current treatment is set to today's date, with no further input from you. You can see this date on the Findings page of the patient folder.
- When this activity is triggered, the actual appliance removal date for the patient's current treatment is set to today's date, with no further input from you. You can see this date on the Findings page of the patient folder.
Use the Set Progress Date workflow activity to enter today's date as the patient's last progress report date, and set the next date based on the progress report cycle.
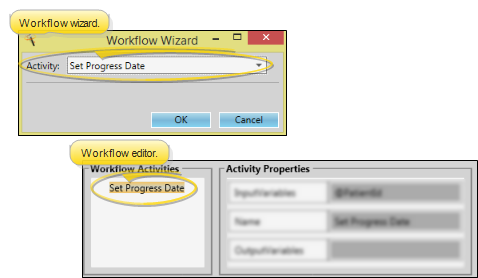
No Properties![]() - This activity does not have any user-defined properties.
- This activity does not have any user-defined properties.
What Happens?![]() - When this activity is triggered, the last progress report date on the Milestones panel of the patient's Home page is set to today's date, and the next progress report date is updated, based on the progress report cycle, with no further input from you.
- When this activity is triggered, the last progress report date on the Milestones panel of the patient's Home page is set to today's date, and the next progress report date is updated, based on the progress report cycle, with no further input from you.
More About this Activity![]() - See "Milestone Reminders" for details about progress and dental reminder cycles.
- See "Milestone Reminders" for details about progress and dental reminder cycles.
Use the Set Start Date workflow activity to enter today's date as the start date for the patient's current treatment.
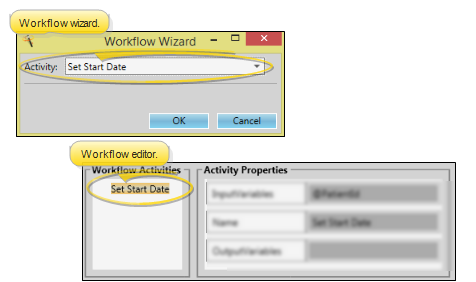
No Properties![]() - This activity does not have any user-defined properties.
- This activity does not have any user-defined properties.
What Happens?![]() - When this activity is triggered, the start date for the patient's current treatment is set to today's date, with no further input from you. You can find this date on the Findings page of the patient folder.
- When this activity is triggered, the start date for the patient's current treatment is set to today's date, with no further input from you. You can find this date on the Findings page of the patient folder.