Mail Merge Document Editor
Use the Mail Merge Documents editor to manage the documents you have integrated with your
![]() Open the Mail Merge Documents Editor
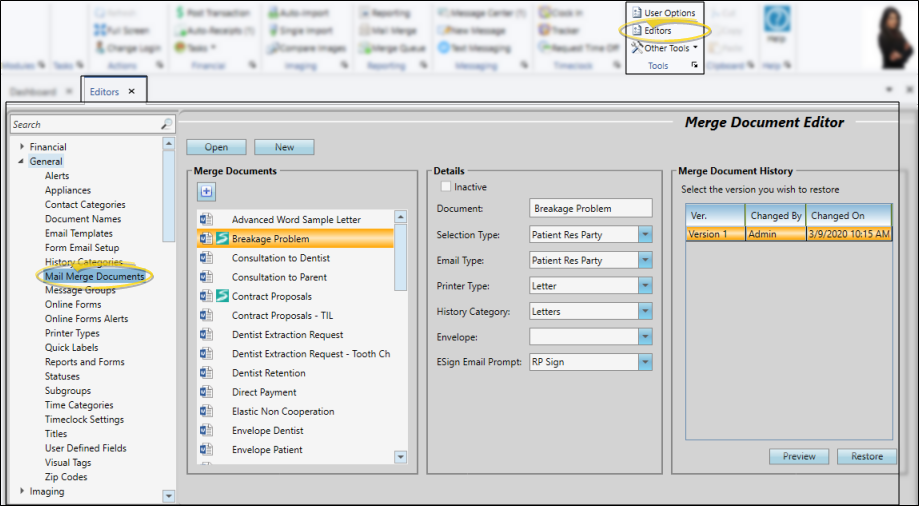
Open the Mail Merge Documents Editor
Select Editors from the Tools section of the Home ribbon bar. Then, from the General section, open the Mail Merge Documents editor. (You can also use the Search field to look for the editor you want to work with.)
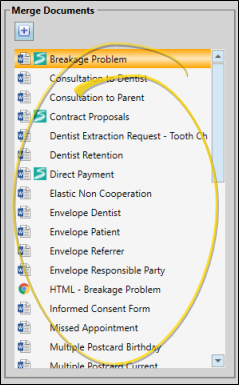
The Merge Documents section of the window shows the names of your existing merge documents alphabetically. You can toggle the  Show/Hide Inactive icon at the top of the window to include / hide inactive documents. The icon beside the name indicates whether it was created with
  Microsoft Word or the
  HTML editor. An
  Edge Signature icon appears beside documents that include Edge Signature variables.
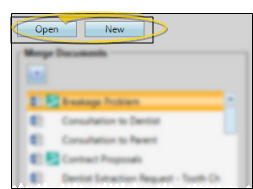
Edit a Document - To edit the text of an existing document, click the document name in the Merge Documents list, then click Open at the top of the window. Your word processor or HTML editor is launched, with the document opened and your Edge Cloud mail merge integration enabled.
Create a New Document - To create a mail merge document from scratch, click New at the top of the window, then choose whether to use Microsoft Word or our HTML editor to create the document, and enter a name for your document. Your editor is launched, with the Edge Cloud mail merge integration enabled.
Use Word Processing Mail Merge Tools - You can edit the text of your mail merge letters, and use mail merge tools to help personalize the documents even further. When you save the document and exit your word processor, you return to the
Use HTML Merge tools - You can edit the text of your HTML-based mail merge documents, and use merge tools to help personalize the documents even further. When you save the document and exit the editor you return to the
The Details section of the window shows the settings for the selected document.
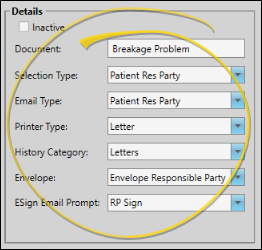
Inactive / Active Toggle - Once you create a record, you cannot delete it. You can, however, flag it Inactive. Records you flag as Inactive are not available for general use, but they remain in your system for reporting and other data collection needs. In addition, you can toggle records back to Active whenever needed.
Document - You can click in this column to change the name of a document if needed. When this document is emailed to a patient, parent, or professional, the document name will be the email's subject.
![]() Selection Type - The Selection Type property determines the nature of the data to be
merged with your letter. This property works with the Email To property to determine which correspondence history (or histories) will receive a copy of the generated merge document. Certain types of documents require certain selection type settings. For example, contract proposal letters must be set to the Patient Responsible Party selection type, and online form letters must be set to the Online Form selection type. Please contact Ortho2 if you have any doubts about which selection type you should use.
Selection Type - The Selection Type property determines the nature of the data to be
merged with your letter. This property works with the Email To property to determine which correspondence history (or histories) will receive a copy of the generated merge document. Certain types of documents require certain selection type settings. For example, contract proposal letters must be set to the Patient Responsible Party selection type, and online form letters must be set to the Online Form selection type. Please contact Ortho2 if you have any doubts about which selection type you should use.
![]() Appointment - Select this type to merge appointment details from a patient’s appointment history into a letter. When you generate this type of document for an individual patient that has multiple appointments scheduled, you must select the appointment date you want to work with.
Appointment - Select this type to merge appointment details from a patient’s appointment history into a letter. When you generate this type of document for an individual patient that has multiple appointments scheduled, you must select the appointment date you want to work with.
Documents with this selection type use Appointment merge variables, such as Appointment Date Time, Appointment Next Date, and Appointment Next Procedure.
The Missed Appointment letter that comes with your Edge Cloud system is an example of an Appointment selection type document.
Mail merge saves a copy of Appointment type letters in the patient's correspondence history.
![]() Contract - Select this type to merge financial details for a patient's contract into a letter. When you generate this type of document for an individual patient that has multiple contracts, you must select the contract you want to work with. (To merge contract proposal details, use the Patient Responsible Party type instead.)
Contract - Select this type to merge financial details for a patient's contract into a letter. When you generate this type of document for an individual patient that has multiple contracts, you must select the contract you want to work with. (To merge contract proposal details, use the Patient Responsible Party type instead.)
Documents with this selection type use Contract merge fields, such as Contract Balance, Contract Total, Initial Fee, Contract First Period Date.
The Past Due Contracts and Truth In Lending documents that come with your Edge Cloud system are examples of Contract selection type letters.
Documents with this selection type can be the message text for certain financial forms that you email for your patients. See "Reports and Forms Editor" for details.
Mail merge saves a copy of Contract type letters in the patient's correspondence history. When you expand the correspondence history, the To column indicates the responsible party name.
Employer - Select this type to merge details from an Employer record into a letter. You might use the Employer selection type, for example, to generate open house notices or to send holiday cards.
Family - Select this type for letters that you want to send to each patient member of a family. Mail merge saves a copy of Family type letters in each patient's respective correspondence history.
![]() Insurance - Select this type to merge details from an Insurance Company record.
Insurance - Select this type to merge details from an Insurance Company record.
Documents with this selection type use Insurance merge fields, such as the insurance company name and address details.
You might use the Insurance selection type, for example, to create a mailing that you send to all, or a subgroup of, insurance companies that you work with.
Mail merge saves a copy of Insurance type letters in the insurance company's correspondence history.
![]() Insurance Detail - Select this type to merge data from a patient's Insurance Detail page.
Insurance Detail - Select this type to merge data from a patient's Insurance Detail page.
Documents with this selection type use Insurance Detail merge fields, such as the subscriber-specific insurance detail fields from a patient record.
Documents with this selection type can be the message text for certain insurance forms that you email for your patients. See "Reports and Forms Editor" for details.
You might also use the Insurance Detail selection type, for example, to create a document containing insurance details that you submit on behalf of a patient.
Mail merge saves a copy of Insurance Detail type letters in the patient's correspondence history.
Office Contacts - Select this type to merge details from an Office Contacts record into a letter. You might use the Office Contacts selection type, for example, to generate open house notices or send holiday cards.
![]() Online Form - Select this type to merge data from online forms submitted by patients and/or responsible parties.
Online Form - Select this type to merge data from online forms submitted by patients and/or responsible parties.
Documents with this selection type use Patient and OII Health History merge fields. Letters that use online form data must be set to this selection type for the data to merge correctly.
The OII Health History and custom health history forms that come with your Edge Cloud system are examples of Online Form selection type letters.
Mail merge saves a copy of this type of letter in the patient's correspondence history.
![]() Operator - Select this type to merge data from the Operator editor and your HR Manager employee records.
Operator - Select this type to merge data from the Operator editor and your HR Manager employee records.
Documents with this selection type use Human Resources fields.
You might use the Operator selection type, for example, to create a document containing data from your staff records, such as performance review documentation.
Mail merge saves a copy of this type of letter in the associated employee's HR Manager correspondence history.
If your Security editor does not allow you access to the HR Manager and/or HR Manager Compensation areas of your system, those variables will appear blank in merged Operator documents.
![]() Other Referrer - Select this type to merge details from records in your Other Referrers editor.
Other Referrer - Select this type to merge details from records in your Other Referrers editor.
Documents with this selection type use Other Referrer merge fields, including the referrer name and address details.
You might use the Other Referrer selection type, for example. to generate open house or office event notices, or to send holiday cards.
Mail merge does not save a copy of this type of letter in any correspondence history.
![]() Patient - Select this type to merge data from the patient folder, including letters you send to the patient, responsible party, dentist, referrer, other professional, or insurance company regarding specific patient data.
Patient - Select this type to merge data from the patient folder, including letters you send to the patient, responsible party, dentist, referrer, other professional, or insurance company regarding specific patient data.
Examples of merge fields that are commonly used in Patient type letters include Patient, Responsible Party, Treatment Findings, etc. fields.
You can find many examples of Patient type letters in the documents that come with your Edge Cloud system.
Mail merge saves a copy of Patient type letters in the patient's correspondence history. If the patient has multiple responsible parties, a document will be generated for each party, and saved in the patient's correspondence history separately.
![]() Patient Professional - Select this type to merge professional and patient details into the same letter. When you generate this type of document for an individual patient that has multiple professionals, you must select the professional you want to work with.
Patient Professional - Select this type to merge professional and patient details into the same letter. When you generate this type of document for an individual patient that has multiple professionals, you must select the professional you want to work with.
Documents with this selection type use Patient and Professional merge fields.
You might use the Patient Professional selection type, for example, to generate letters going to professionals on behalf of their patients, such as consultations or extraction requests.
Mail merge saves a copy of this type of letter in both the patient's correspondence history and the professional's correspondence history. When you expand the patient correspondence history, the To column indicates the professional's name, while the To column of the professional correspondence history indicates the patient name.
![]() Patient Responsible Party - Select this type to merge responsible party and patient data into the same letter. When you generate this type of document for an individual patient that has multiple responsible parties, you must select the party you want to work with.
Patient Responsible Party - Select this type to merge responsible party and patient data into the same letter. When you generate this type of document for an individual patient that has multiple responsible parties, you must select the party you want to work with.
Documents with this selection type use Patient and Responsible Party merge fields, and contract proposal fields. (To merge active contract fields, use the Contract type instead.)
You might use the Patient Responsible Party selection type, for example, to generate letters going to responsible parties on behalf of a specific patient, such as consultations, treatment updates, or consent forms.
Mail merge saves a copy of this type of letter in both the patient's correspondence history and the responsible party's correspondence history. When you expand the patient correspondence history, the To column indicates the responsible party name, while the To column of the responsible party correspondence history indicates the patient name.
![]() Patient Res Party Professional - Select this type to merge responsible party data, patient data, and professional data into the same letter. When you generate this type of document for an individual patient that has multiple responsible parties and professionals, you must select the combination of parties you want to work with.
Patient Res Party Professional - Select this type to merge responsible party data, patient data, and professional data into the same letter. When you generate this type of document for an individual patient that has multiple responsible parties and professionals, you must select the combination of parties you want to work with.
Documents with this selection type use Patient and Responsible Party merge fields, and contract proposal fields. (To merge active contract fields, use the Contract type instead.)
You might use the Patient Responsible Party selection type, for example, to generate letters going to responsible parties on behalf of a specific patient, such as consultations, treatment updates, or consent forms.
Mail merge saves a copy of this type of letter in the patient's correspondence history, the responsible party's correspondence history, and the professional's correspondence history. When you expand the patient correspondence history, the To column indicates the responsible party name, while the To column of the responsible party correspondence history indicates the patient name.
![]() Professional - Select this type to merge details from records in your Professionals editor into letters that do not need specific patient data.
Professional - Select this type to merge details from records in your Professionals editor into letters that do not need specific patient data.
Documents with this selection type use Professional merge fields.
You might use the Professional selection type, for example, to generate letters going to professionals for non-patient reasons, such as open house or office event invitations, lunch-and-learn opportunities, or holiday cards.
Mail merge saves a copy this type of letter in the professional's correspondence history.
![]() Responsible Party - Select this type to merge details from your responsible party records into letters that do not need specific patient data.
Responsible Party - Select this type to merge details from your responsible party records into letters that do not need specific patient data.
Documents with this selection type use Responsible Party fields.
You might use the Responsible Party selection type, for example, to create forms that must be filled out prior to a patient beginning treatment, such as consent forms, and health record agreements.
Mail merge saves a copy of this type of letter in the responsible party correspondence history.
Email Type - Use the Email Type column of your Mail Merge Documents editor to define which email address to use when merging this document to send via email. If this column is blank, you cannot email this document via mail merge. When you expand a patient's Correspondence panel, the To column indicates to whom mail merge documents were printed, captured, or emailed, according to the Email Type setting in the Merge Document editor.
Printer type - Use the Printer Type column to identify the type of printing and/or paper required for this document, such as photo stock, envelopes, or labels. If you have multiple printers, or a printer with multiple paper feed sources, this feature gives you a way to batch-print letters and envelopes without stopping to change paper. The Printer Type of your envelope documents must specify Envelope if you want to be able to print that envelope directly after printing an associated letter. See "Printer Types Editor" for details about setting up your list of printers.
History Category - Use the History Category column to categorize the document in your Correspondence Histories. See "History Categories Editor" for details about setting up your history categories.
Envelope - Use this column to select the envelope document to print directly after this document is printed. If the document does not require an envelope, or if you never mail this document, leave this field blank. Your envelope documents must have the Printer Type of Envelope in order to be on your envelope list. See "Mail Merge Envelopes" for details.
Use the Merge Document History section of the Mail Merge Documents editor to review a list of revisions made to the selected document. You can select a revision document from the list, and click Preview to see the letter as it was at that point in time, and click Restore to return the document to the selected state, overwriting any changes.

Click  Save in your Quick Access toolbar or File ribbon bar (or press Ctrl+S on your keyboard) to save any changes you have made.

Assign Settings Tool![]() - These settings are specific to you, and will follow you on whatever computer you log into: Other operators may have different settings. If another operator has the settings you want to use, that operator can use the Assign Options tool to copy those settings to you, or vice-versa.
- These settings are specific to you, and will follow you on whatever computer you log into: Other operators may have different settings. If another operator has the settings you want to use, that operator can use the Assign Options tool to copy those settings to you, or vice-versa.