Patient Notepad
Use the notepad to type free-form notes. You can categorize your notes, then use the filter to view only the categories of notes you need to see. In addition, you can use entries from the internal Edge Cloud dictionary, as well as your personal and shared dictionaries, to auto-complete your text.
Use the Patient Record security group in your Security editor to set up the level of access Edge Cloud users have to creating, editing, deleting, and viewing notepad entries.
If the Notepad option is set to Full Access, which gives the user rights to create and edit notepad entries, you can set the Modify Notepad Entries Created by Other Users to No Access. The user will then still be able to create notepad entries, but only edit and delete entries they created themselves. If you leave the Modify Notepad Entries setting to Full Access, the user will be able to edit / delete anyone's notepad entries.

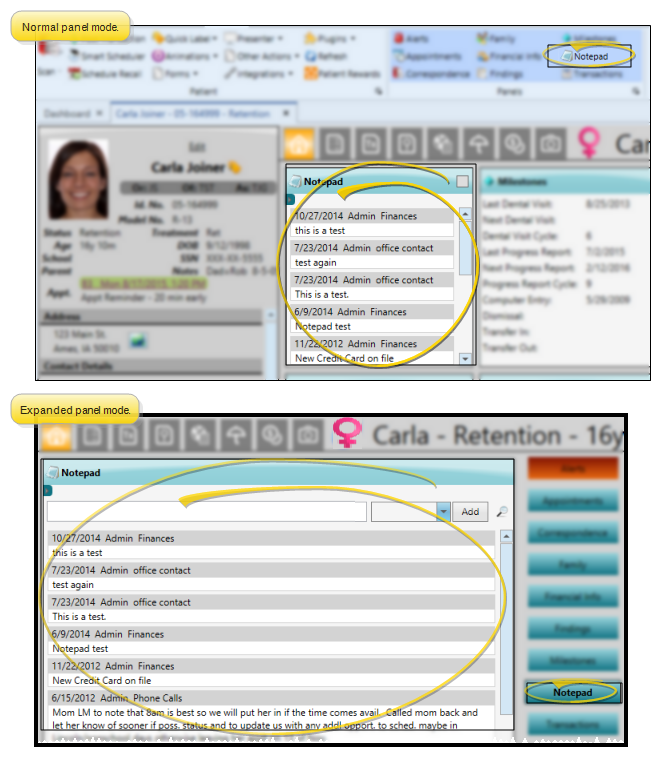
Open the patient folder Home page, and enable the  Notepad panel. (See "Patient Home Page" for details about opening the patient's Home page and selecting the panel(s) to view. The process is slightly different, depending on whether Normal panel mode or Single Expanded panel mode is enabled in your Visual User Options.)
You can optionally view patient notes from the patient's Treatment
![]() View, Add, Edit, & Search Notes
View, Add, Edit, & Search Notes
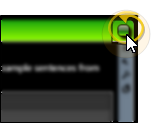
![]() Expand / Collapse / Move the Panel
Expand / Collapse / Move the Panel
If the patient's Home page is in Normal mode, you can click the top-right box, or double-click the header to expand or collapse the panel, and drag the panel around the screen. If you opened the Home page in Single Expanded mode, the selected panel will be expanded, and all other panel headers appear at the right.
Certain features only function when the panel is expanded. If a feature doesn't seem to be working, be sure you are in expanded panel mode. See "Patient Home Page" for details.
View Notes![]() - All notepad entries are date stamped automatically, and listed by date, user, and category. Newer entries appear at the top of the notepad. You can use the
- All notepad entries are date stamped automatically, and listed by date, user, and category. Newer entries appear at the top of the notepad. You can use the  Filter icon to view only certain types of notes.
View Notes in Treatment Hub - You can use the Filters settings in your Treatment Hub to include notepad entries within your patients' treatment chart records. See "Treatment Hub" for details.
Filter Notepad Display - Click the Filter icon at the left of the frame to select the categories of items to display. When you are finished, move your cursor off the filter selection box to close it. Edge Cloud remembers filter settings by user and page: So, no matter what workstation you use, or which notepad you are working with, your favorite filters go along with you. See "History Categories Editor" for details about setting up your categories.
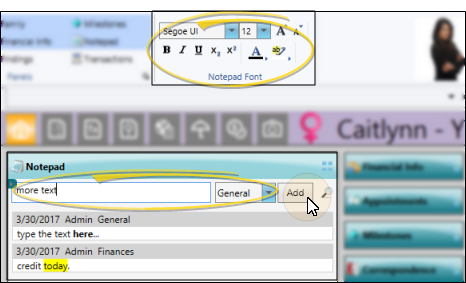
![]() Add Notes - (Expanded mode only.) Type your note in the text field at the top of the notepad window, and select a category from the drop down list. You can use the Notepad Font section of the ribbon bar, as well as standard word processing keyboard shortcuts (i.e. cut, copy, paste, bold, underline, italics) to enhance the text. As you type, your Edge Cloud dictionaries provide suggestions to auto-complete the text. If your text is not recognized, you may right-click for spelling suggestions, or to add the text to a dictionary for later use. When you are finished, click Add. The date, your Edge Cloud user name, and the assigned category are inserted automatically, and the new note is added to the beginning of the notepad. (See "History Categories Editor" for details about creating your notepad category list.)
Add Notes - (Expanded mode only.) Type your note in the text field at the top of the notepad window, and select a category from the drop down list. You can use the Notepad Font section of the ribbon bar, as well as standard word processing keyboard shortcuts (i.e. cut, copy, paste, bold, underline, italics) to enhance the text. As you type, your Edge Cloud dictionaries provide suggestions to auto-complete the text. If your text is not recognized, you may right-click for spelling suggestions, or to add the text to a dictionary for later use. When you are finished, click Add. The date, your Edge Cloud user name, and the assigned category are inserted automatically, and the new note is added to the beginning of the notepad. (See "History Categories Editor" for details about creating your notepad category list.)
Add Notes to a Subgroup - Use the Post Patient Notes tool to add a message to a subgroup of patient notepads simultaneously. See "Post Notes to Patient Subgroups" for details.
Automate Notepad Entries - Use the Make Notepad Entry workflow activity to prompt you for text to add to the patient's notepad. See "Workflow Editor" for details.
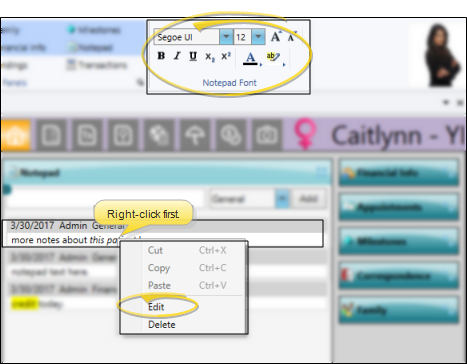
![]() Edit Notes - (Expanded mode only.) Right-click a note and choose Edit, then make your changes to the text. As you type, your Edge Cloud dictionaries provide suggestions to auto-complete the text. If your text is not recognized, you may right-click for spelling suggestions, or to add the text to a dictionary for later use.You can also right-click to access a basic text editing menu, or use standard cut, copy, and paste You can cut, copy and paste to add and edit text and/or images to many areas of your system using standard keyboard shortcuts ( Ctrl+X , Ctrl+C , Ctrl+V , respectively). Or, you can often right-click the field or image you are working with and select the action from a menu. In many cases, Ctrl+A selects all available text or images, ready for you to cut or copy, Ctrl+Z performs an Undo of the last action, and Ctrl+Y performs a redo of the last action. keyboard shortcuts. You cannot change the category assigned to the note.
Edit Notes - (Expanded mode only.) Right-click a note and choose Edit, then make your changes to the text. As you type, your Edge Cloud dictionaries provide suggestions to auto-complete the text. If your text is not recognized, you may right-click for spelling suggestions, or to add the text to a dictionary for later use.You can also right-click to access a basic text editing menu, or use standard cut, copy, and paste You can cut, copy and paste to add and edit text and/or images to many areas of your system using standard keyboard shortcuts ( Ctrl+X , Ctrl+C , Ctrl+V , respectively). Or, you can often right-click the field or image you are working with and select the action from a menu. In many cases, Ctrl+A selects all available text or images, ready for you to cut or copy, Ctrl+Z performs an Undo of the last action, and Ctrl+Y performs a redo of the last action. keyboard shortcuts. You cannot change the category assigned to the note.
You can use the tools in the Notepad Font section of the ribbon bar, or standard word processing shortcut keys, to format and emphasize text.
Search Notes - Click the  Search icon beside the Add button to search for any text within the notepad entries.
Delete Notes - (Expanded mode only.) Right click a note, and choose Delete to remove it from your
Print Displayed Notes - (Expanded mode only.) - Click  Print from your File ribbon bar or Quick Access toolbar (or press Ctrl+P on your keyboard) to print a copy of the current screen contents.
Click  Save in your Quick Access toolbar or File ribbon bar (or press Ctrl+S on your keyboard) to save any changes you have made.

You can also record notes in the Employer editor, Insurance Company editor, Other Referrer editor, and Professional records, as well as HR Manager employee records.