The default image types that come with Edge Imaging, such as Facial smiling, Facial lateral, Anterior model, and Lateral Ceph will likely meet most of your needs. You can, however, add image types specific to your practice, and designate a default image type to display along with your patient folders. Once set up, we recommend changing image types only with extreme caution.
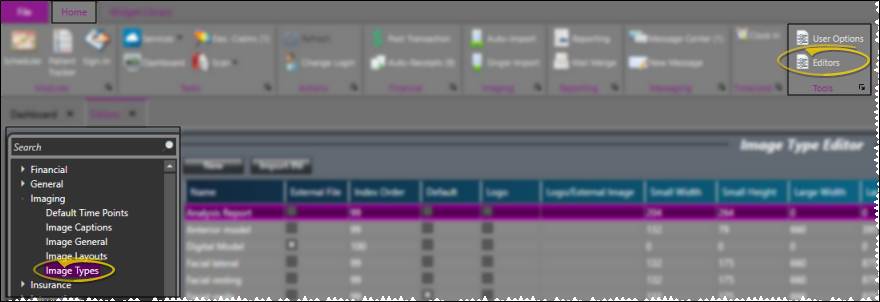
Home ribbon bar > Editors > Imaging > Image Types. (You can also search for the editor you want to work with.)
Add a new image type - Click New. Go to the bottom of your list and select New Image Type in the Name column and type a descriptive name. Assign values to the fields in the remaining columns (described below).
Edit image type - Click in the field you wish to modify (described below) and enter the correct information.
Import logo - You can import your practice logos into Edge Imaging for use in image layouts. First, enable the Logo option for the appropriate image type, such as Logo (Small), then import the graphic to the Logo image field. When you include your logo in a static layout, you will also see the information you have selected for your Layout Caption.
Import INI - (Not common.) Use this feature if you have already customized an .INI file with your image types, and want to import it into Edge Imaging. You might do this, for example, if you used a different imaging system previously (such as VP Imaging), and want to keep your customized image type information intact. If you are unsure of whether you should do this, or need additional information, please contact Ortho2 for assistance.
Save your changes - Click Save to save your changes.
These fields determine how patient images with this image type will be imported. Certain details, such as image size and rotation can be changed after the image is imported.
Name - The name of the image type.
Index order - (Optional.) Use the Index Order field to re-arrange the order images appear in the Index layout in your patient folders. If you only want to specify the order of certain images, you can leave all other images at 99.
Default -
Logo - Enable this option if this image type is a logo and not a patient image. You can then import a graphic in the Logo Image field to use with your image layouts .
Logo Image - If you have enabled this image type as a Logo (see above), click [...] to navigate to your logo graphic. Once imported, a picture of your logo appears in this field.
Small Width - Enter a value in this field (in pixels) to force the thumbnail of this image type to be a specific width. If you leave the value at 0, the thumbnail width will be determined by the imported image and the layout column width.
Small Height - Enter a value in this field (in pixels) to force the thumbnail of this image type to be a specific height. If you leave the value at 0, the thumbnail height will be determined by the imported image and the layout row height.
Large Width - Enter a value in this field (in pixels) to force the full-size view of this image type to be a specific width. If you leave the value at 0, the width will be determined by the imported image and the layout column width.
Large Height - Enter a value in this field (in pixels) to force the full-size view of this image type to be a specific height. If you leave the value at 0, the height will be determined by the imported image and the layout row height.
Facial Image - Enable this field to indicate this image type is a facial photograph.
X-ray Image - Enable this field to indicate this image type is an X-ray and not a photograph.
Mirror Import - "Mirror" an image to turn it on its vertical axis. (Think of looking in a mirror.)
Flip Import - "Flip" an image to turn it on its horizontal. (Think upside down.)
Import Rotation - Enter a value in this field (in degrees) for the amount of rotation that should be used when importing this image type. If you leave the value at 0, the image will be imported as-is.
Inactive / active toggle - Once you create an image type, you cannot delete it. You can, however, flag it Inactive.
Optional panorex orientation label - Use your Imaging Options to enable / disable the inclusion of a left-right orientation label when you import a panorex image into a patient folder.See "Set Up Imaging User & Machine Options" for details.
Premier Imaging image types - Note that the Analysis Report, Traced Lateral, Traced Lateral Ceph, Traced Lateral Photo, and Superimposition are image types associated with SmartCeph, part of the optional Premier Imaging package. You can use these image types in image layouts just as you use other patient images.
Ortho2.com │1107 Buckeye Avenue │ Ames, Iowa 50010 │ Sales: (800) 678-4644 │ Support: (800) 346-4504 │ Contact Us
Remote Support │Email Support │New Customer Care │ Online Help Ver. 8/3/2015