Appointment Day Sheet
Run an Appointment Day Sheet to obtain a list of appointments scheduled for a specific date, or any range of dates. Most offices run the report for today or tomorrow in preparation for their day. In addition to detailed appointment data, the report includes the number of months the patient has been in treatment, along with the number of expected treatment months, and the patient's current status. You can optionally include medical
You can also use the Print function from your Scheduler to print a graphical version of your schedule. See "Scheduler Printing Options" for details.
-
 Open the Report - Select Reporting from the Reporting section of the Home ribbon bar. Then from the Appointment section, open the Appointment Day Sheet report. (You can also use the Search field to find the report you want to work with.) You might also be able to run this report or form from your Recent Reports or Quick Reports list.
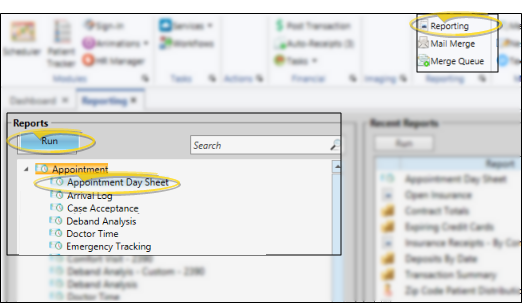
-
Report Settings - Select the options to use for choosing records and generating this report. Choose carefully, as your selections will affect which data is included in the report.
 Show/Hide icon in the upper left corner of the Reporting window.)Report Type - Choose the report type, which determines the kind of data included on the report.
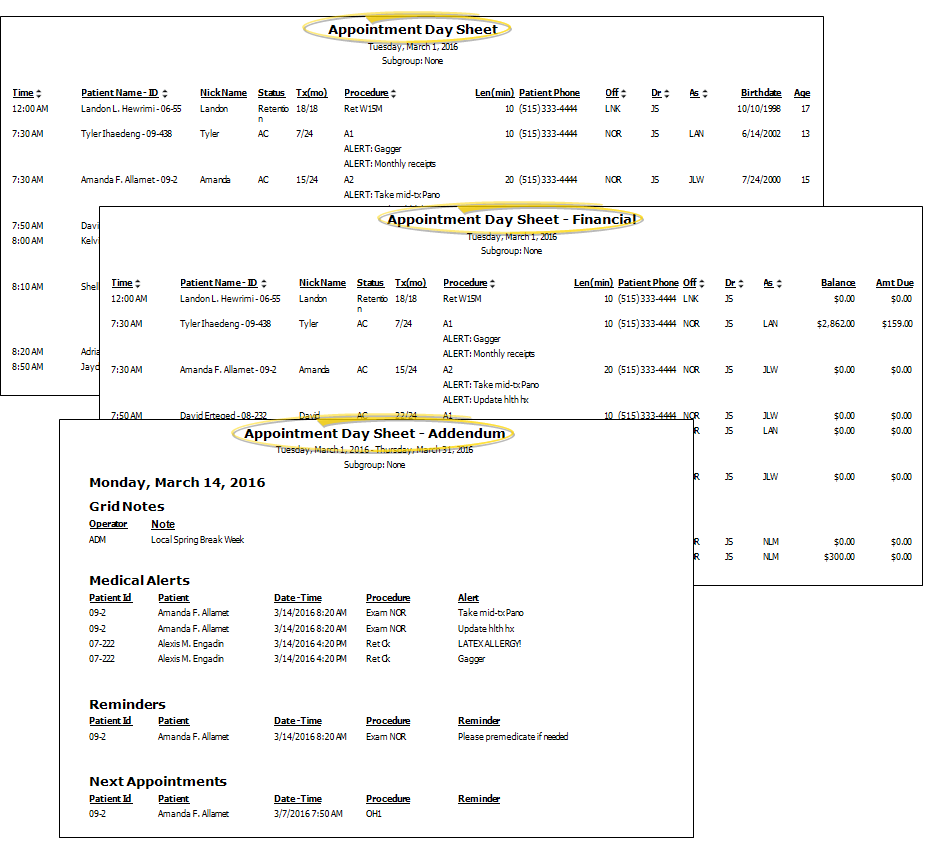
Standard - This report includes scheduled appointment details, and lists the patient birthday & age, if the birthday is within 30 days of the report dates.
Financial - Choose the Financial type of Appointment Day Sheet to include scheduled appointment details, along with the account balance and amount due for each patient. The financial amounts are calculated from the patent's appointment date, not the date the report is run. Patients with an active Auto Receipt plan will have “(AR)” appended to their name.
Addendum - This report includes the Scheduler (grid) notes, medical alerts, appointment reminders, and next appointment information for the appointments scheduled during any date range. Use this report along with either the Standard or Financial day sheet.
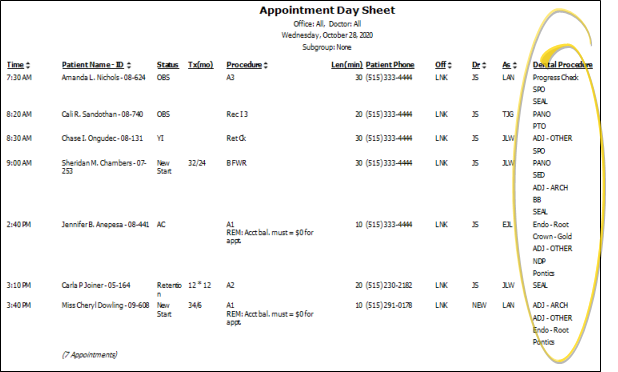
Dental Procedures - Choose the Dental Procedures type of Appointment Day Sheet to include the scheduled appointment details, along with any planned dental procedures that are linked to the appointments, on the report.

Date Range or Smart Date
- Enter the range of dates to include on this report, or select a single date for both the Start Date and End Date fields to run the report for an individual date. You can type a date in the fields, or click the calendar icon to select a date. You can also enable a Smart Date option to automatically calculate the dates for you. When a Smart Date is enabled, any dates you enter manually are ignored. Your selected date or date range will appear just under the report title when you view your report; if you select a date that is not today, this date will be different than the run date that appears in the report header.
Office
- Choose to include only the records for a specific office, or include the records for all office locations in your practice.
Orthodontist / Doctor
- Choose to include only the records for a specific orthodontist / doctor, or include the records for all orthodontists in your practice.
Specialty
- If you have Edge Specialist, you can choose to include only records for a specific specialty, or include the records for all specialties in your practice.
(Does not apply to the Addendum report.) Regular Appointments - Enable this option to include appointments that are scheduled with a date and time on your scheduling grid (these are appointments for which your patients will physically be in the office). If this option is disabled, regular appointments will not be included.
(Does not apply to the Addendum report.) Recall Appointments - Enable this option to include recall appointments on the report (these are appointments that remind patients to call to schedule an appointment). If this option is disabled, recall appointments are ignored and will not be included.
If neither appointment type is enabled, both regular and recall appointments will be included on the report.
(Does not apply to the Addendum report.) Medical Alerts - Enable this option to display medical alerts underneath the procedure description.
(Does not apply to the Addendum report.) Other Alerts - Enable this option to display non-medical alerts on the report next to the patient name. If this option is disabled, non-medical alerts will be omitted. If alerts are included on the report, they print in the Procedure column, just underneath the patient's scheduled procedure code.
(Does not apply to the Addendum report.) Double-Spaced Output - Enable this option to double-space the report (to allow for writing notes). Or, leave the option disabled to print more appointments on one sheet of paper.
-
Subgroup
- You can optionally choose a subgroup to use to narrow the records to include on the report. Only records that fit your selected subgroup as well as all other report settings will be included. If you use a subgroup, the report will display the name of your selected subgroup just under the report name, so you know which criteria was used to generate the results. See "Subgroup Editor" for details.about creating subgroups.
-
View Results
- If needed, click View at the top of the report settings panel to view the results on your screen. When you run a report or form from your Recent Report list, or when you run a Quick Report, the initial results are sent to your screen immediately, with one exception: A Quick Report that has the Print Only option enabled will not show your results on the screen at all, but continue with the printing options.
-
Manage Options and Output
- With the results on your screen, you can choose the output with the toolbar at the top of the report window. See "Report Output Options" for details.
Most columns of the Appointment Day Sheet are self-explanatory. Special details are noted below.
![]() Tx(mo) Column Calculations - The treatment months column contrasts the number of months a patient has been in treatment (according to the treatment start date) with the expected and/or actual treatment time (according to the expected and/or actual appliance removal dates). These dates are found on the Findings page of the patient folder. (See "Patient Treatment Findings" for details.)
Tx(mo) Column Calculations - The treatment months column contrasts the number of months a patient has been in treatment (according to the treatment start date) with the expected and/or actual treatment time (according to the expected and/or actual appliance removal dates). These dates are found on the Findings page of the patient folder. (See "Patient Treatment Findings" for details.)
Current progress - If the numbers are separated by a slash ( 24 / 48 ), the patient has an expected appliance removal date, but no actual removal date, indicating that the patient is currently in treatment. In our example, the patient has been in treatment for 24 months, with an expected treatment time of 48 months. In other words, this patient should be approximately half way through this phase of treatment.
Actual treatment time - If the numbers are separated by an asterisk ( 48 * 49 ), the patient has both expected and actual appliance removal dates, indicating this phase of treatment has been completed. In our example, treatment was expected to take 48 months, and actually took 49 months to complete.
Undefined - If the Tx(mos) column is blank, the patient has neither an expected or actual appliance removal date recorded in the patient folder.
Phone Number - The Appointment Day Sheet displays the patient cell phone if the patient has no home phone number listed.
Birthdate - The Appointment Day Sheet - Standard includes the birthdate only if the date is within 30 days of the appointment.
Report Title & Header![]() - Whether you view the report on your screen or print it, the report title and run date appear in the header of each report page. If you used subgrouping or other report options, that information appears just under the report title so you know which criteria was used to generate the results.
- Whether you view the report on your screen or print it, the report title and run date appear in the header of each report page. If you used subgrouping or other report options, that information appears just under the report title so you know which criteria was used to generate the results.
![]() Open the Patient Folder / Responsible Party Record While viewing some Edge Cloud reports, you can click a patient name or responsible party name to open that record. Not all Edge Cloud reports support this feature. If your cursor changes to look like a hand, the feature is available.
Open the Patient Folder / Responsible Party Record While viewing some Edge Cloud reports, you can click a patient name or responsible party name to open that record. Not all Edge Cloud reports support this feature. If your cursor changes to look like a hand, the feature is available.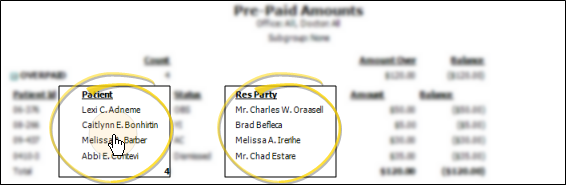
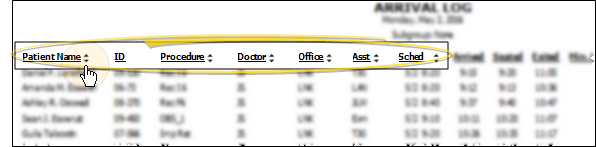
![]() Use Arrows to Re-Sort Report While viewing certain Edge Cloud reports, you can use the arrow beside certain column headings to re-sort the report according to that column’s criteria. Click the arrows a second time to sort that column in reverse order, or click the arrows beside a different column to change the sort order again. (Not all Edge Cloud reports support this feature. If your cursor changes to look like a hand, the feature is available.)
Use Arrows to Re-Sort Report While viewing certain Edge Cloud reports, you can use the arrow beside certain column headings to re-sort the report according to that column’s criteria. Click the arrows a second time to sort that column in reverse order, or click the arrows beside a different column to change the sort order again. (Not all Edge Cloud reports support this feature. If your cursor changes to look like a hand, the feature is available.)