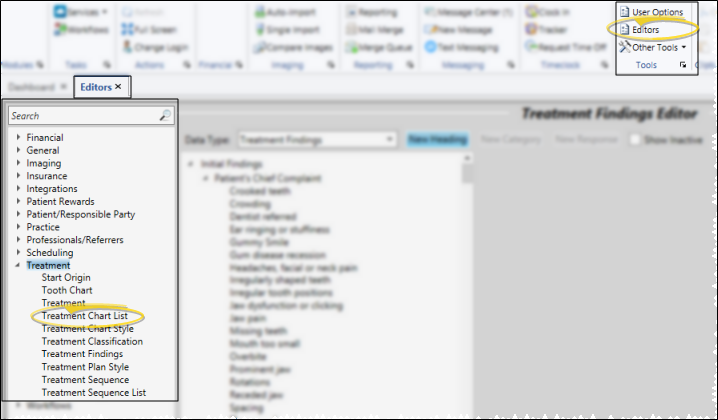
 Editors > Treatment > Treatment Chart List. (You can also search for the editor you want to work with.) Note that you use the lists you create in the Treatment Chart List Editor with both treatment chart and treatment plan styles.
Use the
Home Ribbon Bar - Tools Section >  Editors > Treatment > Treatment Chart List. (You can also search for the editor you want to work with.) Note that you use the lists you create in the Treatment Chart List Editor with both treatment chart and treatment plan styles.
Click  Editors from the Tools section of the Home ribbon bar.

Select Treatment in the list at the left, and choose the Treatment Chart List option.

Choose List to Work With - Your list of existing lists appears at the left. Click the list you want to work with.
Display Active / Inactive Lists - Click the  icon at the top of the window to include/exclude the inactive records. When all lists are displayed, inactive lists are noted with a checkmark beside their names.
Create New List -
Change List Name- Type in the Name box
Search List by Text or Number - When the  Text Search option
is enabled for a list, you can begin typing a list response, and your cursor will jump to the response that begins with your typed text.
  Text Search is disabled, your list responses will be numbered, and you can type a number to jump to the response you want.
Enable / Disable Auto-Complete Response - When the  Auto Complete option is enabled for a list, you can press the Tab key on your keyboard to add the entirety of the currently selected response to the treatment chart/plan record. If
  Auto Complete is disabled, you must click the response to add the entire response text to the record.
Edit List Responses - Add, edit and remove responses, and re-order the responses in your list.
Add a response -
Edit response text - Click the response to change, then make your changes in the
Assign Patient Reward Points - To add or deduct Patient Reward points when a specific response is entered in a patient's treatment chart, enter a description and point value (either positive or negative) in the Patient Reward fields of your Treatment Chart List. For example, you might award 5 points when the response "Excellent" is selected for the Oral Hygiene column of a treatment chart record, or deduct 5 points if the response is "Poor". Note that both you and the patient will be able to see the reward description.
Change Response Colors - Click the response you want to work with, then change the color properties.
Enable / Disable Next Appt Option - Enable the  Next Appt option to indicate that this list specifies the time frame for scheduling the patient's next appointment. When a treatment chart style includes both a column that requires a response from this list, and a column that requires a Procedure response, the information will automatically transfer to your Needs Appointment List.
Re-Order Responses Manually - Click a response in your list, then click the up / down buttons to re-order the responses.
Re-Order Responses Alphabetically - Click Alpha ^ or Alpha v to re-order all responses in ascending or descending alphabetical order.
Delete a Response - Click the response to work with, then click Delete. This does not remove the response from any existing patient treatment chart or plan records, but you can no longer choose this response for a patient.
Save Changes![]() Click
Click  Save in your Quick Access toolbar or File ribbon bar (or press Ctrl+S on your keyboard) to save any changes you have made.
Ortho2.com │1107 Buckeye Avenue │ Ames, Iowa 50010 │ Sales: (800) 678-4644 │ Support: (800) 346-4504 │ Contact Us
Remote Support │Email Support │New Customer Care │ Online Help Ver. 8/3/2015