Appointment Cards
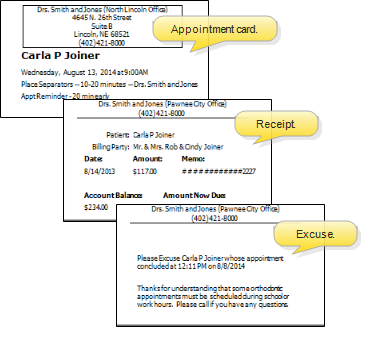
Run Appointment Card forms to generate detailed appointment reminder cards for your patients. The information available for printing on the card, such as the most recent payment receipt, or a school / work excuse, depends on the style you select. You may also include your office name and address on the form as it prints, or have your logo pre-printed on special form paper for a more professional appearance. In addition, you may choose to email appointment cards to patients and / or responsible parties, rather than printing them.
Get Started
Choose Default Format - Use the Default Forms section of your Reports and Forms editor to select the default format to use for your forms. This is the format that will be used when you run the form from the Forms option of the Home or Patient ribbon bar. If you have purchased customized forms, you may choose your form as the default. See "Set Up Reports and Forms" for details. This format will only be used when you print appointment cards; emailed appointment cards use the Form Email editor settings instead.
Set Up Email Appointment Card Format - Use the Form Email Setup tools to set up your online correspondence system. The setup options include specifying your return email address, web site, and logo, as well as creating the text of appointment card and receipt messages. See "Set Up Form Email Options" for details.
You must set up your Form Email Setup editor before the email option will be available for your appointment cards and payment receipts.
Run This Form
-
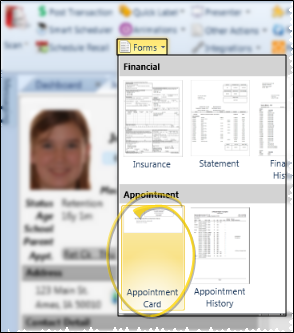
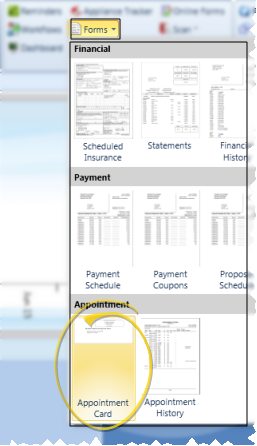
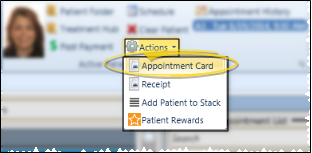
 Open the Form - You can open this feature in multiple ways: Use the method that's most convenient for you.
 You can email appointment cards only when you right-click an appointment link in your Scheduler or the Patient Information Panel, or choose the Appointment Card action for the active patient in your Scheduler. Otherwise, you must print the card on paper.
-
Form Settings - Select the options to use for choosing records and generating this form.
 Show/Hide icon in the upper left corner of the Reporting window.)
 -
(Not available for email appointment cards.) View Results - If needed, click View at the top of the report settings panel to view the results on your screen. When you run a report or form from your Recent Report list, or when you run a Quick Report, the initial results are sent to your screen immediately, with one exception: A Quick Report that has the Print Only option enabled will not show your results on the screen at all, but continue with the printing options.
-
(Not available for email appointment cards.) Manage Options and Output - With the results on your screen, you can choose different report settings from the left side of the screen and click View again to obtain different results. In addition, you can manage the output with the toolbar at the top of the report window. See "Use Report Results" for details.


More Information
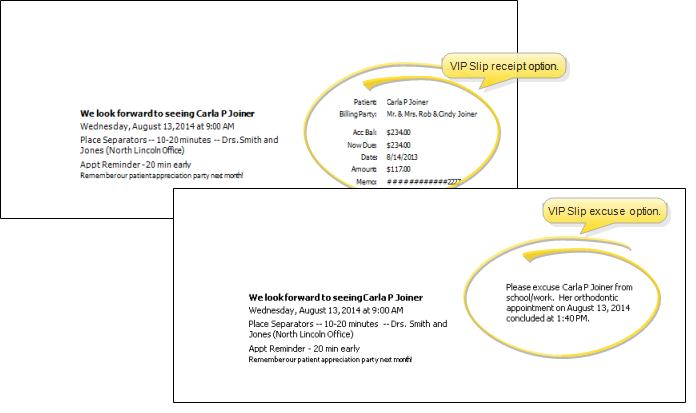
Appointment Dates Included - When a patient has multiple appointments, most appointment card formats always include the first 3 made appointments, regardless of which appointment you launched the card from. However, when you print the VIP Slip format, the next-scheduled appointment is always printed, and when you print the Business Card format, you can select which appointment to include on the form when you select the patient to print for.
Appointment Length - The appointment length that prints on the appointment card is taken from the Appointment Card Length field of your
School / Work Excuse Option - Although you can include an excuse slip any time you print a regular appointment card, you might want to print the slip at the conclusion of the appointment instead. See "School / Work Excuse Forms" for details.
![]()
www.ortho2.com │ 1107 Buckeye Ave. │ Ames, IA 50010 │ 800.346.4504 │ Contact Us
Chat with Software Support │ Chat with Network Engineering │ Chat with New Customer Care
Remote Support │ Email Support │ Online Help Ver. 11/11/2019


