 Open patient >
  Treatment Plan.
Open a patient folder and click the Treatment Plan tab.

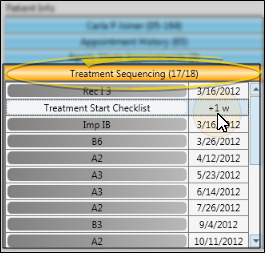
The treatment sequence appears in the top portion of the window.
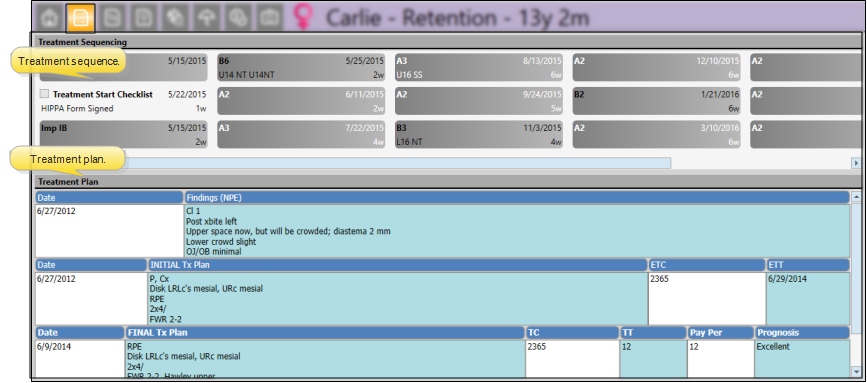
The sequence of proposed and completed appointments appears at the top of the treatment plan page. Use the scroll bar at the bottom of the sequence to view additional appointments, if needed. Right-click to edit or process an appointment, or to change the sequence.
Open patient > Treatment Plan.
Open a patient folder and click the Treatment Plan tab.
The treatment sequence appears in the top portion of the window.
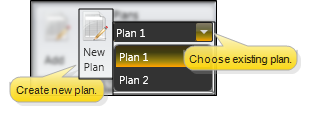
Select plan to work with - Each treatment sequence is tied to a specific treatment plan. If the patient has multiple treatment plans, select the plan to work with. (Note that you must create a new plan the first time you want to enter treatment plan records or a treatment sequence for a patient.)
Set up a treatment sequence - When you first add a treatment sequence to a patient chart, you usually insert a pre-determined set of appointment and checklist items, then add individual items specific to that patient's proposed treatment.
Select an initial treatment sequence - Click  Change in the Sequence section of the Tx Plan ribbon bar to choose the pre-determined Treatment Sequence to apply to this patient. (Note that any existing treatment sequence will be replaced by the sequence you select.) See "Set Up Default Treatment Sequences" for detailsabout creating and editing pre-determined sequences.

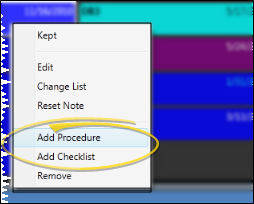
Add a sequence item - Right-click anywhere in the treatment sequence and select either Add Procedure or Add Checkist. The item is added to the end of your sequence. You can then move and edit the item as needed. (See below for details.)
Remove a sequence item - Right-click the item you want to erase from the sequence and select Remove. The proposed dates for subsequent items are updated automatically. (If you do not notice the changes,  Refresh your page.)
Replace a treatment sequence - Click Change in the Sequence section of the Tx Plan ribbon bar to erase the existing sequence and replace it with a different pre-determined set of items. Be cautious: all prior treatment sequence items are erased from the patient's folder!
Build a sequence from scratch - Although you can build a patient's treatment sequence from scratch by adding one item at a time, it is generally more efficient to select an initial pre-determined sequence (with the Change tool) then add and remove items as needed for this patient.
Change sequence items - As the patient progresses through treatment, you edit associated items in the treatment sequence to reflect that progress. Although you can right-click to manually process and edit items, certain sequencing tasks happen automatically as you schedule and process patient appointments.
Kept - When you process an appointment in your Scheduler as Kept, or when a patient uses Sign-In, the next item in your treatment sequence is also flagged as Kept, if the appointment procedures match. If you instead manually flag a sequence item as Kept, it is marked with today's date, and appears dimmed in your treatment sequence. If you enable Kept accidentally, edit that item (described below) and remove the date to return it to active status. You can also flag an item as Kept by editing the item and inserting the date it was completed. In addition, The proposed dates for subsequent items are updated automatically. (If you do not notice the changes, Refresh your page.)
Edit - Edit a sequence item to update the description, number of weeks to schedule after the previous item, the date the item was completed, and any associated note.
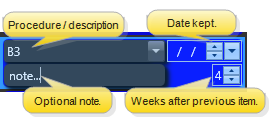
Description - Select from your procedure list, or type a description of what you need to do for your checklist element. Note that the editing tool does not let you change a procedure item into a checklist item, or vice versa.
Date - If you insert or change the date, that item will be flagged Kept as of that date.
Note - Type a note about this item, or select from the assigned Sequence List. (See "Set Up Treatment Sequence Lists" for details.)
Weeks -Enter the number of weeks this element should happen after the previous element is completed. The proposed dates for subsequent items are updated automatically. (If you do not notice the changes, Refresh your page.)
Change list - Add or change the Sequence List that is associated with the item. Then, when you edit the item, you can insert a response from the list into the note section. You can also click Clear to remove any list assignment.(See "Set Up Treatment Sequence Lists" for details.)
Reset note - Choose Reset Note to erase the note from the item.
Move & re-order sequence - You can drag & drop items to re-order the treatment sequence. This feature is especially useful for placing newly created procedures and checklist items, which are added to the end of the sequence, into their proper locations. The proposed dates for subsequent items are updated automatically. (If you do not notice the changes, Refresh your page.)
Save Changes![]() Click
Click  Save in your Quick Access toolbar or File ribbon bar (or press Ctrl+S on your keyboard) to save any changes you have made.
Treatment sequence & needs appointment integration - Patients in an appointment-required status that have no future appointment scheduled are automatically placed
Treatment sequence & treatment chart integration - When you create a treatment chart record that includes that includes both a column that requires a response from your Procedure List, and a List Only column that is assigned to a list with the Next Appt Time enabled, the patient's next treatment sequence appointment is entered as the default automatically. See "Add, Edit, & Sign Treatment Chart Records" for details.
Treatment sequence & Scheduler integration - You can review a patient's treatment sequence while scheduling an appointment. This feature helps you stay on the proposed course of treatment with every appointment.
 │
│
Ortho2.com │1107 Buckeye Avenue │ Ames, Iowa 50010 │ Sales: (800) 678-4644 │ Support: (800) 346-4504 │ Contact Us
Remote Support │Email Support │New Customer Care │ Online Help Ver. 8/3/2015


