Post Miscellaneous Charges
Use the
Watch video tutorial. (Windows Media Player, an active Internet connection, and a valid Ortho2 customer login are required to run video tutorials, webinars, and training programs.)
Do Not Post Dental Charges Here - Charges for dental procedures are posted when the procedure is flagged as Completed in the patient Treatment
Use This Feature
-
 Open the Post Transaction Window - Home or Patient or Patient Finances or Scheduler ribbon bar >
  Post Transaction. Post Transaction Security - Your Edge
 -
Select Patient and Billing Party - The patient's name, id number, office, doctor and any patient tag and visual tags appear at the top of the window. All associated contracts appear below. If this person's record has a visual tag applied, the appropriate color/shape appears beside the name. Choose the account to work with. If needed, you can
-
Enable Post Charge Mode - Click
-
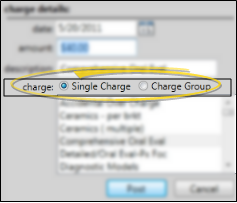
Single or Group Charge - Select whether you want to post an individual miscellaneous charge, or a charge group. (See "Set Up Miscellaneous Charges & Groups" for details about setting up charge groups.) The list of available descriptions changes, depending on which type of posting you choose.
-
Charge Details - Enter the charge date and amount, then choose a charge description from your list, or type a unique description.
-
Post the Transaction - Click Post.
More Information
Alert Stop - If the patient has an alert trigger enabled for this feature, the Alert Stop pup-up window will appear when you initiate this feature for the patient. Review the alert information, then click the box to continue. (See "Patient Alerts" for details.)
Last Posted Transaction - The last transaction you posted appears at the
Charge Groups - Although you post a charge group as a single transaction, the individual charges will appear in the patient's ledger and on your Transaction Report.
OOPS - If you post a miscellaneous charge in error, you must reverse it properly to preserve the integrity of your accounting audit system.
Completed Contracts Option - Contracts that are fully paid do not appear in the list of accounts when you are posting transactions unless you enable the Display Completed Contracts option at the top of the window.
Automate Posting Charges - Use the
Open Ledger From Post Transaction Window - Click a responsible party name in the Account Holder column of the contract list that's displayed at the top of the Post Transaction window to open the patient's Finance page to the ledger details. You may need to drag the Post Transaction window to another location on your screen, or minimize it to your task bar in order to view the transactions.
Select a Different Patient - Click
![]()
www.ortho2.com │ 1107 Buckeye Ave. │ Ames, IA 50010 │ 800.346.4504 │ Contact Us
Chat with Software Support │ Chat with Network Engineering │ Chat with New Customer Care
Remote Support │ Email Support │ Online Help Ver. 11/11/2019


