Create Professional Records
Use the Professional editor to create and maintain records for the consulting and treating professionals, such as oral surgeons, pedodontists, and periodontists, that work with your patients. Each record includes the professional's name, practice name, address, phone number, several user-defined fields, correspondence history, list of patient assigned to this professional, and a notepad you can use to add additional information. You can optionally include a photograph in each record.
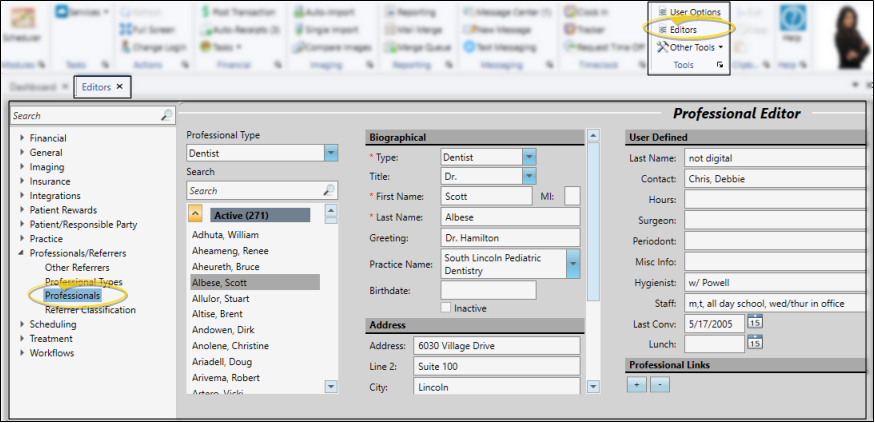
Define Professional Types - Use the Pofessional Types
Flag "Email" and "Work Phone" Contacts - The Professional List report includes the details for the email and work phone contact styles only. In order for Edge Cloud to recognize this information accurately, you must use the Contact Categories editor to assign a category to the "Email" style, and to the "Work Phone" style. Then, be sure to use those categories when entering contact information in professional records. Other contact information in the professional record will be ignored by the Professional List report. See "Contact Categories Editor" for details.
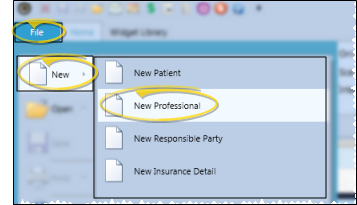
![]() Open the New Professional Window
Open the New Professional Window
Select  New from the File ribbon bar and select the New Professional option. Or, press Ctrl-N on your keyboard from nearly any
You can also open the New Professional window while searching to open a professional record with Fast Find. See "Professional Records" for details.
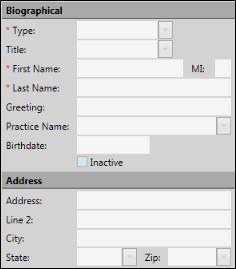
![]() Biographical & Address Details - Enter the individual's professional type (i.e. dentist, oral surgeon, speech therapist), name, birthdate, address and other basic information. The greeting field is primarily used for mail merge documents:
Enter the greeting as
you would like to see it in the salutation of a letter. All required fields are preceded by a red asterisk ( * )
Biographical & Address Details - Enter the individual's professional type (i.e. dentist, oral surgeon, speech therapist), name, birthdate, address and other basic information. The greeting field is primarily used for mail merge documents:
Enter the greeting as
you would like to see it in the salutation of a letter. All required fields are preceded by a red asterisk ( * )
![]() Contact Info - Enter phone numbers and email addresses into the Contact Info fields. You can also flag the contact information to use for delivering Edge Reminders messages. (See "Contact Categories Editor" for details about setting up your contact types.)
Contact Info - Enter phone numbers and email addresses into the Contact Info fields. You can also flag the contact information to use for delivering Edge Reminders messages. (See "Contact Categories Editor" for details about setting up your contact types.)
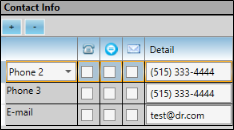
Add a Contact - Click [ + ] to add a new line to the contact list, and select the appropriate type. (See "Contact Categories Editor" for details about setting up your contact types.) Then enter the phone number or email address in the Detail column.
Assign Edge Reminders Contacts![]() - In the Contact section of the record, enable the
- In the Contact section of the record, enable the  Telephone,
  Text, and/or
  Email icon beside the contact you want to use for the delivery of Edge Reminders messages. Tell me more...
Multiple Messages Possible![]() - If you flag multiple contact types, the party will receive a message in each of the selected formats; if you do not flag any contact types, the party will not receive any messages, even when they fit the subgroup you select. However, if the patient and responsible party contact information matches,
- If you flag multiple contact types, the party will receive a message in each of the selected formats; if you do not flag any contact types, the party will not receive any messages, even when they fit the subgroup you select. However, if the patient and responsible party contact information matches,
Default Flags![]() - Use the Default columns of your Contact Category editor to set up default Edge Reminders contact descriptions. Then, when you add that contact description to the Contact Info section of a patient folder, responsible party, or professional record, they will automatically be enabled to receive reminders.
- Use the Default columns of your Contact Category editor to set up default Edge Reminders contact descriptions. Then, when you add that contact description to the Contact Info section of a patient folder, responsible party, or professional record, they will automatically be enabled to receive reminders.
Apply Flags to a Subgroup![]() - You can enable / disable Edge Reminders contact flags for any subgroup of patients with the Assign Edge Reminders Defaults tool. You might use this, for example, to enable the Text Message flag for the Patient Cell contact type of all "Active" patients when you first start sending appointment reminder text messages. See " Apply Edge Reminders Contact Flags to a Subgroup" for details.
- You can enable / disable Edge Reminders contact flags for any subgroup of patients with the Assign Edge Reminders Defaults tool. You might use this, for example, to enable the Text Message flag for the Patient Cell contact type of all "Active" patients when you first start sending appointment reminder text messages. See " Apply Edge Reminders Contact Flags to a Subgroup" for details.
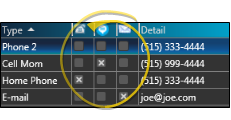
Remove a Contact - Select the contact detail you want to work with, then click [ - ] to remove it from the record.
Send an Email - When viewing the record, you can click the email address in the Contact Details section to send a Quick Message to this party. See "Send Quick Email Messages" for details.
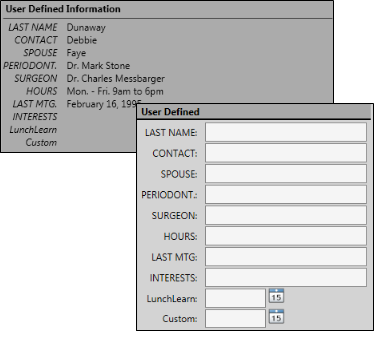
![]() User Defined Information - The User Defined Information section details the unique information you have chosen to include in your professional records.You can change the details when you open the record from the Professionals editor, or by clicking the Edit link while viewing the professional's page. See "Professional Types Editor" for details about defining the type of information you want to track.
User Defined Information - The User Defined Information section details the unique information you have chosen to include in your professional records.You can change the details when you open the record from the Professionals editor, or by clicking the Edit link while viewing the professional's page. See "Professional Types Editor" for details about defining the type of information you want to track.
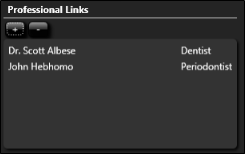
![]() Professional Links - Use this section of the professional record to indicate with professionals this party prefers to work with. When you create a link in one professional record, that same link appears in the other party's record automatically. You can change the details when you open the record from the Professionals editor, or by clicking the Edit link while viewing the professional's page.
Professional Links - Use this section of the professional record to indicate with professionals this party prefers to work with. When you create a link in one professional record, that same link appears in the other party's record automatically. You can change the details when you open the record from the Professionals editor, or by clicking the Edit link while viewing the professional's page.
Save Your Changes - Click Save to save the changes you have made and close the editing window.
Link to Patient - You can link professional records as you create patient folders, or when you edit the Patient Information Panel.
View Professional Records - You can review and edit professional records from linked patient folders, or from the Professional editor. See "Professional Records" for details.
Edge Cloud Messaging - To send a professional a message via Edge Cloud Messaging, the professional record must have a valid email address, and that email address must be registered to use your Edge Portal Premium app to retrieve the message.When you select a professional to receive a message you send via Messaging, the processional can optionally receive a notice of the message at the email address in the professional record; the professional must then log into Edge Portal to retrieve the complete message text. You may choose to have multiple messages condensed into a digest, to be emailed to the professional at one time, instead of many times throughout the day. In addition, messages received through Edge Portal are saved in the correspondence history. If a patient link was included, the message is saved in the patient's correspondence history as well. Use your Edge Portal settings to enable / disable the professional message options. See "Send an Instant Message" for details.
![]() Print a List of Professional Names and Contact Information
Print a List of Professional Names and Contact Information
Run a Professional List report to obtain a list of active professional records (i.e. pedodontist, oral surgeon, pediatrician) you have created. The report includes the professional and practice name, contact information, user-defined text and dates you have included in their record, and their birthday. You can choose specific professional types to include, or run the report for all professionals in your system. Only active records are included in the report: Any items flagged Inactive in the editor are omitted. See "Professional List" for details.
