Online Scheduling
Use Online Scheduling to allow prospective patients to book an appointment with you directly from your website. With just a few clicks, your new patients can be set up and on their way to you. Your Scheduler flags these appointments so you can tell at a glance which are prospective patients, and start your follow-up process, including turning that prospect into a new
![]() Set Up Your Office Editor for Online Scheduling
Set Up Your Office Editor for Online Scheduling
Use your Office editor to set up the office name or alias, logo, and Scheduling Email address to use when prospective patients use Online Scheduling to book appointments with you.

Formal Name / Display Name![]() - Prospective patients will see the office's "alias", or display name, if there is one, when booking their appointment through Online Scheduling. If there is no display name, the Formal Name field will be used.
- Prospective patients will see the office's "alias", or display name, if there is one, when booking their appointment through Online Scheduling. If there is no display name, the Formal Name field will be used.
Scheduling Email![]() - The appointment confirmation message your prospective patient receive will be sent from the address you have set up in the Scheduling Email field.
- The appointment confirmation message your prospective patient receive will be sent from the address you have set up in the Scheduling Email field.
Logo![]() - Your office logo can optionally appear on the form prospective patients see when they use Online Scheduling to book their appointment.
- Your office logo can optionally appear on the form prospective patients see when they use Online Scheduling to book their appointment.
Use your Schedule Templates editor to confirm the time zone, and make sure each chair in the template(s) you want to use for Online Scheduling has a specific office assigned to it. Once you have edited your templates, you can use the Reclassify Chairs feature to update future uses of those templates to your new chair/office settings.
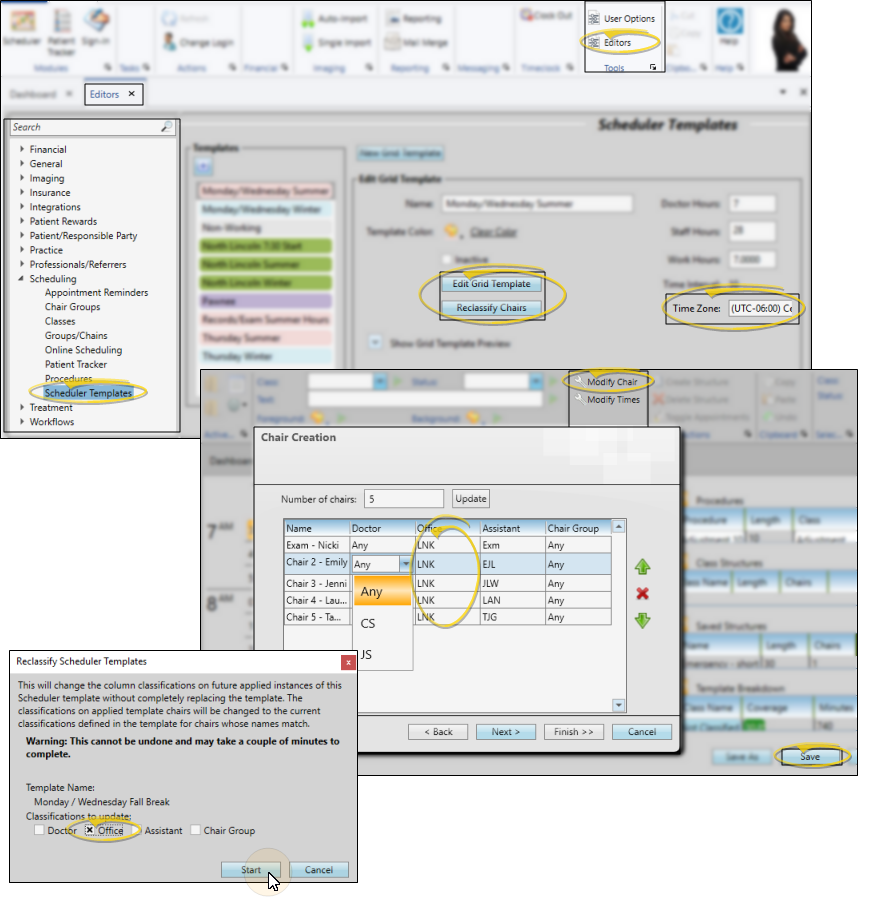
Confirm Time Zone![]() - Open the Scheduler Templates editor, and check the time zone in the Edit Templates section of the window for each template you will use with Online Scheduling.
- Open the Scheduler Templates editor, and check the time zone in the Edit Templates section of the window for each template you will use with Online Scheduling.
Assign Chairs to Offices![]() - Your template chairs must be assigned to a specific office for Online Scheduling to function. To review and edit chair assignments, from the Scheduler Templates editor, select a template to work with. Click the Edit Grid Template button to open the Grid Template Editor. Then, use the Modify Chair option on the Edit Layout section of the Grid Tools ribbon bar to assign chairs to a specific office. When finished, click Save.
- Your template chairs must be assigned to a specific office for Online Scheduling to function. To review and edit chair assignments, from the Scheduler Templates editor, select a template to work with. Click the Edit Grid Template button to open the Grid Template Editor. Then, use the Modify Chair option on the Edit Layout section of the Grid Tools ribbon bar to assign chairs to a specific office. When finished, click Save.
Reclassify Chairs![]() - From the Scheduler Templates editor, select the template you have just assigned to specific offices. Click the Reclassify Chairs button and enable the Office option. Click Start. This will add the office location to each chair for all future uses of this template.
- From the Scheduler Templates editor, select the template you have just assigned to specific offices. Click the Reclassify Chairs button and enable the Office option. Click Start. This will add the office location to each chair for all future uses of this template.
![]() Set Up the Online Scheduling Editor
Set Up the Online Scheduling Editor
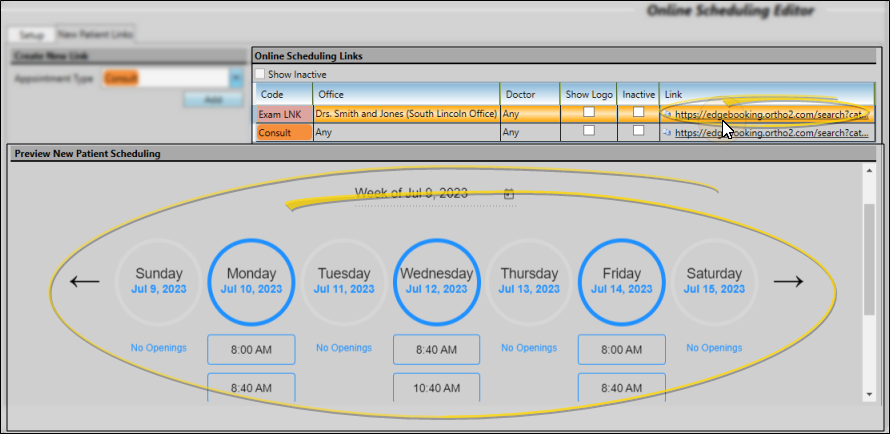
Use the Online Scheduling editor to set up how prospective patients can book appointments from your website. The Setup tab and New Patient Links tab work together to first enable office locations and appointment types for Online Scheduling, then assigning doctors and offices, creating website links, and previewing your scheduling forms. See "Online Scheduling Editor" for details.
![]() Apply Templates to Your Schedule
Apply Templates to Your Schedule
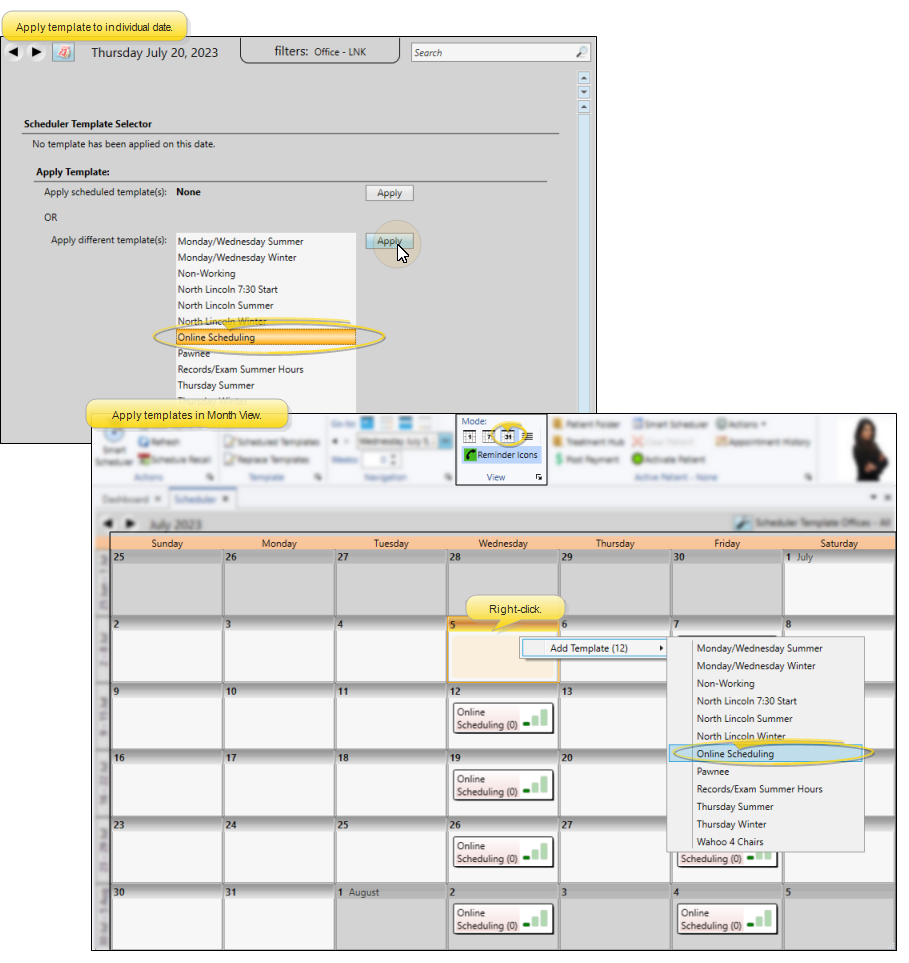
Online Scheduling will only work for dates that have templates specifically applied to them. So, even if you correctly set up your Scheduler templates, Online Scheduling cannot use them unless they are applied to specific dates. To do this, you can either go to each date you wish to use with Online Scheduling and apply the appropriate template(s), or use Month View mode to easily apply templates to dates in the future.
When you're ready to go, use the link(s) created in the New Patient Links tab of the Online Scheduling editor to add one or more online scheduling links to your website. You might need to consult your website developer for assistance.
Cellphone Required Option![]() - If you want to require a cell phone number on your online scheduling forms, you must add "&cellrequired=true" to the end of your scheduling links, like this: https://edgebooking.ortho2.com/search?catalog=xxxxxxx&code=xxxx&cellrequired=true
- If you want to require a cell phone number on your online scheduling forms, you must add "&cellrequired=true" to the end of your scheduling links, like this: https://edgebooking.ortho2.com/search?catalog=xxxxxxx&code=xxxx&cellrequired=true
Locally Hosted Systems![]() - Locally hosted
- Locally hosted
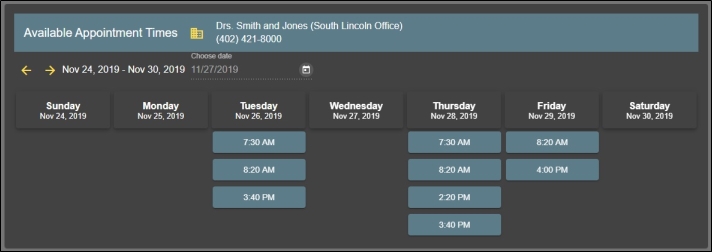
Prospective patients can go to your web site and click your Online Scheduling link, or use the link you copied from your Online Scheduling editor and emailed to them, to open a window with available appointment slots. If you have multiple office locations, and didn’t assign an office when creating the link, the prospect will be asked which office they are scheduling with before they can select a time.
After an appointment date and time are selected, the prospective patient fills out a brief form, and the appointment will be added to your
Appointments that are in the process of being booked online will not appear in the Smart Scheduler when you are scheduling simultaneously in the office.
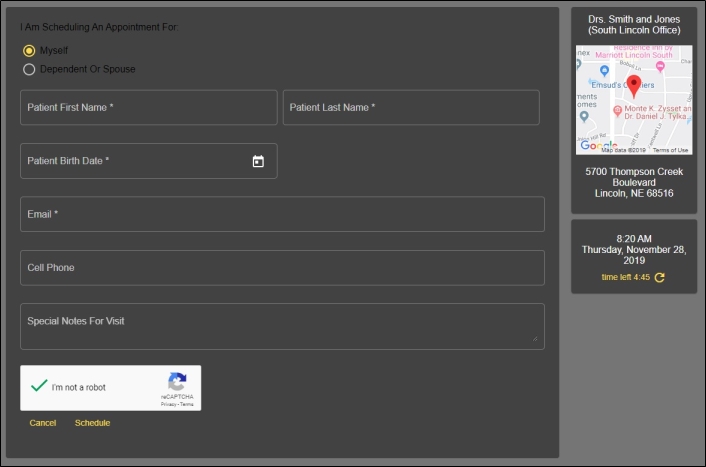
You can demo the self-scheduling experience by using the Preview section of the Online Scheduling editor, or by clicking the URL link at the top of the window to open the experience in a browser. If you complete the booking, it will be scheduled in your Edge Cloud Scheduler, just like any pending patient appointment.
![]() Manage Online Scheduling Appointments and Pending Patients
Manage Online Scheduling Appointments and Pending Patients
![]() View Patients in Your Scheduler
View Patients in Your Scheduler
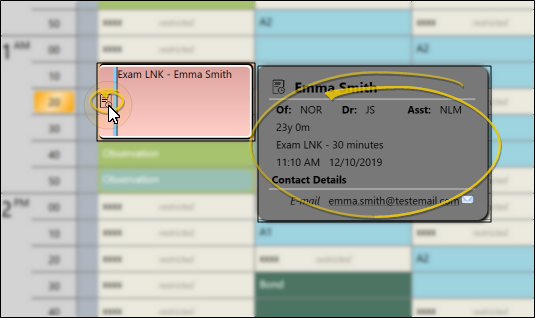
Prospective patients who use Online Scheduling are considered "pending": They don’t have an Edge Cloud patient record yet. These appointments are flagged with the  Pending icon in your Scheduler. You can hover over the appointment to view a pop up window that includes the patient name and contact information.
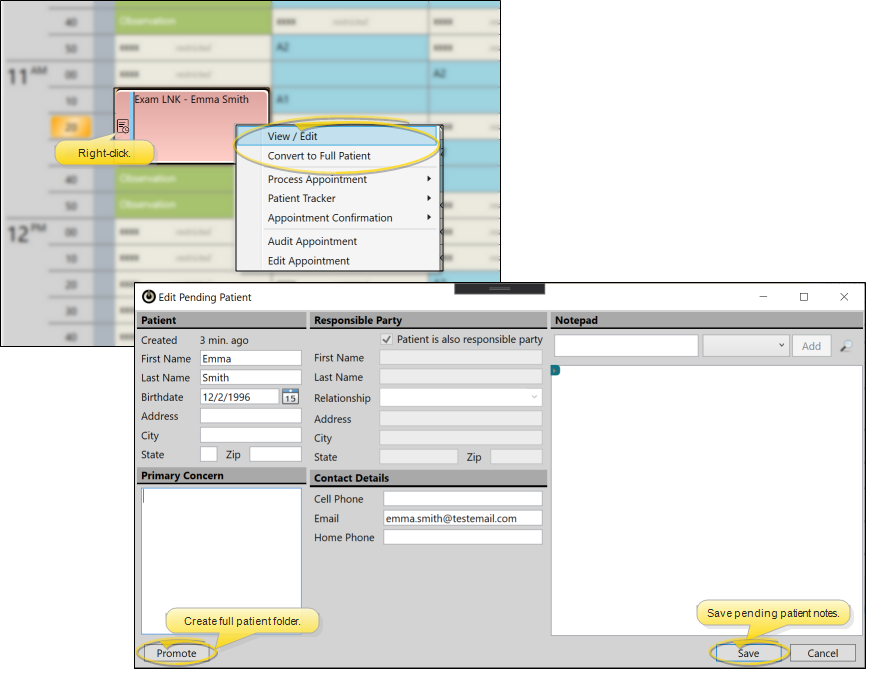
Right click on the appointment and select View/Edit to open the Edit Pending Patient window. This window has various patient information fields and a notepad. Enter any information in the notepad as needed, and click Save. You can continue to add notes to this window while the patient is still a prospect.
When you are ready to create make the prospective patient into a full patient, right-click the appointment and select click Convert to Full Patient. Or, right click and select View/Edit, then click Promote at the bottom of the editing window. All of the information, including any notepad text, will be transferred to the new Edge Cloud patient folder.
You can also right-click a pending patient appointment to track and process the appointment in your
![]() Track Online Scheduling Appointments and Pending Patients
Track Online Scheduling Appointments and Pending Patients
You can create subgroups to track pending patients and appointments created with Online Scheduling to view with your Subgroup widget.
Online Scheduling and Edge Cloud Reports![]() - Appointments scheduled with Online Scheduling are tracked by your Edge Cloud appointment reports, but only the appointment details will be available. Since the patient name, and all other patient data is "pending", it will not be available for reports or labels, and simply remain blank on reports.
- Appointments scheduled with Online Scheduling are tracked by your Edge Cloud appointment reports, but only the appointment details will be available. Since the patient name, and all other patient data is "pending", it will not be available for reports or labels, and simply remain blank on reports.
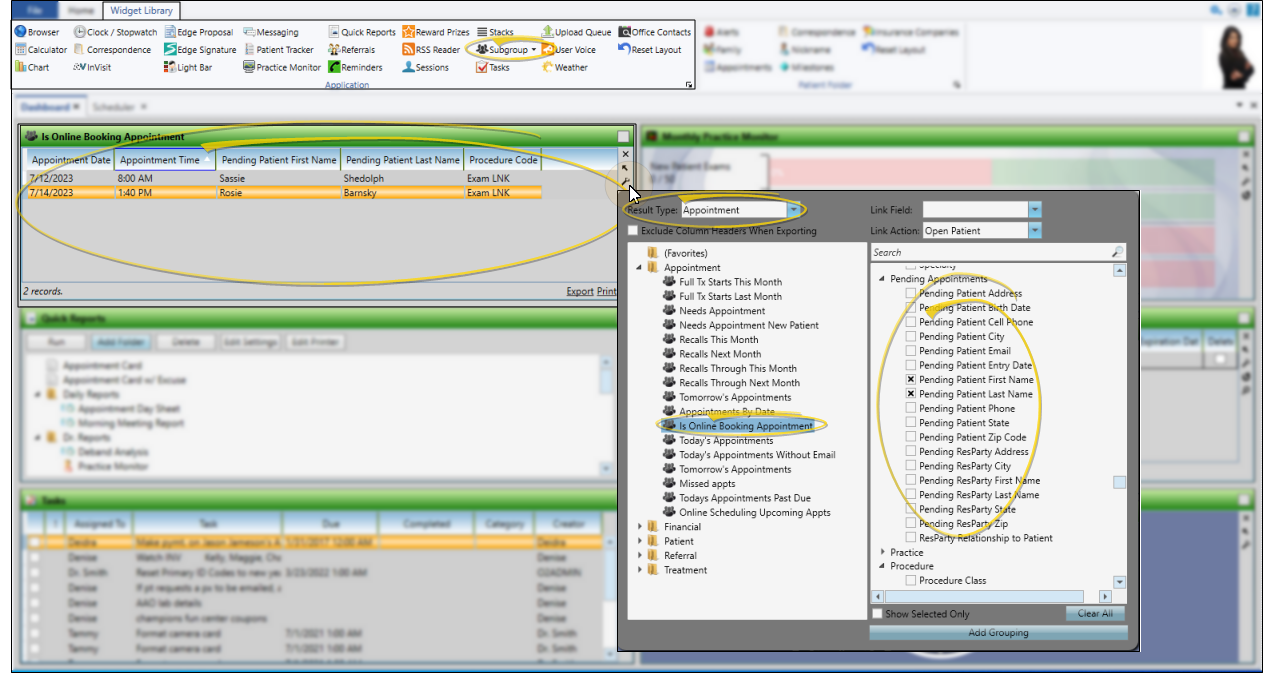
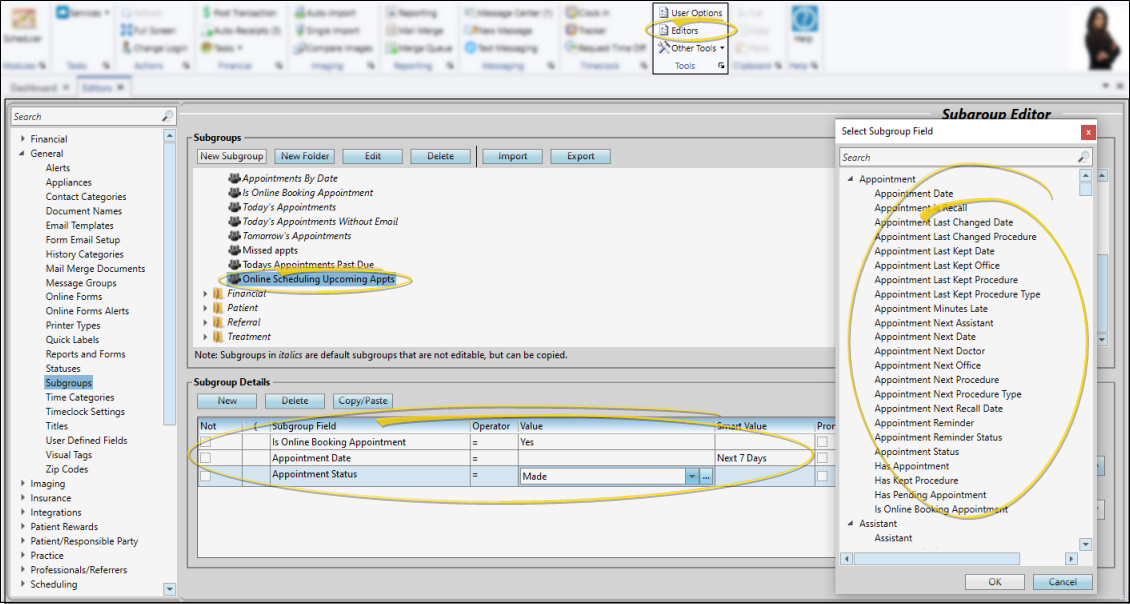
Use your Subgroup editor to create a subgroup that includes the field "Is Online Booking Appointment = Yes". You can use other appointment, pending appointment, and procedure fields to narrow the subgroup, but no other fields will work, since the prospective patient has no other presence in Edge Cloud. For tracking upcoming appointments, we recommend something like this: "Is Online Booking Appointment = Yes", and "Appointment Date" set to either a prompt, date, date range, or smart value as needed, and "Appointment Status = Made". This subgroup would include made appointments created through Online Scheduling.
Open the Subgroup widget as either a dashboard or application widget, and choose to view your online scheduling subgroup. In the widget settings, the Result Type MUST be "Appointment", since the prospective patient has no other presence in Edge Cloud; Also, you can only use the Appointment, Pending Appointment, and Procedure categories when choosing what to display in the widget. We recommend including Pending Patient First Name, Pending Patient Last Name, Appointment Date, Appointment Time, and Procedure Code (if desired).
Subgroup Widget Result Type![]() - It is very important to set the Subgroup widget's Result Type to "Appointment". Since pending patients do not have Edge Cloud patient records yet, they only exist as appointments, and will not show up if you use any other result type.
- It is very important to set the Subgroup widget's Result Type to "Appointment". Since pending patients do not have Edge Cloud patient records yet, they only exist as appointments, and will not show up if you use any other result type.