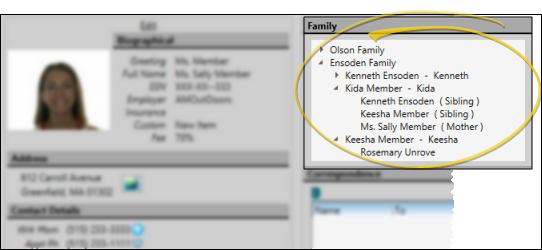
Use the Family panel on the patient folder Home page to review and assign family relationships among your patients, responsible parties, and non-patient members of your practice.
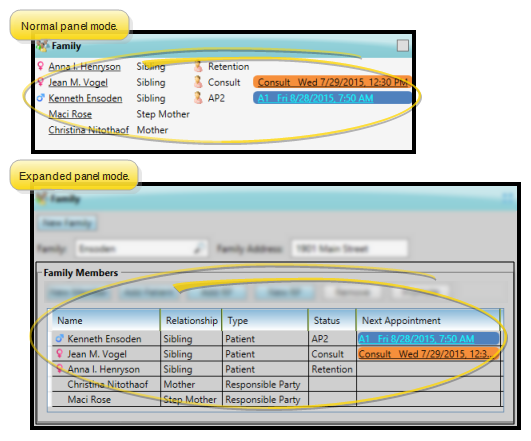
Expand / Collapse / Move the Panel - (Normal panel mode only: Single Expanded panel mode always shows panels expanded. See "Patient Home Page" for details.) You can expand, collapse, and move the information panel as needed. Some features of this panel only function when the panel is expanded.
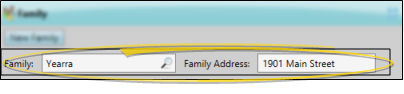
Family Name & Address (Expanded panel only.) If you edit the Family Name or Family Address field, those fields will be updated automatically for all family members.
Reassign Patient Family (Expanded panel mode only.) All patients must be assigned to one family, even if the patient is the only member of that family. If a patient is incorrectly assigned to a family, you can either select a different existing family for that patient, or create a new family.
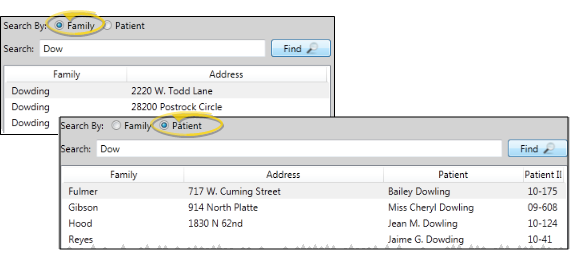
Search for a Family - Click the search icon in the Family text box, then choose whether to search by family name or patient last name. When the results appear, select the appropriate family name and address, and click Ok to assign the patient to that family. The patient is moved out of the original family and into the selected family. Any responsible parties already associated with the patient remain with the patient, and the patient does not gain any additional responsible parties.
Create a New Family - Click New Family, then type the family name (often the patient's last name) and address. Any responsible parties already associated with the patient remain with the patient, but other patients and non-patient member records remain in their original families.
Family Members List Each member of the patient's family is listed, including the patient name, gender, treatment status, and next scheduled appointment, if available.
Gender Icon - The gender icon to the left of the patient or family member's name indicates whether the person listed is male or female. Responsible parties do not have a gender icon.
Record Type - The patient icon ( )appears in Normal panel mode to indicate that this person has an Edge patient folder. Non-patient family members and responsible parties do not have the patient icon. In expanded panel mode, the Type column identifies whether the person has an Edge patient folder.
Open Patient Folders & Appointments - Click or double-click a family member name to open that patient folder or responsible party page, or click an appointment link to open your Scheduler, with that appointment selected.
If you have multiple Scheduler tabs open, clicking a patient appointment link will bring the left-most tab to the front of your Edge window. Note that before you click the link, you can reorder your tabs by simply dragging them into place, thus selecting which Scheduler tab you want to work with. See "Set Up General Scheduler Options" for details about enabling/disabling the multiple Scheduler option.
Add Family Member (Expanded panel mode only.) You can add non-patient family members (i.e. younger siblings), existing patients, existing responsible parties, and new responsible parties to a patient's family.
Add a Non-Patient Family Member - To create a family member record for someone that is neither a patient or a responsible party, such as a younger sibling, click New Member, then enter the Member Details, described below.
Add an Existing Patient to the Family - To add an existing patient to the family, click Add Patient and use Fast Find to search for the patient. Then review the Member Details, described below. The patient is removed from his or her original family and added to this family.
Add an Existing Responsible Party to the Family - To add an existing responsible party to the family, click Add RP and use Fast Find to search for the party. Then review the Member Details, described below. Responsible parties can be associated with multiple families: When you add an existing responsible party to a family, any other family associations remain unchanged.
Add a New Responsible Party - Click New RP and enter the information to create a new responsible party record. Then review the Member Details, described below. See "Create Responsible Party Records" for details.
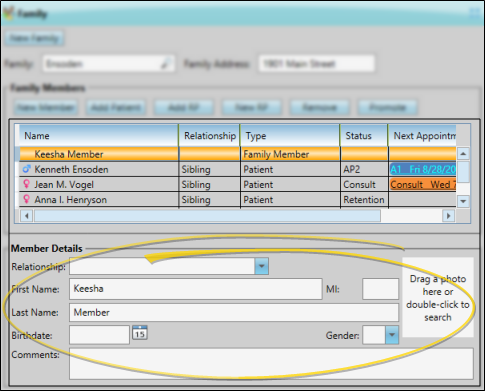
Member Details (Expanded panel mode only.) Select a family member, then review the Member Details section of the window. The details available depend upon the type of family member you chose to work with.
Relationship - Use the drop down list to select how this family member is related to the patient. When you change the relationship this patient has with another Edge patient folder, the relationship is automatically updated in the Family panel of that patient folder.
Name - The Family panel only allows you to change the name of family members that do not have Edge patient folders or responsible party records. To change patient or responsible party details, double-click to open that record.
Photo - Click the photo space and choose the photo to use, or drag a photo into the photo space. You can repeat this process to change the photo at any time. To remove the photo completely, right-click the photo and select Clear Image. The Family panel only allows you to add a photo of family members that do not have Edge patient folders or responsible party records. To change patient or responsible party details, double-click to open that record.
Birthdate - The Family panel only allows you to change the birthdate of family members that do not have Edge patient folders or responsible party records. To change patient or responsible party details, double-click to open that record.
Gender - The Family panel only allows you to identify the gender of family members that do not have Edge patient folders or responsible party records. To change patient or responsible party details, double-click to open that record.
Comments - Use the Comments section of family members that do not have Edge patient or responsible party records to record additional information about this person, such as future interest in orthodontics.
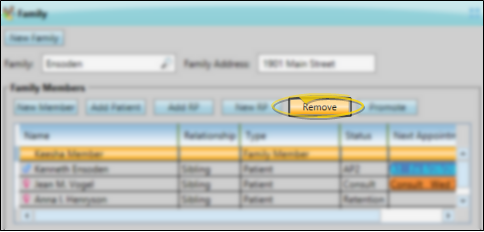
Remove a Family Member (Expanded panel mode only.) Select the non-patient family member or responsible party to work with, then click Remove. Non-patient family member records are permanently erased. Responsible parties are removed from this patient's family, but remain in Edge. You cannot remove a responsible party that has an active financial contract for this patient. To remove a family member that has an Edge patient folder, double-click to open that patient's folder, and reassign that patient to a different family (described above).
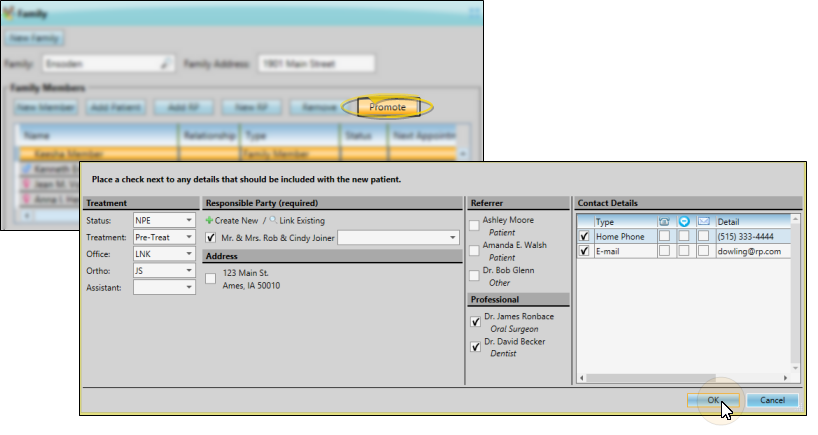
Promote a Family Member (Expanded panel mode only.) Select the non-patient family member to work with, and click Promote to create an Edge patient folder for that person. Then choose at least one responsible party, and optionally the referrers, professionals, and contact details to copy to the new patient. After the record is saved, be sure to open the new patient folder and complete additional details that are not available when using the Promote feature.
Responsible Party - (Required.) All responsible parties that are linked to the original patient folder, as well as responsible parties that are linked to other patients assigned to this family are listed. You can checkmark each responsible party that should be copied to the new patient folder, and indicate the relationship. Or, click +Create New to create a new responsible party for the new patient, or click Link Existing to search for a different responsible party to assign to the new patient. You must assign at least one responsible party to the new patient.
Address - The home address of the original patient folder, as well as the addresses of all responsible parties and patients assigned to this family are listed. You can checkmark the address that matches the new patient's home address. Otherwise, you will need to edit the new patient folder and add the information later.
Referrer - All referrers that are linked to the original patient folder, as well as referrers that are linked to other patients assigned to this family are listed. You can checkmark each referrer that should be copied to the new patient folder. Otherwise, you will need to edit the new patient folder and add the information later.
Professional - All professionals that are linked to the original patient folder, as well as referrers that are linked to other patients assigned to this family are listed. You can checkmark each professional that should be copied to the new patient folder. Otherwise, you will need to edit the new patient folder and add the information later.
Contact Details - All contact details that are linked to the original patient folder, as well as contact details from other patients assigned to this family are listed. You can checkmark each contact that should be copied to the new patient folder. Otherwise, you will need to edit the new patient folder and add the information later.
Finish - Click Ok to close the Import New Patient Details window. The family member will now be listed as a patient in the Family panel, but the patient folder will not be created until you save your changes (described below). Once saved, the new patient folder will include any details you selected, as well as the original patient's orthodontist and office settings.
Workflows Not Triggered - Any workflow you have assigned to the New Patient trigger will not be activated when you create a new patient in this manner.
Save Changes Click Save in your Quick Access toolbar or File ribbon bar (or press Ctrl+S on your keyboard) to save any changes you have made.
More Information
View Family on Responsible Party Page All family members are listed in the Family section of your responsible party pages, and patients are also listed in the Patient section. See "Responsible Party Page" for details. You cannot modify families from the responsible party page: You can only modify families from the expanded Family panel of the patient folder Home page.
 Family panel. (See "Patient Home Page" for details about opening the patient's Home page and selecting the panel(s) to view. The process is slightly different, depending on whether Normal panel mode or Single Expanded panel mode is enabled in your Visual User Options.)
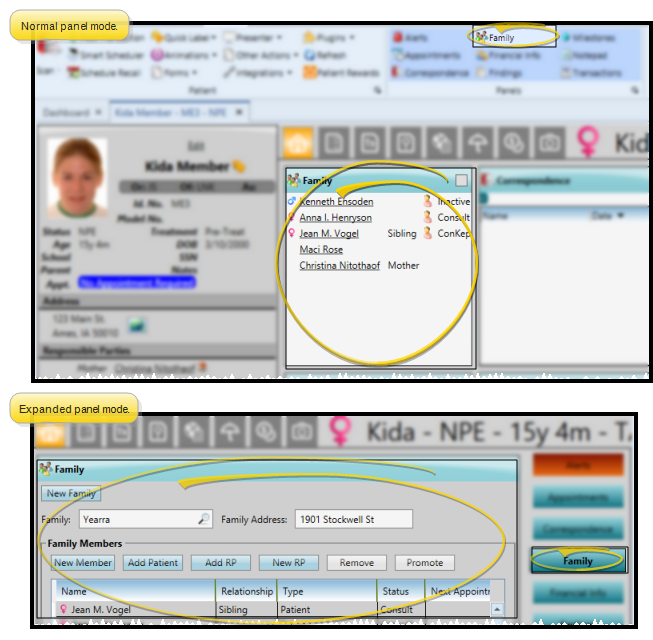

 )appears in Normal panel mode to indicate that this person has an Edge patient folder. Non-patient family members and responsible parties do not have the patient icon. In expanded panel mode, the Type column identifies whether the person has an Edge patient folder.
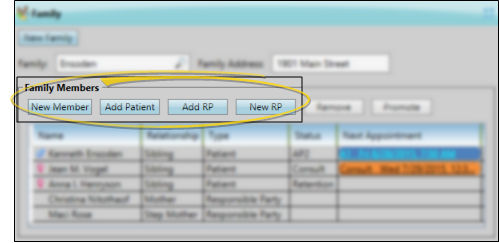
 Save in your