Post Payments
Use the Post Payment option of the Post Transaction window to post cash, check, credit card, debit card, and electronic transfer payments to your patient accounts.
Set Up Payment Accounts - Use the Payment Accounts editor to define the types of payments you accept from responsible parties. If you integrate Edge Cloud with an electronic payment processing system, such as OpenEdge, Vanco, or Vantiv Worldpay (formerly Element), you must create at least one payment account to use with that integration. See "Set Up Payment Accounts" for details.
-
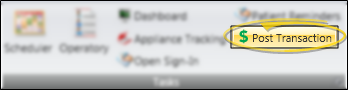
 Open the Post Transaction Window - Home or Patient or Patient Finances or Scheduler ribbon bar >
  Post Transaction.
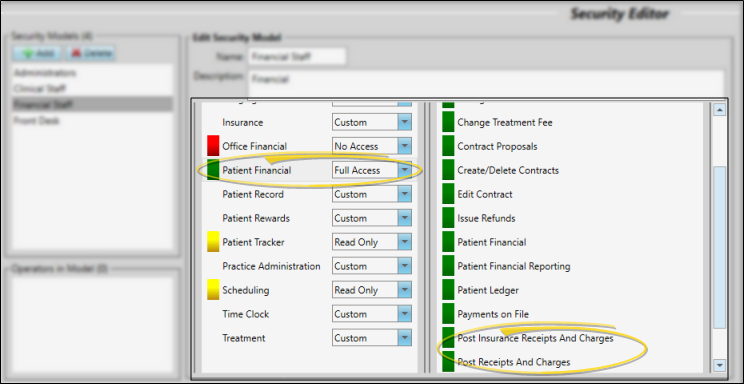
Post Transaction Security - Your Edge Cloud security settings can allow or prevent operators from posting transactions. To set up this security access, open the Security editor and choose the security model to work with. Then click the Patient Financial security group, and set the Post Insurance Receipts and Charges and Post Insurance Receipts and Charges options to the appropriate access settings. (See "Set Up Security Access" for details about using the editor.)
The placement of the icon depends upon which ribbon bar you are using. If a patient record is already active, that patient's information will be loaded automatically. Otherwise, you use Fast Find (either typing information or swiping a registered reward card) to search for the patient to work with. (You can also post transactions from the Quick Access toolbar at the top of your Edge Cloud screen, and by right-clicking a patient's appointment in your Scheduler.)
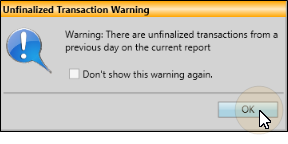
You can set up Edge Cloud so that when you attempt to post a transaction before you finalize the Transaction Report for the previous day, you see a warning message before the Post Transaction window will open. You must then confirm your action before continuing. This feature helps you maintain the integrity of daily transaction postings. After you have seen the message once, you can select not to see it again that day, if you choose. (See "Financial User Options" for details.)
-
Select Patient and Billing Party - The patient's name, id number, office, doctor and any patient tag and visual tags appear at the top of the window. All associated contracts appear below. If this person's record has a visual tag applied, the appropriate color/shape appears beside the name. Choose the account to work with. If needed, you can use the Change Patient button at the bottom of the window to launch Fast Find and choose a different patient. If the patient has multiple responsible parties and / or contracts, select the account holder and contract to use. Insurance contracts are listed directly below the associated subscriber.
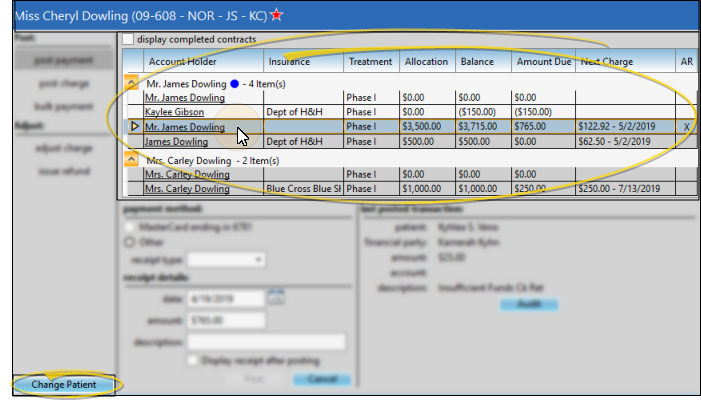
Display Current or Completed Contracts - By default, only currently active contracts appear in the list. If the contract you want
does not appear, enable the Display Completed Contracts option to be sure you are viewing all accounts associated with this patient.
Next Charge - The far right edge of the contract list at the top of the post transaction screen includes the next scheduled payment date and amount. You might use this information to ask the responsible party for their next payment amount in addition to any miscellaneous charges incurred during the day's visit.
Auto Receipt Contract - The AR column at the right of the post transactions window indicates whether the contract is set up with an Auto Receipts agreement.
-
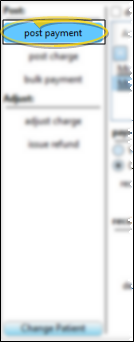
Enable Post Payment Mode - Click Post Payment at the left of the Post Transactions window to begin posting payments to patient accounts.
-
Payment Method - Select whether to use a responsible party payment on file, credit card, cash, check, or other method of payment.
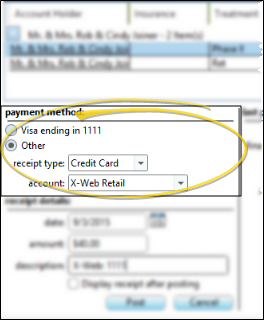
Payment on File - If you have saved credit card or electronic transfer information in the responsible party folder, those Payment on File records are listed on the Post Transaction screen for easy selection. You cannot post a payment with an account whose expiration date has passed. See "Set Up Payments on File" for details.
Other Receipt Type - If you have no Payment on File records for this responsible party, or if they paid you in a different way, enable the Other option, then choose the type of receipt you are posting: Cash, Check, Credit Card, PIN Debit, Money Order, or Electronic Transfer.
Account - If the receipt type you selected is associated with multiple payment accounts, select the account to apply to this payment. Otherwise, the receipt type determines the payment account. See "Set Up Payment Accounts" for details.
-
Receipt Details - Enter the payment date, amount, and description of the payment, and choose whether to generate a receipt immediately after posting.
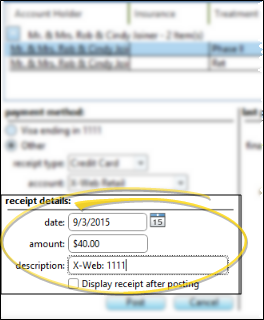
Date - Your financial security settings may limit or restrict you from changing the transaction posting date. See "Set Up System Financial Settings" for details.
Description - You can set up default payment descriptions in your Payment Accounts editor. In addition, typing the letters "ck" followed by a space will insert the description "Check No." automatically. You can then simply enter the appropriate check number to complete the description.
Display Receipt Option - Enable the Display receipt after posting option to generate and sign a receipt of payment immediately after you post the transaction. See "Receipt of Payment" for details. A receipt will be displayed for all credit card payments whether or not this option is enabled.
-
Post the Transaction - Click Post.Edge Cloud calculates the new account balance and amount due, and asks you to confirm the transaction. Click Yes to complete the process, or click No to exit without posting the transaction.
Credit / Debit Card Details - If you are posting a credit card or debit card payment that is not saved as a Payment on File in the responsible party folder, you will see a credit card details window as you post the payment. Swipe the card (or type the information), and choose to complete the process. The appearance of the credit card details window depends upon the type of payment processing integration you are using. (When you use a Payment on File, the processing happens automatically and you do not see the credit card details window.)
-
Sign & Print Receipt - If you enabled the Display receipt after posting option, or if you posted a credit card payment, a receipt form appears on your screen, waiting for a signature.
Show Account Balance & Amt Due - Enable this option to expand the signature form and display the contract's account balance and amount due. Disable the option to remove these amounts from the form. This is the form that will be saved in the patient's Correspondence History: The form you print or email may look different.
Sign the Receipt - Use your pointing device (i.e. your mouse) to sign the receipt. If needed, click the  beside the signature field to clear the signature and start over. If you do not display and sign a receipt form as you post a transaction, you will not be able to obtain a signature for the payment.
Send Receipt - Choose to Print or Email the receipt. Printed forms will use your Quick Report settings; emailed forms will use your Form Email Setup settings. When you select the email option, you can then choose to send the message to any email address associated with the responsible party that made the payment.
Correspondence History Tracking - When you print a receipt at the time a payment is posted, the event is recorded in both the patient and responsible party Correspondence History. This receipt is a copy of the form that appeared on your screen as you posted the transaction, including any signature. If you print a receipt later, the event is not recorded in the Correspondence History.
Misc. Charge - Select the miscellaneous charge description from your Transaction Types table. You must select a description from the list: You cannot type a unique description here.
Alert Stop - If the patient has an alert trigger enabled for this feature, the Alert Stop pup-up window will appear when you initiate this feature for the patient. Review the alert information, then click the box to continue. (See "Patient Alerts" for details.)
Last Posted Transaction - The last transaction you posted appears at the right of the post transactions window for your reference. This helps prevent duplicate posting errors. In addition, when posting a charge, receipt, or refund, you can click Audit to review the posting details of this last-posted transaction. (You can use your Financial User Options to choose whether or not to display this information. See "Financial User Options" for details.)
Bulk Payments - Use the Bulk Payment tool to allocate one payment among multiple contracts. For
example, you would use the bulk payment tool when you receive an insurance check for several clients, instead of posting individual payments to each account. See "Post Bulk Payments" for details.
Print Prior Receipt - If you do not generate a receipt of payment as you post the transaction, you can generate one later. You will not, however, be able to sign the receipt at that time. See "Receipt of Payment" for details.
Office / Doctor Payment Designation - All payments you post in Edge Cloud are applied to the office and doctor listed on the Patient Information Panel of the patient folder, regardless of what payment account is used. So, if an office sets up a payment account called Credit Card – Main Office, and uses that account to post a payment for a patient assigned to their Satellite Office, the payment will be applied to the Satellite Office on the deposit slip and Transaction report.
Open Ledger From Post Transaction Window - Click a responsible party name in the Account Holder column of the contract list that's displayed at the top of the Post Transaction window to open the patient's Finance page to the ledger details. You may need to drag the Post Transaction window to another location on your screen, or minimize it to your task bar in order to view the transactions.
Exclude From Deposit Slip - (Uncommon.) You can right-click a receipt in the patient's transaction ledger, and select Exclude From Deposit Slip. The receipt will still be applied to the patient account, but it will not be counted as part of your deposits for the day. You might use this feature, for example, if you are re-entering a payment after making a correction, and the payment amount had already appeared on a deposit slip. In addition, your Transaction Report will show an astrisk ( * ) along with the description in the Receipts section of the report. (Use the Transaction Excluded from Deposit Slip workflow trigger to activate a workflow whenever you flag a ledger receipt with Exclude From Deposit Slip. (Note that receipt adjustments and refunds are always excluded from the deposit slip, and do not trigger this workflow.)
Audit Transactions Processed by your Payment Accounts - Run the Processed Transactions report to obtain the details of each electronic and credit card transaction run through the selected payment processor for any range of dates or Transaction reports. The report includes the responsible party and patient identifiers, receipt description, date, and amount, and the Transaction number on which the receipt appears, as well as the payment processor details.See "Processed Transactions" for details.


