Run the Deposit Slip to obtain a list of all of the deposit receipts for a given
We recommend that you print the Deposit Slip after you finalize your Transaction Report for the day, as finalizing the Transaction Report also finalizes the Deposit Slip. The Deposit Slip separates cash, check, credit card, electronic transfer, debit card, and money order receipts and itemizes them for your bank. Items that you do not take to the bank (such as credit cards, electronic transfers, and debit cards) appear on the last page of the report, while items that need to be deposited (cash, checks, and money orders) appear on the first page. See "Finalize Transactions" for details
Finalize transactions - If you want to print a Deposit Slip for today's receipts that you can take to the bank, be sure to first finalize the transactions for the day. If you routinely finalize transactions for individual offices rather than finalizing all offices at once, note that the transactions of un-finalized offices will not be included on today's Deposit Slip. See "Finalize Transactions" for details.
Home ribbon bar >  Reporting > Financial > Deposit Slip > Run. (You can also search for the report you want to work with.)
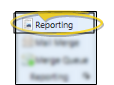
Click Reporting from the Reporting section of the Home ribbon bar.
If needed, expand the Financial reports section, and select the Deposit Slip report. Then click Run.
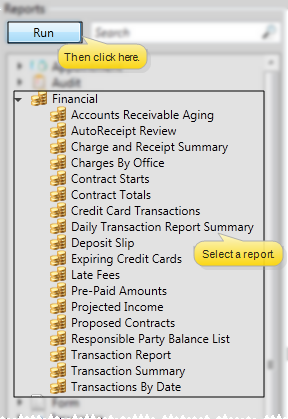
You might also be able to run this report or form from your Recent Reports or Quick Reports list.
Select the options to use for choosing records and generating this report or form. Choose carefully, as your selections will affect which patients are included in the report.
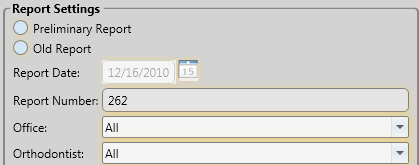
Preliminary or Old report - Choose Preliminary Report to include information that has not yet been finalized on a Transaction Report. Choose Old Report to include finalized transactions.
Report date - (Available only for Old deposit slips: This field is ignored for Preliminary deposit slips, which include all non-finalized receipts.) Select to generate an Old deposit slip, then enter the transaction date to use. Generally, you print the Deposit Slip for today's transactions. However, you can re-create a Deposit Slip for a different date if needed.
Report number - (Available only for Old deposit slip: This field is ignored for Preliminary deposit slips, which include all non-finalized receipts.) You can use this field in place of the Report Date when generating an Old deposit slip, if you know the number of the Deposit Slip you want to print.
Office - Choose to include only the records for a specific office, or include the records for all office locations in your practice.
Orthodontist - Choose to include only the records for a specific orthodontist, or include the records for All orthodontists in your practice. Be sure you select the orthodontist appropriate for the deposit slip you want to generate.
View Results - If needed, click View at the top of the report settings panel to view the results on your screen. When you run a report or form from your Recent Report list, or when you run a Quick Report, the initial results are sent to your screen immediately, with one exception: A Quick Report that has the  Print Only option enabled will not show your results on the screen at all, but prompt you for the printer to use.
Report Title & Header - Whether you view the report on your screen or print it, the report title and run date appear in the header of each report page. If you used subgrouping or other report options, the subgroup description appears just under the report title so you know which criteria was used to generate the results.
Open Patient Folder - While viewing the report, you can click a patient name that appears on the report to open that patient folder.
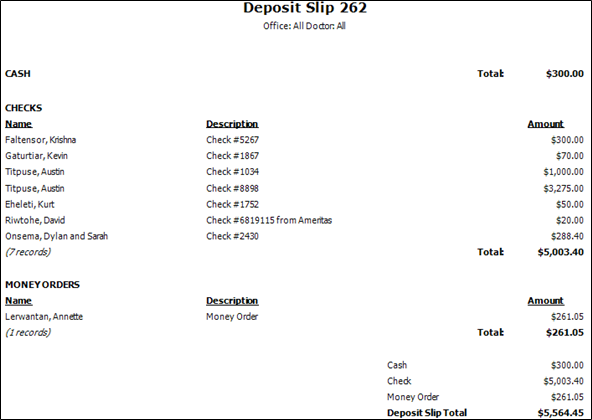
Date - Notice the Deposit Slip can be printed for a single date only, and includes the receipt transactions that correspond to the Transaction Report of the same date.
Office / Orthodontist noted - If you generate the Deposit Slip for a specific doctor and/or location, the name will appear in the header of the report. If you seem to be missing transactions, try running the Deposit Slip again, but for All offices and orthodontists.
Deposit Slip Total - The bottom of the first page of the Deposit Slip summarizes the total of just the checks, cash and money orders, so that you can take this page to your back along with your deposit items.
Deposit Slip Grand Total - The bottom of the last page of the Deposit Slip summarizes all deposit transactions, including credit cards, debit cards and electronic transfers.
Office / Orthodontist payment designation - All payments you post in Edge are applied to the office and orthodontist listed on the Patient Information Panel of the patient folder, regardless of what payment account is used. So, if an office sets up a payment account called Credit Card – Main Office, and uses that account to post a payment for a patient assigned to their Satellite Office, the payment will be applied to the Satellite Office on the Deposit Slip and Transaction Report.
Manage Options and Output - With the results on your screen, you can choose different report settings from the left side of the screen and click View again to obtain different results. In addition, you can manage the output with the toolbar at the top of the report window. See "Navigate, Print, & Export Report Results" for details. In addition, reports can either be printed, or exported as an image or PDF file.
Excluded from Deposit Slip Workflow Trigger - Use the Transaction Excluded from Deposit Slip workflow trigger to activate a workflow whenever you flag a ledger receipt with Exclude From Deposit Slip. (Note that receipt adjustments and refunds are always excluded from the deposit slip, and do not trigger this workflow.)
 │
│
Ortho2.com │1107 Buckeye Avenue │ Ames, Iowa 50010 │ Sales: (800) 678-4644 │ Support: (800) 346-4504 │ Contact Us
Remote Support │Email Support │New Customer Care │ Online Help Ver. 8/3/2015


