Appointment Cards
Run Appointment Card forms to generate detailed appointment reminder cards for your patients. The information available for printing on the card, such as the most recent payment receipt, or a school / work excuse, depends on the style you select. You may also include your office name and address on the form as it prints, or have your logo pre-printed on special form paper for a more professional appearance. In addition, you may choose to email appointment cards to patients and / or responsible parties, rather than printing them.
![]() Get Started with Appointment Cards
Get Started with Appointment Cards
Use the Default Forms section of your Reports and Forms editor to select the default format to use for paper forms. This is the format that will be selected when you run the form from the Forms option of the Home or Patient ribbon bar. If you have purchased customized forms, you may choose your form as the default. If needed, you can set up different default forms for individual offices and specialties in your practice. See "Reports and Forms Editor" for details.
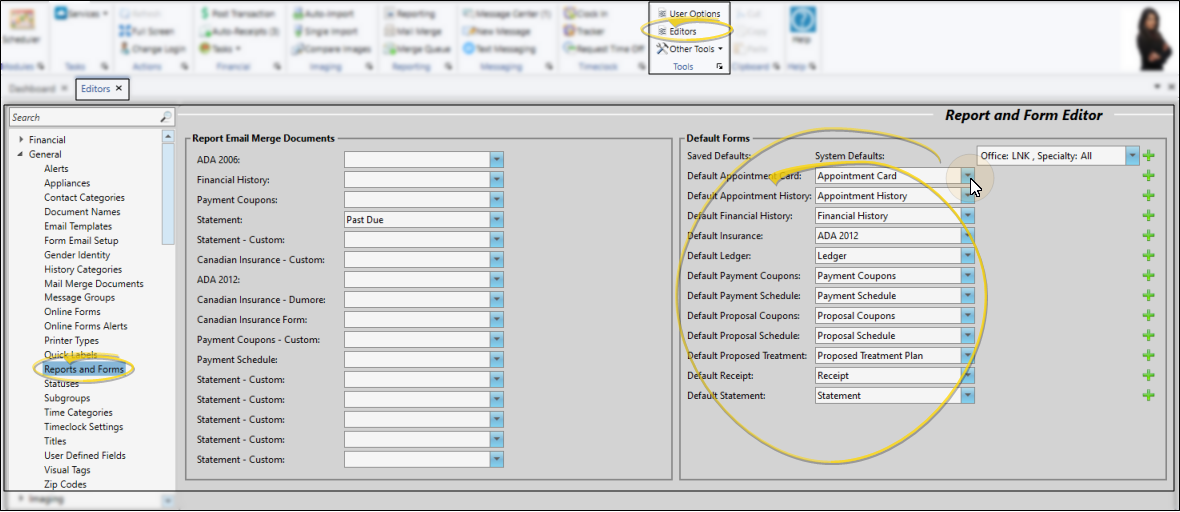
This format will only be used when you print appointment cards; use the Form Email editor to set up appointment cards that you email to patients.
You can use pre-printed, personalized forms, instead of printing this form on plain paper. To order your personalized forms, contact Quality Resource Group, the only authorized supplier of Ortho2 forms. You can reach them at www.quality-resource.com or 800.788.6376. Please contact your Ortho2 Regional Managerfor more information about QRG.
![]() Set Up Appointment Card Quick Report Settings
Set Up Appointment Card Quick Report Settings
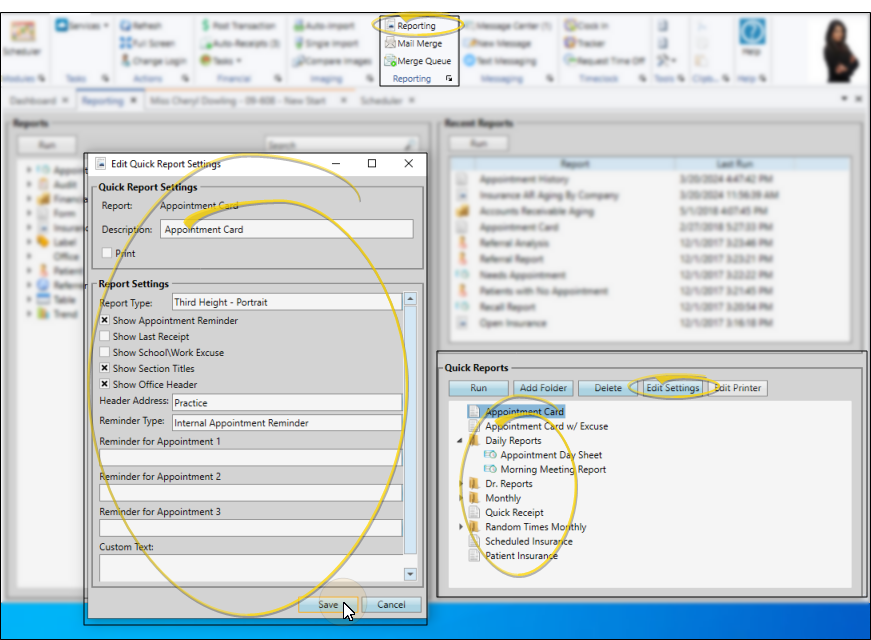
When you print a form for a patient from the Patient ribbon bar, or the Scheduler ribbon bar, or by right-clicking an appointment from the Patient Information Panel or the Scheduler, the results default to the Quick Report settings. If those settings include printing the form immediately, you will not have an opportunity to review before the form prints. See "Quick Reports" for detailsabout creating / updating these settings.
![]() Set Up Email Appointment Cards
Set Up Email Appointment Cards
Use the Form Email Setup editor to create and manage appointment cards and payment receipts that you email to your patients and responsible parties. See "Form Email Setup Editor" for details.
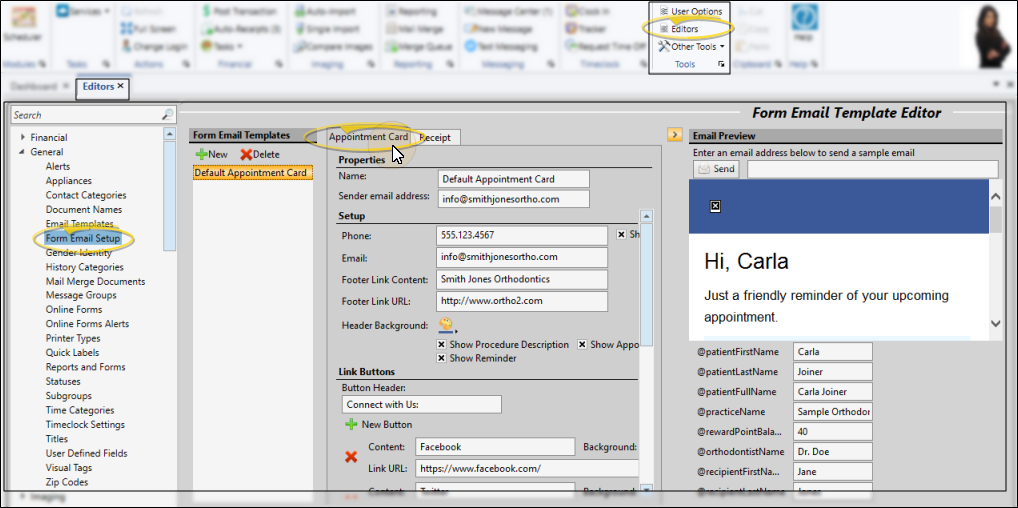
You must set up your Form Email Setup editor before the email option will be available for your appointment cards and payment receipts.
Printing vs Emailing Appointment Cards![]() - The process for printing appointment cards is different than the process for emailing them. Please refer to the appropriate section of this article for the type of output you want to use.
- The process for printing appointment cards is different than the process for emailing them. Please refer to the appropriate section of this article for the type of output you want to use.
![]() Open the Appointment Card Window
Open the Appointment Card Window
You can open this feature in multiple ways: Use the method that's most convenient for you.
Patient or Home Ribbon Bar![]() - Select Forms then Appointment Card from the Patient ribbon bar, or from the Tasks section of the Home ribbon bar When you print a form for a patient from the Patient ribbon bar, or the Scheduler ribbon bar, or by right-clicking an appointment from the Patient Information Panel or the Scheduler, the results default to the Quick Report settings. If those settings include printing the form immediately, you will not have an opportunity to review before the form prints. See "Quick Reports" for detailsabout creating / updating these settings.
- Select Forms then Appointment Card from the Patient ribbon bar, or from the Tasks section of the Home ribbon bar When you print a form for a patient from the Patient ribbon bar, or the Scheduler ribbon bar, or by right-clicking an appointment from the Patient Information Panel or the Scheduler, the results default to the Quick Report settings. If those settings include printing the form immediately, you will not have an opportunity to review before the form prints. See "Quick Reports" for detailsabout creating / updating these settings.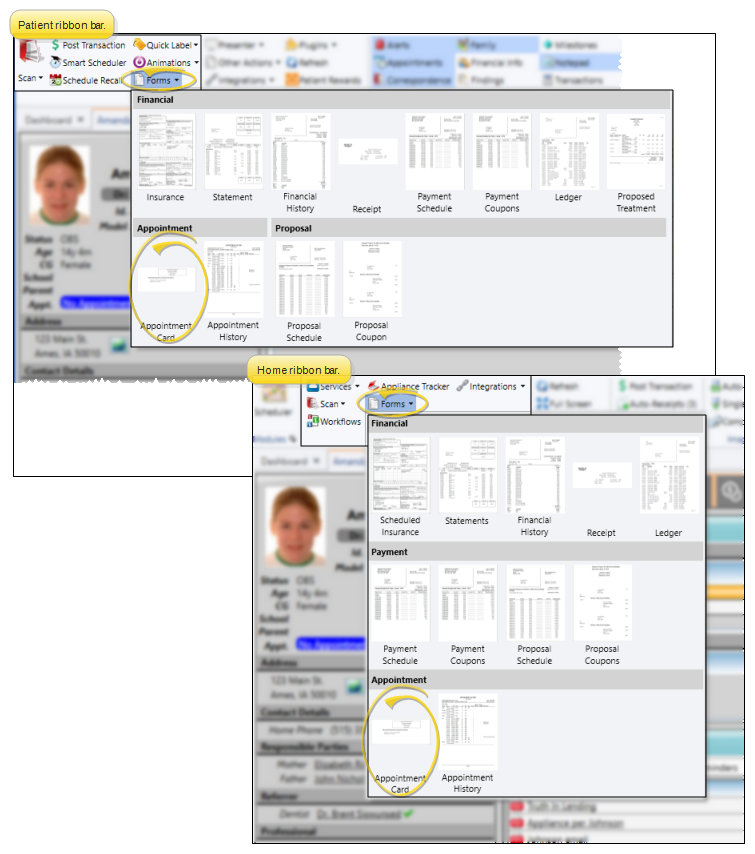
Reporting Window![]() - Select Reporting from the Reporting section of the Home ribbon bar. Then from the Form section, open the Appointment Card. (You can also use the Search field to find the form you want to work with.) You might also be able to run this form from your Recent Reports or Quick Reports list. See "Run Edge Cloud Reports" for details. This option does not automatically select a patient to print for.
- Select Reporting from the Reporting section of the Home ribbon bar. Then from the Form section, open the Appointment Card. (You can also use the Search field to find the form you want to work with.) You might also be able to run this form from your Recent Reports or Quick Reports list. See "Run Edge Cloud Reports" for details. This option does not automatically select a patient to print for.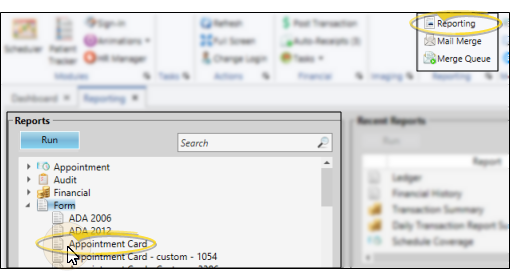
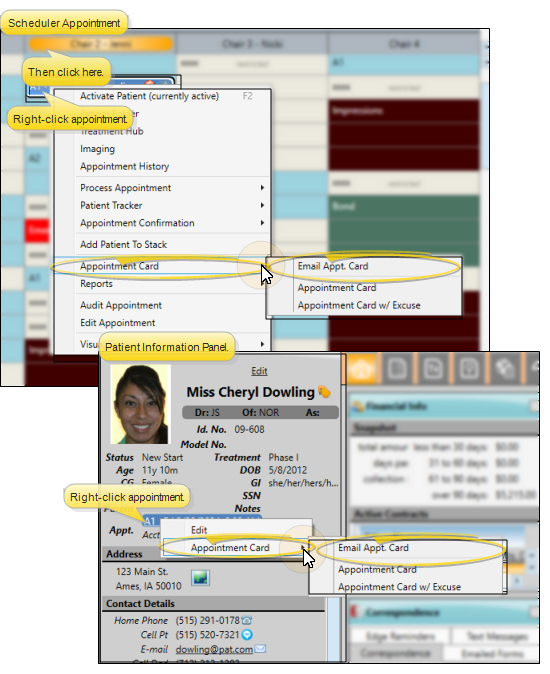
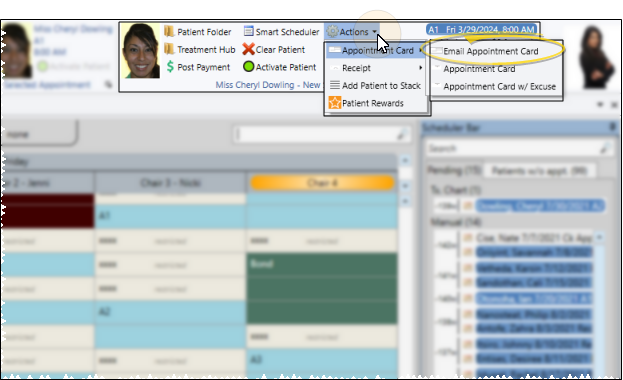
Scheduler Ribbon Bar![]() - Select Actions from the Active Patient section of the Scheduler ribbon bar. Then choose either the Appointment Card or Appointment Card W/Excuse option. If there is an active patient in your Scheduler, the appointment card will print for that person. Otherwise, you will use FastFind to search for the patient. When you print a form for a patient from the Patient ribbon bar, or the Scheduler ribbon bar, or by right-clicking an appointment from the Patient Information Panel or the Scheduler, the results default to the Quick Report settings. If those settings include printing the form immediately, you will not have an opportunity to review before the form prints. See "Quick Reports" for detailsabout creating / updating these settings. (If you want to email the appointment card instead, please refer to that section of this help article.) (See "Your Scheduler" for details).
- Select Actions from the Active Patient section of the Scheduler ribbon bar. Then choose either the Appointment Card or Appointment Card W/Excuse option. If there is an active patient in your Scheduler, the appointment card will print for that person. Otherwise, you will use FastFind to search for the patient. When you print a form for a patient from the Patient ribbon bar, or the Scheduler ribbon bar, or by right-clicking an appointment from the Patient Information Panel or the Scheduler, the results default to the Quick Report settings. If those settings include printing the form immediately, you will not have an opportunity to review before the form prints. See "Quick Reports" for detailsabout creating / updating these settings. (If you want to email the appointment card instead, please refer to that section of this help article.) (See "Your Scheduler" for details).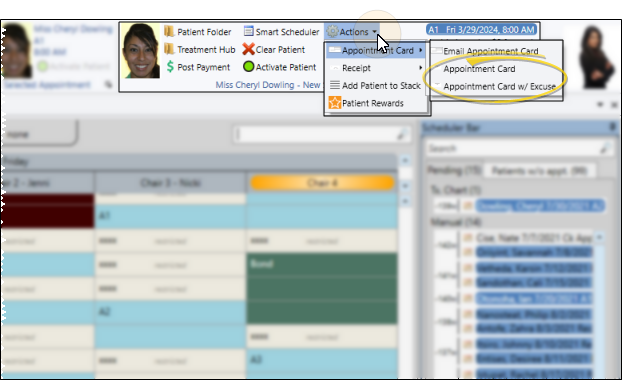
Scheduler Appointment / Patient Information Panel![]() - Right-click an appointment from either the Scheduler or the patient's Patient Information Panel.Then choose either the Appointment Card or Appointment Card W/Excuse option. These options automatically select the active patient as the patient to print for. When you print a form for a patient from the Patient ribbon bar, or the Scheduler ribbon bar, or by right-clicking an appointment from the Patient Information Panel or the Scheduler, the results default to the Quick Report settings. If those settings include printing the form immediately, you will not have an opportunity to review before the form prints. See "Quick Reports" for detailsabout creating / updating these settings. (If you want to email the appointment card instead, please refer to that section of this help article.)
- Right-click an appointment from either the Scheduler or the patient's Patient Information Panel.Then choose either the Appointment Card or Appointment Card W/Excuse option. These options automatically select the active patient as the patient to print for. When you print a form for a patient from the Patient ribbon bar, or the Scheduler ribbon bar, or by right-clicking an appointment from the Patient Information Panel or the Scheduler, the results default to the Quick Report settings. If those settings include printing the form immediately, you will not have an opportunity to review before the form prints. See "Quick Reports" for detailsabout creating / updating these settings. (If you want to email the appointment card instead, please refer to that section of this help article.)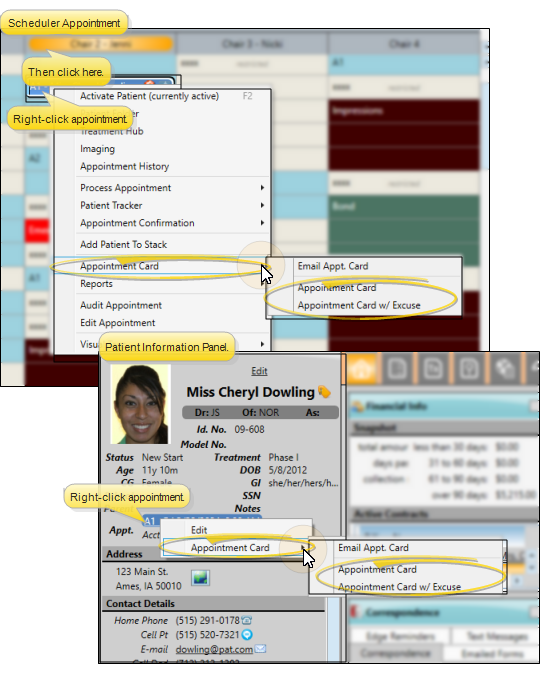
Select the options to use for choosing records and generating this form. Show/Hide icon in the upper left corner of the Reporting window.)
Quick Report Settings![]() - When you print a form from the Patient or Home ribbon bar, the results default to the Quick Report settings. If those settings include printing the form immediately, you will not have an opportunity to review before the form prints. See "Quick Reports" for details about creating / updating these settings.
- When you print a form from the Patient or Home ribbon bar, the results default to the Quick Report settings. If those settings include printing the form immediately, you will not have an opportunity to review before the form prints. See "Quick Reports" for details about creating / updating these settings.
Appointment![]() - If you did not open the form with a patient active, use the Appointment field to select the patient to work with. Edge Cloud will only search patients that have future appointments scheduled.
- If you did not open the form with a patient active, use the Appointment field to select the patient to work with. Edge Cloud will only search patients that have future appointments scheduled.
Report Type![]() - Select the format / paper type to use for your appointment card. Certain formats may print multiple pages for a single patient, depending upon the options you select. If you use pre-printed, personalized forms from QRG, select a VIP Slip option. See examples here.
- Select the format / paper type to use for your appointment card. Certain formats may print multiple pages for a single patient, depending upon the options you select. If you use pre-printed, personalized forms from QRG, select a VIP Slip option. See examples here.
 Third Height / Third Height - Portrait
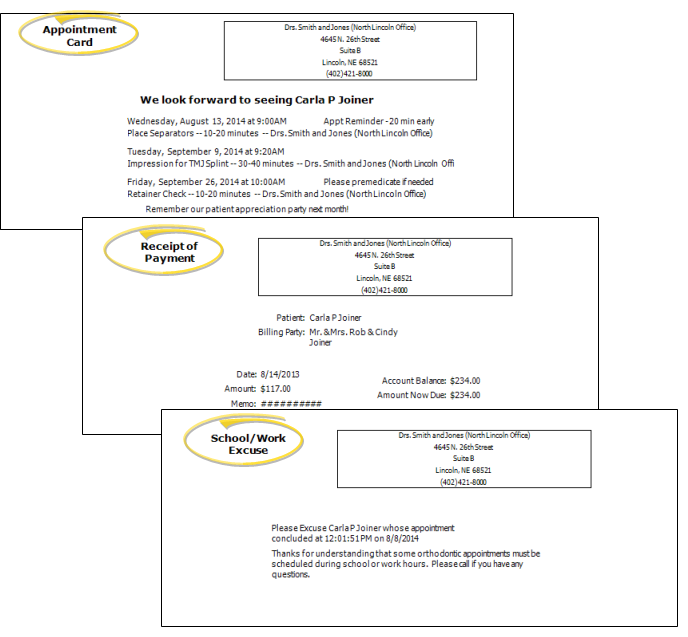
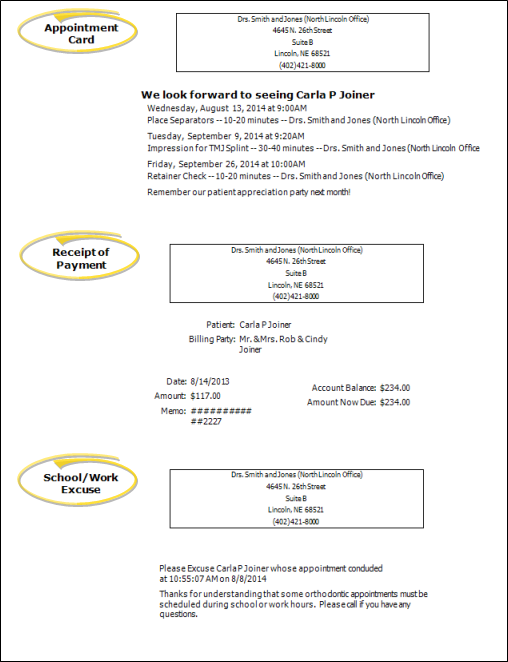
![]() - This format prints on plain paper. It can include an appointment card with up to three future appointments, a receipt for the most recent payment, and a school / work excuse stamped with the current date and time: Each option prints on a separate page. You can also optionally include the title and office header on each card. The Third Height format prints in landscape mode; the Third Height - Portrait format prints in portrait mode.
- This format prints on plain paper. It can include an appointment card with up to three future appointments, a receipt for the most recent payment, and a school / work excuse stamped with the current date and time: Each option prints on a separate page. You can also optionally include the title and office header on each card. The Third Height format prints in landscape mode; the Third Height - Portrait format prints in portrait mode.
 Full Sheet
![]() - This format prints on plain paper. It can include up to three future appointments, a receipt for the most recent payment, and a school / work excuse stamped with the current date and time: All sections you select print on a single sheet of paper. You can optionally include section titles and office headers on each portion of the card.
- This format prints on plain paper. It can include up to three future appointments, a receipt for the most recent payment, and a school / work excuse stamped with the current date and time: All sections you select print on a single sheet of paper. You can optionally include section titles and office headers on each portion of the card.
 Business Card
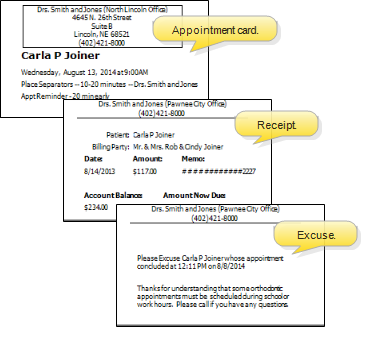
![]() - This small format prints on plain business card paper. It can include only one appointment. If the patient has multiple appointments, be sure you select the appointment you want to print when you select the patient. It can also include a receipt for the most recent payment, and a school / work excuse stamped with the current date and time: Each option you choose prints on a separate page. You can optionally include the office header on each card. This format does not support section titles or custom text.
- This small format prints on plain business card paper. It can include only one appointment. If the patient has multiple appointments, be sure you select the appointment you want to print when you select the patient. It can also include a receipt for the most recent payment, and a school / work excuse stamped with the current date and time: Each option you choose prints on a separate page. You can optionally include the office header on each card. This format does not support section titles or custom text.
 VIP Slip / VIP Slip - Portrait
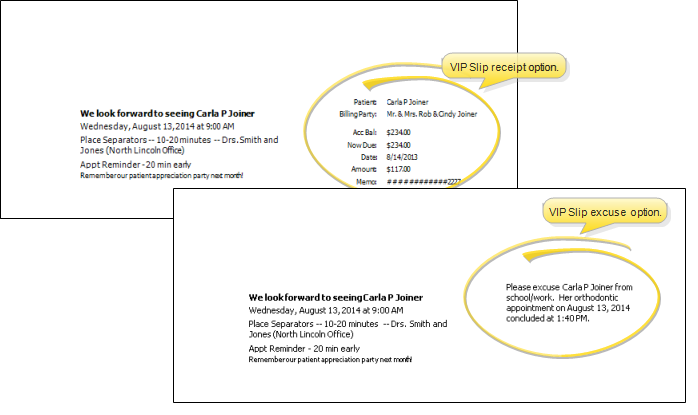
![]() - This format is designed to print on pre-printed forms personalized for your office. The card includes the patient's appointment information, associated reminder, and custom text. You also choose whether to include a receipt for the most recent payment, or a school / work excuse. If the patient has multiple appointment scheduled, a VIP Slip prints for each. The titles and office header are always omitted, since the card is intended for personalized forms. You can use pre-printed, personalized forms, instead of printing this form on plain paper. To order your personalized forms, contact Quality Resource Group, the only authorized supplier of Ortho2 forms. You can reach them at www.quality-resource.com or 800.788.6376. Please contact your Ortho2 Regional Managerfor more information about QRG.
- This format is designed to print on pre-printed forms personalized for your office. The card includes the patient's appointment information, associated reminder, and custom text. You also choose whether to include a receipt for the most recent payment, or a school / work excuse. If the patient has multiple appointment scheduled, a VIP Slip prints for each. The titles and office header are always omitted, since the card is intended for personalized forms. You can use pre-printed, personalized forms, instead of printing this form on plain paper. To order your personalized forms, contact Quality Resource Group, the only authorized supplier of Ortho2 forms. You can reach them at www.quality-resource.com or 800.788.6376. Please contact your Ortho2 Regional Managerfor more information about QRG.
 4.52 Inch
![]() - This format prints on plain paper, and accommodates up to three future appointments, the associated reminders, and custom text. You can optionally include the title and office header on the card. This format will not print a payment receipt or school/work excuse.
- This format prints on plain paper, and accommodates up to three future appointments, the associated reminders, and custom text. You can optionally include the title and office header on the card. This format will not print a payment receipt or school/work excuse.
Show Appointment Reminder![]() - (Not available for VIP Slip and 4.25" formats: These formats always include this information.) Enable this option to include the scheduled appointment information on the card. Disabling this option provides you with a way to generate a school/work excuse or payment receipt for today's appointment without including the next scheduled appointment information on the card.
- (Not available for VIP Slip and 4.25" formats: These formats always include this information.) Enable this option to include the scheduled appointment information on the card. Disabling this option provides you with a way to generate a school/work excuse or payment receipt for today's appointment without including the next scheduled appointment information on the card.
Show Last Receipt![]() - (Not available for 4.25" format.) Enable this option to include the last payment posted to the patient's account, as well as the current account balance and amount due. If this option is disabled, no financial information appears on the card. For some formats, the payment receipt will print on a separate page.
- (Not available for 4.25" format.) Enable this option to include the last payment posted to the patient's account, as well as the current account balance and amount due. If this option is disabled, no financial information appears on the card. For some formats, the payment receipt will print on a separate page.
Show School / Work Excuse![]() - (Not available for 4.25" format.) You can optionally include school / work excuse details on appointment cards you print for your patients. You choose whether to print the current time, the scheduled appointment ending time, or a time you type in as the appointment conclusion time. (See "School / Work Excuse Forms" for details.) For some formats, the excuse will print on a separate page.
- (Not available for 4.25" format.) You can optionally include school / work excuse details on appointment cards you print for your patients. You choose whether to print the current time, the scheduled appointment ending time, or a time you type in as the appointment conclusion time. (See "School / Work Excuse Forms" for details.) For some formats, the excuse will print on a separate page.
Show Section Titles![]() - (Not available for VIP Slip Formats.) Enable this option to print the titles "Appointment Card", School/Work Excuse" and "Receipt of Payment" on the appointment card. The titles will appear only when you have also enabled the corresponding options described above.
- (Not available for VIP Slip Formats.) Enable this option to print the titles "Appointment Card", School/Work Excuse" and "Receipt of Payment" on the appointment card. The titles will appear only when you have also enabled the corresponding options described above.
Show Office Header![]() - (Not available for VIP Slip Formats.) Enable this option to print your office name and address at the top of the form. VIP Slip formats are intended to print on personalized forms, and cannot enable this option.
- (Not available for VIP Slip Formats.) Enable this option to print your office name and address at the top of the form. VIP Slip formats are intended to print on personalized forms, and cannot enable this option.
Header Address![]() - (Not available for VIP Slip Formats.) If you enabled the Show Office Header option above, select which address to include on the appointment card: Practice prints the address from your Practice editor; Patient Office prints the address from the office assigned to the patient folder; Appointment Office prints the address from the office assigned to the appointment. (See "Office Editor" for details about maintaining office addresses.)
- (Not available for VIP Slip Formats.) If you enabled the Show Office Header option above, select which address to include on the appointment card: Practice prints the address from your Practice editor; Patient Office prints the address from the office assigned to the patient folder; Appointment Office prints the address from the office assigned to the appointment. (See "Office Editor" for details about maintaining office addresses.)
Reminder Type![]() - Choose the type of appointment reminder to include on the card; if more than one appointment is printed, the same reminder type is used for each appointment. Select from: Appointment Reminder, which prints the reminder you specifically assigned to the appointment as you scheduled it; Procedure Reminder, which prints the default reminder assigned in your Procedure editor, or; Selected Reminder; which prints the reminder you choose in the fields below this option.
- Choose the type of appointment reminder to include on the card; if more than one appointment is printed, the same reminder type is used for each appointment. Select from: Appointment Reminder, which prints the reminder you specifically assigned to the appointment as you scheduled it; Procedure Reminder, which prints the default reminder assigned in your Procedure editor, or; Selected Reminder; which prints the reminder you choose in the fields below this option.
Appointment Reminder Selections![]() - If you chose the Selected Reminder option above, use the Appointment Reminder fields to choose the reminder to print for each appointment included on the card. Your choices are maintained in your Appointment Reminders editor. See "Appointment Reminders Editor" for details.
- If you chose the Selected Reminder option above, use the Appointment Reminder fields to choose the reminder to print for each appointment included on the card. Your choices are maintained in your Appointment Reminders editor. See "Appointment Reminders Editor" for details.
Custom Text![]() - (Not available for Business Card format.) Type unique information to print on your appointment card. If multiple appointments are included on the card, the custom text appears once, below all appointment information.
- (Not available for Business Card format.) Type unique information to print on your appointment card. If multiple appointments are included on the card, the custom text appears once, below all appointment information.
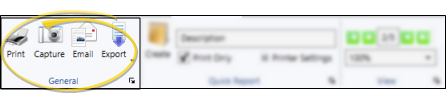
If needed, click View at the top of the report settings panel to view the results on your screen. When you run a report or form from your Recent Report list, or when you run a Quick Report, the initial results are sent to your screen immediately, with one exception: A Quick Report that has the Print Only option enabled will not show your results on the screen at all, but continue with the printing options. See "Report Output Options" for details.
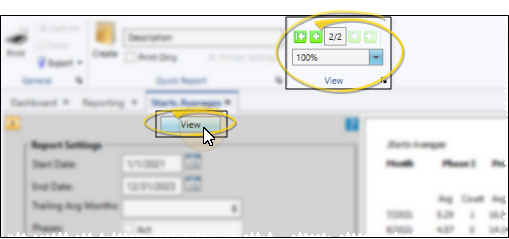
With the results on your screen, you can choose the output with the toolbar at the top of the report window. See "Report Output Options" for details.
![]() Printed Appointment Card Details
Printed Appointment Card Details
Appointment Dates Included![]() - When a patient has multiple appointments, most appointment card formats always include the first 3 made appointments, regardless of which appointment you launched the card from. However, when you print the VIP Slip format, the next-scheduled appointment is always printed, and when you print the Business Card format, you can select which appointment to include on the form when you select the patient to print for.
- When a patient has multiple appointments, most appointment card formats always include the first 3 made appointments, regardless of which appointment you launched the card from. However, when you print the VIP Slip format, the next-scheduled appointment is always printed, and when you print the Business Card format, you can select which appointment to include on the form when you select the patient to print for.
Appointment Length![]() - The appointment length that prints on the appointment card is taken from the Appointment Card Length field of your
- The appointment length that prints on the appointment card is taken from the Appointment Card Length field of your
School / Work Excuse Option![]() - Although you can include an excuse slip any time you print a regular appointment card, you might want to print the slip at the conclusion of the appointment instead. See "School / Work Excuse Forms" for details.
- Although you can include an excuse slip any time you print a regular appointment card, you might want to print the slip at the conclusion of the appointment instead. See "School / Work Excuse Forms" for details.
Printed Appointment Cards not in Correspondence History![]() - Printed appointment cards are not saved in the patient's correspondence history. If you instead choose to email appointment cards, a link to the appointment is saved in the Emailed Forms tab of the patient's Correspondence History.
- Printed appointment cards are not saved in the patient's correspondence history. If you instead choose to email appointment cards, a link to the appointment is saved in the Emailed Forms tab of the patient's Correspondence History.
Printing vs Emailing Appointment Cards![]() - The process for printing appointment cards is different than the process for emailing them. Please refer to the appropriate section of this article for the type of output you want to use.
- The process for printing appointment cards is different than the process for emailing them. Please refer to the appropriate section of this article for the type of output you want to use.
![]() Initiate Email Appointment Card
Initiate Email Appointment Card
You can open this feature in multiple ways: Use the method that's most convenient for you.
Scheduler Appointment / Patient Information Panel - Right-click an appointment from either the Scheduler or the patient's Patient Information Panel.Then choose the Email Appointment Card option. (If you want to print the appointment card instead of emailing it, please refer to that section of this help article.)
Scheduler Ribbon Bar - Select Actions from the Active Patient section of the Scheduler ribbon bar. Then choose either the Appointment Card or Appointment Card W/Excuse option. If there is an active patient in your Scheduler, the appointment card will print for that person. Otherwise, you will use FastFind to search for the patient. (If you want to email the appointment card instead, please refer to that section of this help article.)
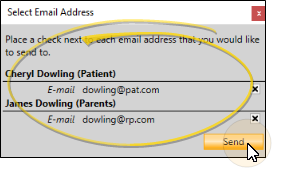
Select one or more email address to send the card to. All valid email addresses in both the patient and responsible party Contact information are available. The information is sent immediately, according to the Appointment Card settings you have in your Form Email editor.
![]() Emailed Appointment Card Details
Emailed Appointment Card Details
![]() Emailed Appointment Cards in Correspondence History
Emailed Appointment Cards in Correspondence History
Use the Emailed Forms tab of the patient's correspondence history to review the appointment cards and payment receipts that were sent using the Edge Form Email feature, instead of being printed. See "Patient Correspondence History" for details.
Emailed Appointment Details![]() - When you email an appointment card to a patient or a responsible party, a link to that appointment is created in the Emailed Forms tab of the patient's correspondence history. You can see that link, and click it to open your Scheduler to that appointment. If, at any time, the appointment information is changed, the link in the correspondence history changes, too. No record of the originally emailed appointment details remain in the correspondence history.
- When you email an appointment card to a patient or a responsible party, a link to that appointment is created in the Emailed Forms tab of the patient's correspondence history. You can see that link, and click it to open your Scheduler to that appointment. If, at any time, the appointment information is changed, the link in the correspondence history changes, too. No record of the originally emailed appointment details remain in the correspondence history.

![]() Emailed Appointment Cards Not Being Delivered
Emailed Appointment Cards Not Being Delivered
If some or all of your Edge Reminders email messages, Edge Broadcast newsletters, or emailed appointment cards and payment receipts aren't being delivered, they are likely being flagged as spam, or blocked as unverified transmissions by the recipients' email providers. If you have ascertained from patients and parents that the message was not delivered to their spam folder or blocked by their spam filters, you can often resolve the problem by configuring your domain records to allow Edge data center messages in your sender list. See "DMARC/SPF: Undelivered Emails" for details.