Print Insurance Forms
You can print ADA and Canadian insurance forms on plain paper with an approved printer.
Paper Claims Only![]() - This topic discusses printing insurance forms on paper. You can also submit insurance claims for your orthodontics contracts electronically through Edge Cloud with a Claim Connect account. See "Generate Electronic Insurance Claims" for details.
- This topic discusses printing insurance forms on paper. You can also submit insurance claims for your orthodontics contracts electronically through Edge Cloud with a Claim Connect account. See "Generate Electronic Insurance Claims" for details.
Orthodontics Claims Only![]() - This article is for orthodontics insurance claims: If you use Edge Specialist, your pediatric dentistry insurance forms are created from the patient's Insurance detail page and submitted through the
- This article is for orthodontics insurance claims: If you use Edge Specialist, your pediatric dentistry insurance forms are created from the patient's Insurance detail page and submitted through the
![]() Get Started with Paper Insurance Forms
Get Started with Paper Insurance Forms
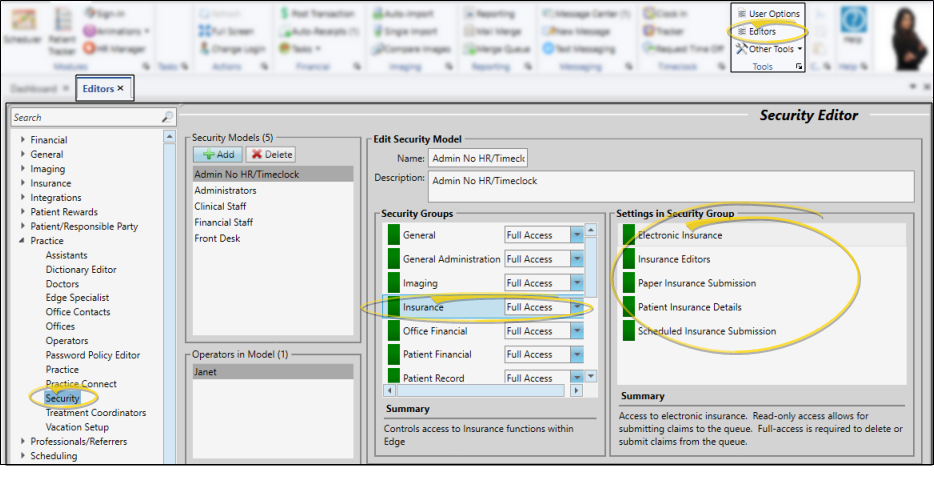
Use the Insurance security group settings of your Security editor to allow / limit the access your Edge Cloud users have to submitting any paper insurance forms, any electronic insurance forms, or scheduled insurance forms.
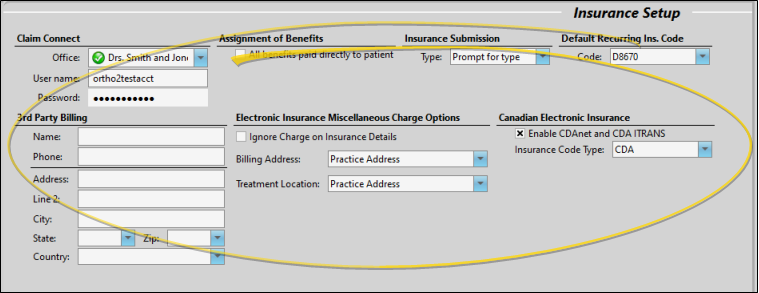
Use the Insurance Setup editor to specify whether insurance benefits are paid to the patient, as well as select your default insurance submission method, and default recurring insurance code. You can also specify a third-party billing name and address for insurance claims, enter your Claim Connect credentials for electronic submissions, and choose the details to use when auto-generating miscellaneous charge insurance claims. See "Insurance Setup Editor" for details.
![]() Select Default Insurance Form Format
Select Default Insurance Form Format
Use the Default Forms section of your Reports and Forms editor to select the default format to use for paper forms. This is the format that will be selected when you run the form from the Forms option of the Home or Patient ribbon bar. If you have purchased customized forms, you may choose your form as the default. If needed, you can set up different default forms for individual offices and specialties in your practice. See "Reports and Forms Editor" for details.
Canadian Insurance Options![]() - The additional information fields required for Canadian insurance forms are only available in the patient folder when the Default Insurance field of your Reports and Forms editor is assigned to a Canadian insurance form.
- The additional information fields required for Canadian insurance forms are only available in the patient folder when the Default Insurance field of your Reports and Forms editor is assigned to a Canadian insurance form.

![]() Enter Insurance Data in Patient Folders
Enter Insurance Data in Patient Folders
Use the Insurance
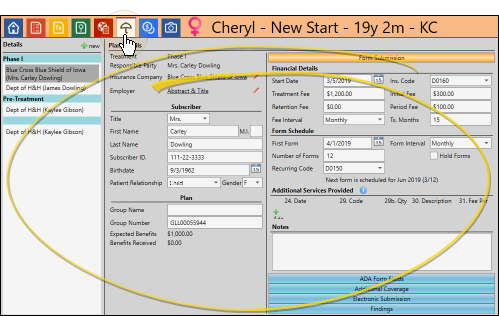
To prevent common errors, review the insurance submission details in your patient folders. In particular, confirm that the patient has released the information to be sent, and note the response in the Claim Submission Reason field. See "Patient Insurance Page" for details.
Assign Email Merge Document - If you will be emailing this form to your patients and parents, you must use your Reports and Forms editor to assign the mail merge document to use as the text of your email message. See "Reports and Forms Editor" for details.
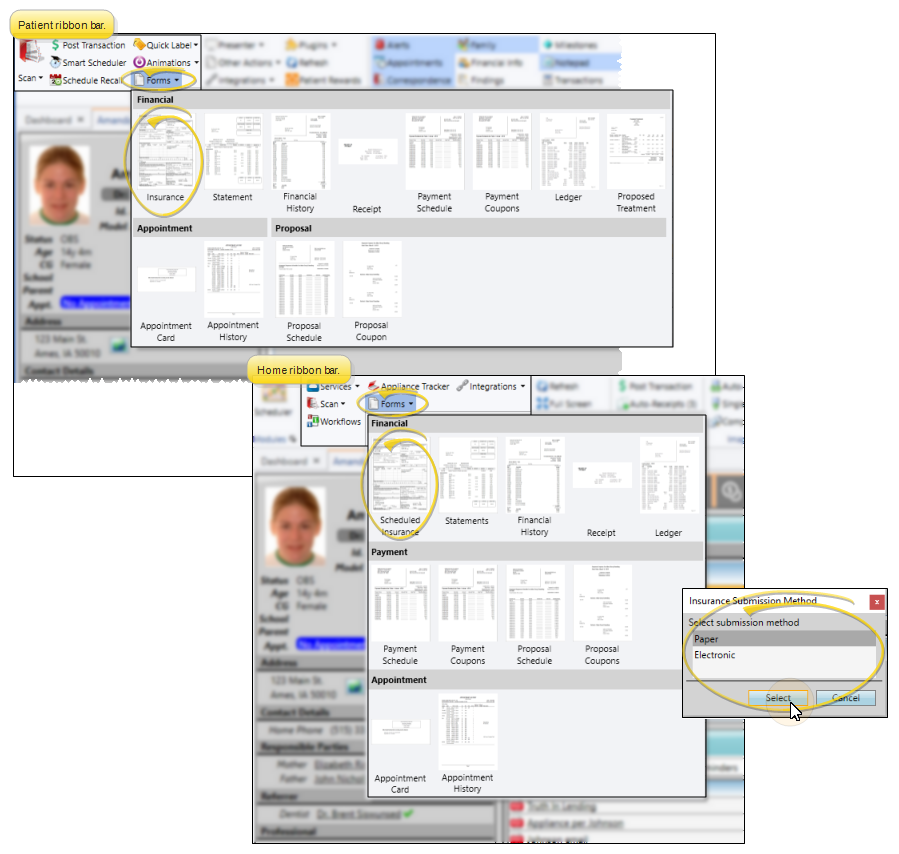
Select Forms then Insurance from the Patient section of the Patient ribbon bar, or select Forms then Scheduled Insurance from the Tasks section of the Home ribbon bar. When you print a form from the Patient or Home ribbon bar, the results default to the Quick Report settings. If those settings include printing the form immediately, you will not have an opportunity to review before the form prints. See "Quick Reports" for details about creating / updating these settings. If the patient has multiple contracts, you will need to select the contract to print for.
When prompted, select whether you are generating Paper or Electronic insurance forms. If you always use either paper or electronic insurance forms, you can set up Edge Cloud to bypass this prompt. See "Insurance Setup Editor" for details.
Insurance Form Format![]() - The format that will be generated (i.e. ADA 2019 or Canadian Insurance Form) is set up in the Reports & Forms editor, and cannot be changed here. See "Reports and Forms Editor" for details.
- The format that will be generated (i.e. ADA 2019 or Canadian Insurance Form) is set up in the Reports & Forms editor, and cannot be changed here. See "Reports and Forms Editor" for details.
Edge Specialist Orthodontics Specialty Only![]() - If ;you have Edge Specialist, the orthodontics specialty must be selected in the patient folder header in order for the Insurance form option to be available. See "Patient Insurance Page" for details about generating insurance forms for pediatric dentistry claims.
- If ;you have Edge Specialist, the orthodontics specialty must be selected in the patient folder header in order for the Insurance form option to be available. See "Patient Insurance Page" for details about generating insurance forms for pediatric dentistry claims.
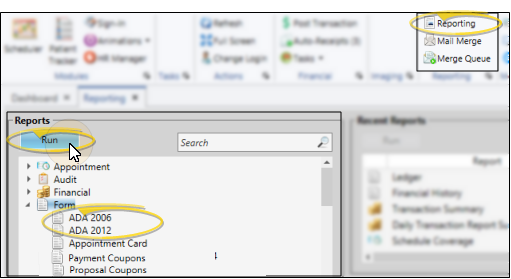
Select Reporting from the Reporting section of the Home ribbon bar. Then from the Form section, open the insurance form you want to run, such as ADA 2019 or Canadian Insurance Form. (You can also use the Search field to find the form you want to work with.) You might also be able to run this form from your Recent Reports or Quick Reports list. See "Run Edge Cloud Reports" for details.
Select the options to use for generating this form. Note that not all options are necessary for all insurance forms: Only those required by the form you have selected will be available to you. A number preceding an option indicates the insurance form field that will be filled in with that information. If the settings panel is not visible, click the  Show/Hide icon in the upper left corner of the Reporting window.
Enter the date you want printed as the form generation date, generally today. You can also use the smart date options to select today's date, or to advance the date by a week or a month.
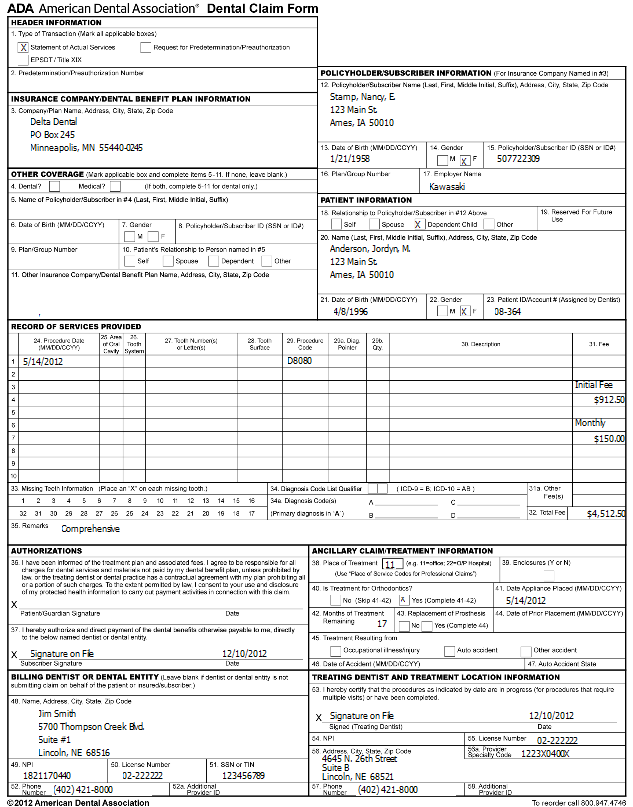
Statement of Actual Services![]() - The Statement of Actual Services insurance form bills for the entire contract, as shown on the Insurance
- The Statement of Actual Services insurance form bills for the entire contract, as shown on the Insurance
Pre-Treatment Statement / Pre-Authorization![]() - You submit this form prior to services to obtain pre-authorization.(The Canadian insurance form offers both the Pre-Treatment Statement and the Pre-Authorization insurance form, which provide for additional data entry options.
- You submit this form prior to services to obtain pre-authorization.(The Canadian insurance form offers both the Pre-Treatment Statement and the Pre-Authorization insurance form, which provide for additional data entry options.
Partial Form![]() - The Partial Form option is a minimally-completed insurance form used for special purposes. It is filled out with the patient, subscriber, and doctor information but does not contain any actual claim, so that you can fill in the rest of the information if a special need arises.
- The Partial Form option is a minimally-completed insurance form used for special purposes. It is filled out with the patient, subscriber, and doctor information but does not contain any actual claim, so that you can fill in the rest of the information if a special need arises.
Scheduled Forms![]() - This format generates this month’s scheduled continuation of treatment forms, as determined by your patient folder Insurance
- This format generates this month’s scheduled continuation of treatment forms, as determined by your patient folder Insurance
The insurance code included on this form can be different from the insurance code that appears on all other insurance forms for a patient. See "Patient Insurance Page" for details about the Insurance Code and Recurring Code fields.
Edge Cloud calculates whether a patient has a "scheduled due" form from the First Form Date, the Interval type, and the number of forms to print. If the Interval is monthly, quarterly, or semi-annually, a form is only considered "due" until the day of the month of the First Form Date. After that, the form is no longer "due", even within the same month. If the Interval is annually, a form is considered "due" the entire month of the First Form Date (plus the interval) regardless of the First Form Date day of the month. See "Patient Insurance Page" for details.
Run a Scheduled Insurance report to obtain a list of the patients for whom insurance forms are due to be generated. See "Scheduled Insurance Reports" for details.
Miscellaneous Charge Form![]() - The Misc.Charges option generates an insurance form for any range of dates to bill for charges you have posted in addition to the contract fees, such as diagnostic records charges. You can print the form on plain white paper or submit the claim electronically.
- The Misc.Charges option generates an insurance form for any range of dates to bill for charges you have posted in addition to the contract fees, such as diagnostic records charges. You can print the form on plain white paper or submit the claim electronically.
Initial Claim Forms![]() - You usually print Initial Claim insurance forms for individual patients just starting a new phase of treatment. The forms print on plain white paper with an approved laser printer. You cannot submit the form electronically.These insurance forms generate a claim for just the initial fee, not the whole treatment fee.
- You usually print Initial Claim insurance forms for individual patients just starting a new phase of treatment. The forms print on plain white paper with an approved laser printer. You cannot submit the form electronically.These insurance forms generate a claim for just the initial fee, not the whole treatment fee.
Custom Fee - Single Line![]() - The Custom Fee - Single Line forms provide a way for you to enter a custom date, insurance code and fee without entering this data into a patient folder. The data you enter into this form is not saved anywhere in
- The Custom Fee - Single Line forms provide a way for you to enter a custom date, insurance code and fee without entering this data into a patient folder. The data you enter into this form is not saved anywhere in
All Scheduled![]() - The All Scheduled Insurance Forms option prints all the scheduled forms for the selected patient(s), not just the ones scheduled for this month. Consider using this to print all forms for a specific patient to submit him/herself if you do not accept assignment of benefits. You cannot submit this type of form electronically. (Note the difference between the All Scheduled insurance forms option and the Scheduled insurance forms option: The All Scheduled option prints the entire series of continuation of treatment forms for the patient(s) you select, while the Scheduled option prints the continuation of treatment forms for each patient due to receive one this month.)
- The All Scheduled Insurance Forms option prints all the scheduled forms for the selected patient(s), not just the ones scheduled for this month. Consider using this to print all forms for a specific patient to submit him/herself if you do not accept assignment of benefits. You cannot submit this type of form electronically. (Note the difference between the All Scheduled insurance forms option and the Scheduled insurance forms option: The All Scheduled option prints the entire series of continuation of treatment forms for the patient(s) you select, while the Scheduled option prints the continuation of treatment forms for each patient due to receive one this month.)
The insurance code included on this form can be different from the insurance code that appears on all other insurance forms for a patient. See "Patient Insurance Page" for details about the Insurance Code and Recurring Code fields.
Dental Procedures![]() - The Dental Procedures insurance form prints claims for dental procedures that were completed during any range of dates.
- The Dental Procedures insurance form prints claims for dental procedures that were completed during any range of dates.
Signature on File![]() - (NOT available on Canadian forms) Enable each person for whom the you want “Signature on File” to print on the appropriate signature line of the insurance form. If you enable the Doctor signature on file, you can optionally select to print the doctor's name (instead of "Signature on File") on that line of the insurance form.
- (NOT available on Canadian forms) Enable each person for whom the you want “Signature on File” to print on the appropriate signature line of the insurance form. If you enable the Doctor signature on file, you can optionally select to print the doctor's name (instead of "Signature on File") on that line of the insurance form.
Services Provided Order![]() - (ADA Statement of Actual Services, ADA Pretreatment Statement only.) Choose whether to list the services provided in service-date order, or the order they were entered into the patient's insurance detail page.
- (ADA Statement of Actual Services, ADA Pretreatment Statement only.) Choose whether to list the services provided in service-date order, or the order they were entered into the patient's insurance detail page.
Include Current Month![]() - (Scheduled forms only.) Enable this option to include fees for the period prior to and including the current month of treatment. Otherwise, the forms will include fees for the period prior to but not including the current month. Once you begin submitting claims, it is best not to change this setting.
- (Scheduled forms only.) Enable this option to include fees for the period prior to and including the current month of treatment. Otherwise, the forms will include fees for the period prior to but not including the current month. Once you begin submitting claims, it is best not to change this setting.
24 Show Procedure Date![]() (ADA Initial / Scheduled forms only.) - Enable this option to include the Form Date you just entered as the procedure date on the insurance form.
(ADA Initial / Scheduled forms only.) - Enable this option to include the Form Date you just entered as the procedure date on the insurance form.
Misc. Charges to Include![]() (Misc. Charge forms only.) - Select whether the insurance form should include All Charges (miscellaneous charges posted to the responsible party and all associated insurance detail accounts), Charges to Patient and Current Insurance (charges posted to the responsible party and the selected insurance detail), or Charges to Current Insurance (excluding charges posted to the responsible party and any other insurance detail).
(Misc. Charge forms only.) - Select whether the insurance form should include All Charges (miscellaneous charges posted to the responsible party and all associated insurance detail accounts), Charges to Patient and Current Insurance (charges posted to the responsible party and the selected insurance detail), or Charges to Current Insurance (excluding charges posted to the responsible party and any other insurance detail).
Misc. Charge First & Last Sates![]() - (Misc. Charge forms only.) Miscellaneous charges posted between and including the first and last dates will be included. If a miscellaneous charge was not posted within the date range, it will not be included.
- (Misc. Charge forms only.) Miscellaneous charges posted between and including the first and last dates will be included. If a miscellaneous charge was not posted within the date range, it will not be included.
Exclude Charges With No Insurance Code![]() - (Misc. Charge forms only.) - Enable this option to exclude miscellaneous charges that do not have an associated insurance code. See "Miscellaneous Charge Editor" for details about assigning insurance codes to charges.
- (Misc. Charge forms only.) - Enable this option to exclude miscellaneous charges that do not have an associated insurance code. See "Miscellaneous Charge Editor" for details about assigning insurance codes to charges.
48. Billing Entity Name![]() - (NOT available on Canadian forms) Choose whether the billing name to include on this insurance claim should be your general practice name (from your Practice editor), the name of the orthodontist assigned to the patient folder, the name of the office assigned to the patient folder, or the 3rd party billing name from your Insurance Setup editor.
- (NOT available on Canadian forms) Choose whether the billing name to include on this insurance claim should be your general practice name (from your Practice editor), the name of the orthodontist assigned to the patient folder, the name of the office assigned to the patient folder, or the 3rd party billing name from your Insurance Setup editor.
48. Billing Entity Address![]() - Choose whether the billing address to include on this insurance claim should be your general practice address (from your Practice editor), the address of the office assigned to the patient folder, or the 3rd party billing address from your Insurance Setup editor. ( When you auto-generate electronic miscellaneous insurance claims, the billing address is pulled from the Insurance Setup editor.)
- Choose whether the billing address to include on this insurance claim should be your general practice address (from your Practice editor), the address of the office assigned to the patient folder, or the 3rd party billing address from your Insurance Setup editor. ( When you auto-generate electronic miscellaneous insurance claims, the billing address is pulled from the Insurance Setup editor.)
49. & 54. NPI Numbers to Use![]() - Select the NPI number to use for the Billing Entity (line 49 of the insurance form) and Treating Location (line 54). Choose from Doctor - Type 1, (from your Orthodontist
- Select the NPI number to use for the Billing Entity (line 49 of the insurance form) and Treating Location (line 54). Choose from Doctor - Type 1, (from your Orthodontist
50. Use Office License / Social / TIN for Billing Entity![]() (NOT available on Canadian forms) - Enable this option to include the license / social / TIN number of the office assigned to the patient folder in the billing section of the form. Otherwise, the identification numbers for the orthodontist assigned to the patient folder will be used.
(NOT available on Canadian forms) - Enable this option to include the license / social / TIN number of the office assigned to the patient folder in the billing section of the form. Otherwise, the identification numbers for the orthodontist assigned to the patient folder will be used.
55.Use Office License for Treating Entity![]() - Enable this option to use the office license number in Treating Entity field #55 of the insurance form.
- Enable this option to use the office license number in Treating Entity field #55 of the insurance form.
56.Use Patient Office Address for Treating Location![]() - Enable this option to use the patient's assigned office as the treating location. Otherwise, your general practice address is used.
- Enable this option to use the patient's assigned office as the treating location. Otherwise, your general practice address is used.
Dentist Use Only![]() - (Canadian forms only) The text you enter in this field appears in the Dentist’s Use Only box on Canadian insurance forms.
If you enable the Use Dentist Only from Patient Record option, the form will insert the text you have already entered into the Insurance tab of a patient folder, instead of the text you type here.
- (Canadian forms only) The text you enter in this field appears in the Dentist’s Use Only box on Canadian insurance forms.
If you enable the Use Dentist Only from Patient Record option, the form will insert the text you have already entered into the Insurance tab of a patient folder, instead of the text you type here.
Subscriber Signature![]() - (Canadian forms only) Enter the subscriber's name here if they have agreed to assign benefit payments from this insurance company directly to your office.
- (Canadian forms only) Enter the subscriber's name here if they have agreed to assign benefit payments from this insurance company directly to your office.
Include Patient Info![]() - (Canadian pre-authorization form only) Enable this option to fill
in the Patient Identification section of the form.
- (Canadian pre-authorization form only) Enable this option to fill
in the Patient Identification section of the form.
Treatment Type![]() - (Canadian pre-authorization form only) Select whether the Full Treatment Case; Limited Treatment Caseor Early Treatment Case box will be checked on the form, or choose not to check a treatment box.
- (Canadian pre-authorization form only) Select whether the Full Treatment Case; Limited Treatment Caseor Early Treatment Case box will be checked on the form, or choose not to check a treatment box.
Brief Description of Condition![]() - (Canadian pre-authorization form only) Type a unique description of treatment, or enable the Use Imported Findings option to instead use the findings text from the patient folder Insurance
- (Canadian pre-authorization form only) Type a unique description of treatment, or enable the Use Imported Findings option to instead use the findings text from the patient folder Insurance
Comments![]() - (Canadian pre-authorization form only) Type any additional information to appear in the Additional Explanatory Comments section, near the bottom of the form.
- (Canadian pre-authorization form only) Type any additional information to appear in the Additional Explanatory Comments section, near the bottom of the form.
Number of Months Valid![]() - (Canadian pre-authorization form only) Enter the number of months this pre-authorization insurance form is valid.
- (Canadian pre-authorization form only) Enter the number of months this pre-authorization insurance form is valid.
Select the subgroup to use for choosing patients that should get an insurance form. Only records that fit your selected subgroup will be included. In addition, if you have selected to generate Scheduled Insuranceforms, only patients that fit your subgroup AND are due for a scheduled insurance form will be included. (See "Patient Insurance Page" for details about scheduling insurance forms.)
When you initiate an insurance form from the Patient ribbon bar, the form will print for that patient only.
![]() Get Detailed Report Description
Get Detailed Report Description
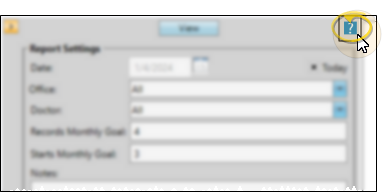
Click the  icon to the right of the View button to open the help article with the detailed description of the report.
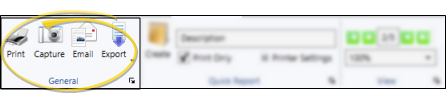
With the results on your screen, you can choose the output with the toolbar at the top of the report window. See "Report Output Options" for details.
Emailed Forms![]() - When you email a form, the name of the assigned mail merge document will be the email subject, the text of the mail merge document will be the email message, and the form will be sent as a PDF attachment. In addition, the mail merge document and the form will be entered as separate items in the patient's correspondence history. See "Reports and Forms Editor" for details about setting up this option.
- When you email a form, the name of the assigned mail merge document will be the email subject, the text of the mail merge document will be the email message, and the form will be sent as a PDF attachment. In addition, the mail merge document and the form will be entered as separate items in the patient's correspondence history. See "Reports and Forms Editor" for details about setting up this option.
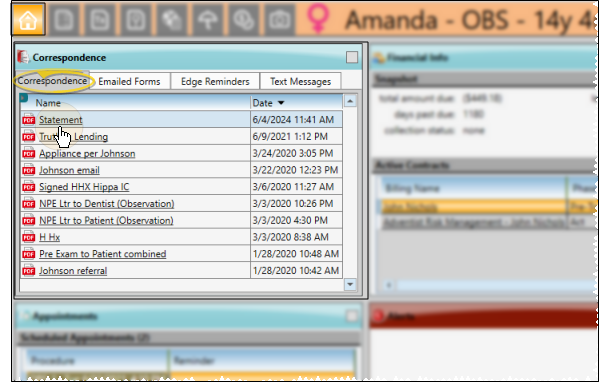
![]() View Forms in the Correspondence History
View Forms in the Correspondence History
After you generate this form, it is recorded in the Correspondence tab of the patient’s correspondence history, in PDF form. You can click the form name to open it.