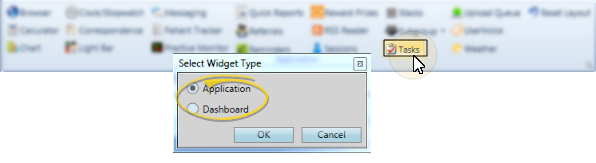
Widget Library Ribbon Bar >  Tasks > Dashboard or Application widget.
Choose Which Tasks to View - Click  Settings to select which tasks to include in the list.
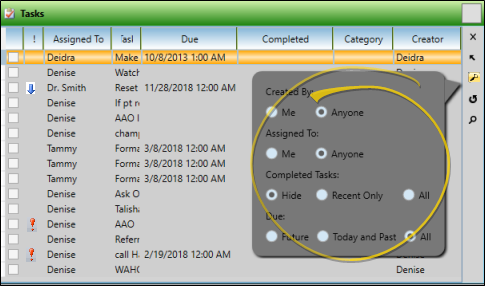
Show other operators - Enable this option to see all tasks for all operators. Disable this option to see only tasks assigned to you.
Show completed tasks - Enable this option to keep completed tasks in your list. Completed tasks will be flagged with a  checkmark, and show the date completed. Disable this option to remove completed tasks from the list. The range of completed tasks that will be included depends on whether or not the Show Completed Tasks Over 30 Days Old option, described below, is enabled.
Show only today's tasks - Enable this option to include only tasks due today in the list. All other tasks, including those with past due dates, future due dates, and no due dates will be excluded. Disable this option to include all tasks, regardless of the due date.
Show completed tasks over 30 days old - Enable this option to include all completed tasks in the list, regardless of the date they were flagged as completed. Disable this option to include only tasks that have been completed within the past 30 days in the list. (If the Show Completed Tasks option, described above, is disabled, it is enabled automatically when you first enable this option.)
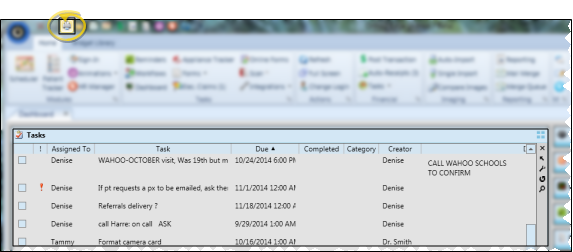
View & Adjust Task List - Adjust the task list view to suit your needs.
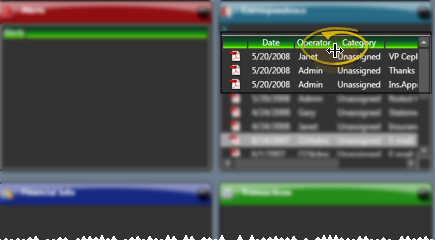
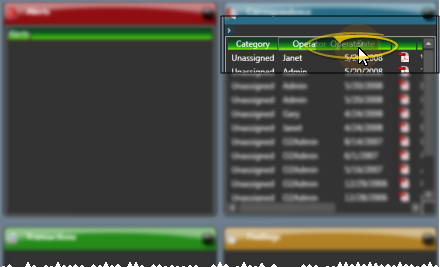
Re-sort - Click a column heading in your task list to sort the tasks by that column.
Adjust Columns![]() You can adjust both the width and location of the columns in the window. All columns return to the defaults when you exit and re-enter.
You can adjust both the width and location of the columns in the window. All columns return to the defaults when you exit and re-enter.
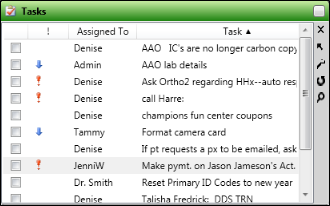
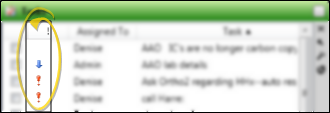
Note priority level - Notice that tasks flagged with  High Priority or
  Low Priority (described below) are flagged with an icon.
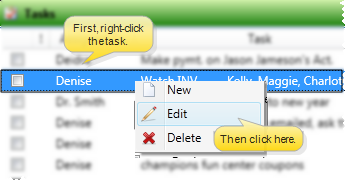
Create a New Task - Right-click anywhere in the Tasks widget, and select  New. You can then complete the task details, described below.
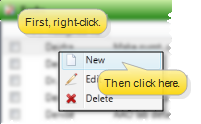
Edit a Task - Right-click the task you want to work with, and select Edit , or double-click the task. You can then change the details, described below.
Task Details - Create a new task, or choose to edit a task, then complete the details.
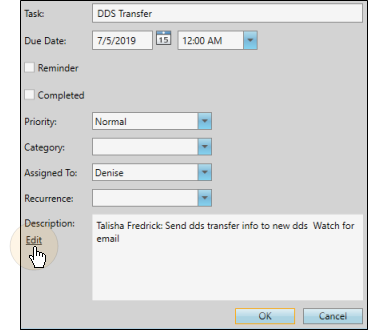
Task - Type a short description of the task in this field.
Due date - Enter the date and time the task is due to be completed in this field.
Reminder - Enable the Reminder task field, then enter the date and time you want to be reminded of the task. At the specified time, the reminder will pop onto the screen of the person assigned to the task. If the operator is not currently logged into your system, the reminder will appear as soon as the log in takes place. (See "Manage Task Reminders" for details.)
Completed - Enable the Completed field, and indicate the date
Priority - Identify the importance of this task. The priority column of your task list indicates the level selected for the task: High priority tasks are indicated with a red symbol; normal tasks have no mark in the priority column; low priority tasks are indicated with a blue symbol.
Category - Select a category for the task, or type a new category name. You can sort tasks by category in your task list, which may be helpful as your list becomes lengthy. Once you type a new category name, it cannot be deleted. Therefore, we recommend that you carefully consider the categories you will need before typing them in, and keep the list as short as possible.
Assigned to - Identify who is responsible for the task, you,
Recurrence - When a task should be completed regularly, select how often it should take place. Note that when you delete or complete an occurrence of the task, the next occurrence will be activated, and will appear on your task list as scheduled.
Description -
Save a task - Click Ok to save the changes to the task.
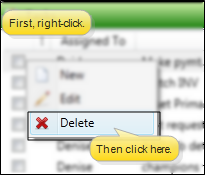
Delete a task - Right-click the task you want to remove, and select  Delete (or, press the Delete key on your keyboard). If the task is set to recur, you have the choice of deleting only the current task, or completely removing this and all future occurrences of the task.
Respond to task reminder - When a scheduled task reminder pops onto your screen, you have the opportunity to work with the task then, flag the task as complete, dismiss further notices, or set a "snooze" timer for future notification. See "Manage Task Reminders" for details.
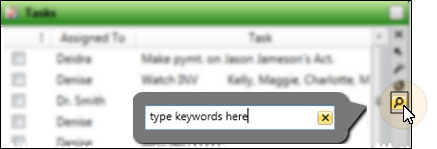
Search tasks - Click the  Search icon in the widget tool panel, then type a key word or words to quickly locate the text you need. To clear your current search, click the X in the search text box.
Widget Panel Options - Depending on your device and panel format, you can expand and minimize widget panels, move the widget location on your screen, float them in their own windows, refresh and print data, and close the widget when you no longer need it. See Application widgets or Your Dashboard for details about using these features.
Print Task List From Widget - Open Tasks as a Dashboard widget, and expand the panel. Click  Print from your File ribbon bar or Quick Access toolbar (or press Ctrl+P on your keyboard) to print a copy of the current screen contents. (See "Printing from Edge" for details.)
Print Upcoming & Over Due Tasks Report - Run an Upcoming and Over Due Tasks report to obtain a list of items from your Tasks widget that will be due within a certain number of days, and/or that are already past due by a certain number of days or more. You can include tasks assigned to one or more specific employees, or all employees, and include tasks created by one or more specific employees, or all employees. See "Upcoming and Over Due Tasks Report" for details.
New Task workflow activity - Use the New Task workflow activity to automatically add a new entry to your Task widget whenever the activity is triggered by a workflow. Note that a link to the patient folder will be included with the task description.See "Set Up Workflows" for details.
Workflow time triggers option - Use the workflow Time Triggers editor to create your own triggers that you can schedule to activate workflow events on specific days and times, for a specific operator. Note that if the operator is not logged into Edge when the trigger is scheduled, it will be activated the next time the operator logs in.See "Set Up Workflow Time Triggers" for details.
 │
│
Ortho2.com │1107 Buckeye Avenue │ Ames, Iowa 50010 │ Sales: (800) 678-4644 │ Support: (800) 346-4504 │ Contact Us
Remote Support │Email Support │New Customer Care │ Online Help Ver. 8/3/2015